Watermarks in Aperture 3—Demystified (part 1)

Did you know that Aperture can watermark your photos on export? Don’t feel bad if you didn’t; a lot of people don’t know it’s there. It’s a feature that has remained essentially unchanged since v.1, and to be honest it’s not that straight forward. It appears simple enough, but can do strange and confusing things on export.
I’ve been using essentially the same watermark for years (I just kept changing the year on it) and probably just got lucky in making one that worked so long ago! So I decided that once and for all, I’d figure out what is and isn’t happening in Aperture when you choose to watermark your images.
Also, one of the frustrations for many is that you need to create the actual watermark file outside of Aperture—and frankly, not everyone owns Photoshop. So part of this adventure was to find a way to create a watermark file for cheap, or even better, for free.
I succeeded.
The Easy Part
To enable watermarking, all you have to do is open the Export presets, and turn on watermarking for one of the presets, and add a PNG or PSD file to it. That’s it. Of course, it’s not really that easy, but here’s where the work is done.
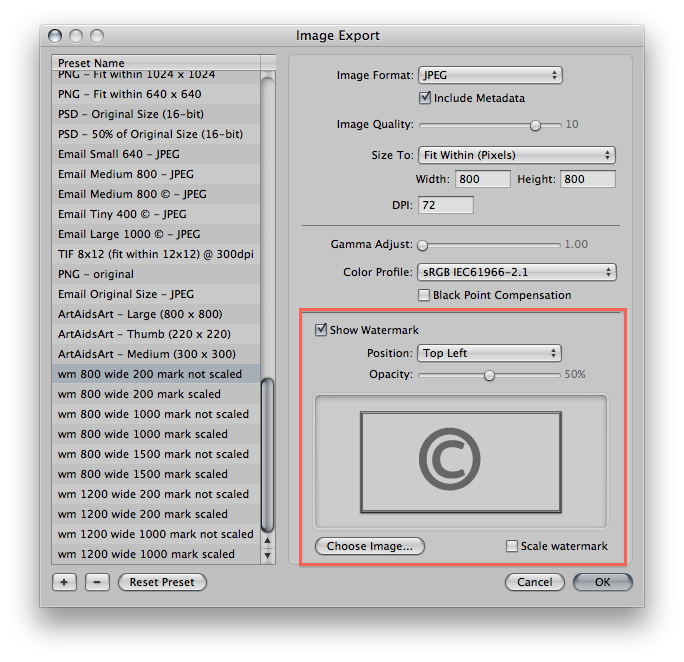 The Image Export settings in Aperture 3 reveal the Watermark options
So really, all you should need to do is choose an image, decide where to put it, and off you go. But notice that little Scale Watermark option? Bizarre behavior. What opacity works best? What kind of file works best? All of this and more is what we’re gonna cover here.
Test Watermark Files
I decided to start out by creating a series of files to use to figure out what size works best. So I created a simple 100 pixel tall file and saved out a series of versions from Photoshop (don’t worry, I’ll show you how to do it in other software later) at a variety of widths, and on each file I created an outline around the edge so I could without a doubt if a watermark was being clipped or distorted.
I ended up only needing two of them to accurately show the results of my test, shown here. Click to open larger and see full size, and feel free to right-click and download them for your own testing if you like.
 200 x 100 PNG file (black on transparency)
 ;) 1000 x 100 PNG file (black on transparency). Click to open full size then right-click to save.
1000 x 100 PNG file (black on transparency). Click to open full size then right-click to save.
Why the different file sizes? I wanted to see how various sizes behaved on export for a) various size output images, both bigger and smaller than the watermark, and b) to see what the Scale Watermark option would do.
Test Presets
Next I made a sequence of presets in Aperture to test the variety of combinations. I wanted to test two size exports with the two size watermarks and also with scaling on and off. Here’s the list… the first number is the output size, then the watermark size, and finally if it’s scaled or not:
- wm 800 wide 200 mark not scaled
(the watermark is smaller than the output file) - wm 800 wide 200 mark scaled
(same as above but scaling enabled) - wm 800 wide 1000 mark not scaled
(the watermark is LARGER than the output file) - wm 800 wide 1000 mark scaled
(same as above but scaling enabled) - wm 1200 wide 200 mark not scaled
(same as the top one… really just wanted to be sure no funny business happened) - wm 1200 wide 200 mark scaled
(same as above but scaling enabled) - wm 1200 wide 1000 mark not scaled
(the watermark is still smaller than the output file, but just by a bit) - wm 1200 wide 1000 mark scaled
(same as above but scaling enabled)
Test Output
I applied the watermark in the top left of the image at opacity 50%. We’ll get into the placement and opacity later; for now I put them where they’d be easiest to see. Here’s the results. Again, click any image to open full-size (which you’ll need to do on some of them to really see the watermark affect). The caption for each photo lists the preset (same order as listed above).
;) wm 800 wide 200 mark not scaled (the watermark is smaller than the output file)
wm 800 wide 200 mark not scaled (the watermark is smaller than the output file)
In the photo above, the watermark is what you’d expect—it’s layered on top of the image at size. The 200 pixel wide watermark is 200 pixels wide on the image. Great.
;) wm 800 wide 200 mark scaled (same as above but scaling enabled)
wm 800 wide 200 mark scaled (same as above but scaling enabled)
In the photo above, the watermark is really small. You’ll see this same thing happening on all the “scaling enabled” images. Honestly I haven’t figured this one out. It may have to do with matching resolutions of the watermark file to the output settings of the photo, but honestly, I just don’t know. The easy answer though, is, don’t use it.
;) wm 800 wide 1000 mark not scaled (the watermark is LARGER than the output file)
wm 800 wide 1000 mark not scaled (the watermark is LARGER than the output file)
In the photo above, we see a 1000 pixel wide watermark on an 800 wide pixel image. And notice that it is NOT cut off. In fact, Aperture has scaled the watermark down to match the size of the file—even though scaling is disabled. This actually turns out to be correct behavior, and is what’s listed in the manual. Aperture will scale watermarks down to match the output size, but never up. Interesting.
;) wm 800 wide 1000 mark scaled (same as above but scaling enabled)
wm 800 wide 1000 mark scaled (same as above but scaling enabled)
In the photo above, we again see the bizarre effects of enabling scaling. We have a 1000 pixel wide watermark taking up about 145 pixels of the 800 pixel wide photo. I’m at a loss.
;) wm 1200 wide 200 mark not scaled (same as the top one… really just wanted to be sure no funny business happened)
wm 1200 wide 200 mark not scaled (same as the top one… really just wanted to be sure no funny business happened)
In the photo above, we’ve moved to a larger file output, and are repeating the watermark file size. In this case, we have a 1200 pixel wide photo and a 200 wide watermark. The watermark is, in fact, 200 pixels wide on the photo. Perfect, that’s what we want to see.
;) wm 1200 wide 200 mark scaled (same as above but scaling enabled)
wm 1200 wide 200 mark scaled (same as above but scaling enabled)
In the photo above, scaling has again thrown us for a loop. It’s larger than it was on the 800 wide photo, so something different is happening, but again… what I don’t know.
;) wm 1200 wide 1000 mark not scaled (the watermark is still smaller than the output file, but just by a bit)
wm 1200 wide 1000 mark not scaled (the watermark is still smaller than the output file, but just by a bit)
In the photo above, we’re again testing a watermark smaller than the output image. As expected, the 1000 pixel watermark is taking up 1000 pixels on the 1200 pixel image. Good news.
;) wm 1200 wide 1000 mark scaled (same as above but scaling enabled)
wm 1200 wide 1000 mark scaled (same as above but scaling enabled)
In the photo above… well, you get it by now.
So what size do you use?
If you require a consistently proportionately sized watermark, such as you always want it to take up 20% of the width of the file, then you’ll need to create multiple watermarks. However assuming that most watermarked output is for the web, and that most images you output will be somewhere between 800 wide on the smaller end and maybe 1200 wide on the top end, you can create a single watermark that will work for all. The size really depends on what your mark is—for example if you want your watermark to be “© 2011 John Doe Photography, Inc. by John Doe”, then you’ll need something wide. Maybe go for the full 800 and it’ll take up the entire bottom of the image. But if it’s a logo, or a signature, or something less wide, then something smaller may do.
What else is there to know?
Armed with this information, you can create one and start applying right now. However there are other things to consider, such as… do I make it in black or white or grey or black with a white outline or white with a black outline, or what will show up against any kind of photo, and not look bad? Do I put a background behind it? Do I put on a drop shadow? What if I want my signature to be on there? Do I bring the opacity back? And of course, how do I create these without Photoshop?
All that and more, in the next post!
More like this
- Tip
- Tip
- Tip
- Tip
- Tip
Comments
on May 30, 2012 - 7:04am
Here is what the apple knowledgebase says about the scaling:
The watermark size is scaled relative to the export size. In this case, the size of the watermark (in terms of actual pixel dimensions) changes, depending on how the image itself is to be scaled.
http://support.apple.com/kb/HT4843
on May 30, 2012 - 8:35am
I still need to test it, but my thinking is that the watermark scaling is done using the relative scale between the master and the export size. So if your master is 1000 x 1000 and you have a 100 x 100 watermark (with scaling on) and export to a 500 x 500 file it will have a 50 x 50 watermark on the exported image.
My guess is that for the post you are using the same master image for all of the exports. The relative size of the watermark compared to the full resolution makes the exported images all appear to have a watermark close to the same size (which is the scaling in action since that would be how large the watermark is compared to the master dimensions).
on May 30, 2012 - 6:17pm
Randy,
My hope is simply that watermarks are sensible, logical and easy in the next release ;-)
@PhotoJoseph
— Have you signed up for the mailing list?