This “ATEM (mini) Tips” series of short video tutorials for your Blackmagic ATEM hardware includes tips for all users, from beginner to advanced. Scroll down to see more in the series!
This is a collection of all PhotoJoseph LIVE shows, from the PhotoJoseph YouTube channel. Additional episodes are listed below!
the MOST IMPORTANT ATEM VIDEO you’ll watch… how to use ANY camera original in ATEM ISO re-edits!
Photo Moment - February 21, 2024
This is real. We've found a way to replace the 1080p ISO clips from ATEM Mini/Extreme Pro ISO's DaVinci Resolve project files with the camera original clips – from ANY camera. Don't use Blackmagic cameras? No problem. This is no longer a limitation. You can now re-edit your live shows at the highest quality and resolution that your cameras can record.
With the ATEMISO models, you can record your live shows to an SSD, capturing not only the program, but also DaVinci Resolve project files and isolated video streams of each camera input for later re-editing. If you use Blackmagic cameras such as the Blackmagic Pocket Cinema Camera 4K or 6K, you can easily replace the ATEM-generated 1080p video files with camera-original 4K or 6K RAW files. This workflow is fantastic, but limited to Blackmagic cameras. Or at least, it was. Not anymore. Let me explain how…
Fellow YouTuber Alex Pettitt figured out the first part of this setup; he discovered how to convert the flat Resolve project file generated by the ATEMISO into a true multicam project. This allows you to much more easily re-edit your live show, with actual multicam clips. This was a huge discovery; as far as anyone knows, he was the first to figure this out. I then realized that from there, it was relatively trivial to replace the 1080p low resolution ATEM-generated files with full resolution camera-originals, no matter what camera they came from.
The Setup
As you’ll see in the video tutorial, I'm using a straightforward setup with the ATEM Mini Pro ISO and three cameras. This will work with any number of cameras that your ATEM supports. Do ensure that your ATEM settings and your camera settings are using the same frame-rate (i.e. 29.97 or 25). You'll need a clear cue, like a clicker sound, at the beginning of each shot for easy manual synchronization later (although after I made the video I realized that you may not need that — Resolve can sync these via waveform; more on that later). Start recording in the ATEM as usual, and also start recording in each camera, and produce your show like normal. After the live show, copy the ATEM files and camera original files to your computer, and begin this seemingly complicated, but actually quick and easy, process:
Convert to multicam
This first step is what Alex figured out; this is how to convert your “flat” multicam timeline into a true multicam project, where you can easily swap camera angles during the re-edit. It sounds tedious, but it really does go quickly once you have memorized the steps.
1/ Open the ATEM-generated project file in Resolve.
Double-click the ATEM-generated project file or import it from inside Resolve. It will automatically adapt whatever your default project resolution settings are, but it’s also good to check that your project is set to the resolution of the camera original clips you’ll be working with later. In most cases, that’s going to be UHD (3840×2160). Even if you set this after you import the project, the change will ripple through where it matters.
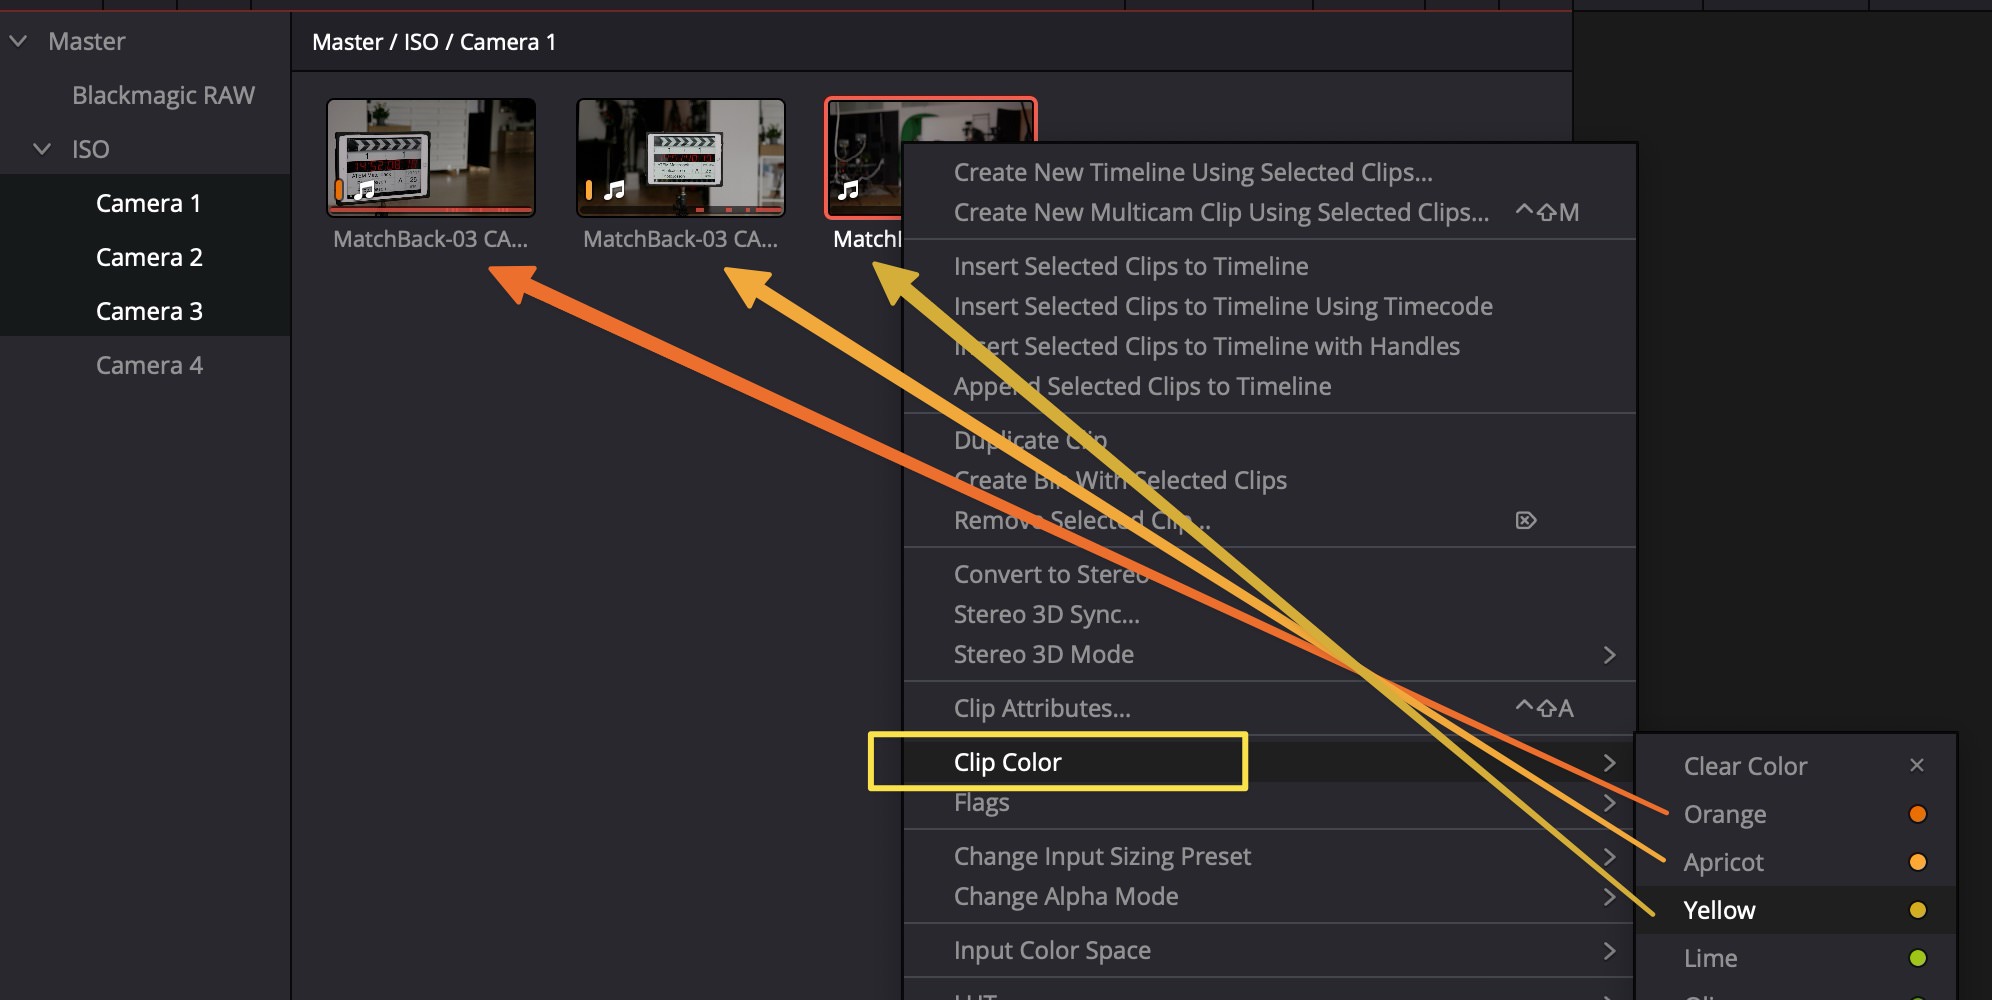
2/ Color code the ATEMISO camera clips.
Right click on each camera angle individually, and assign a color. I advise doing them in order of the color drop-down to make it easier to find them later; so CAM 1 becomes Orange, CAM 2 becomes Apricot, CAM 3 becomes Yellow, and so-on.
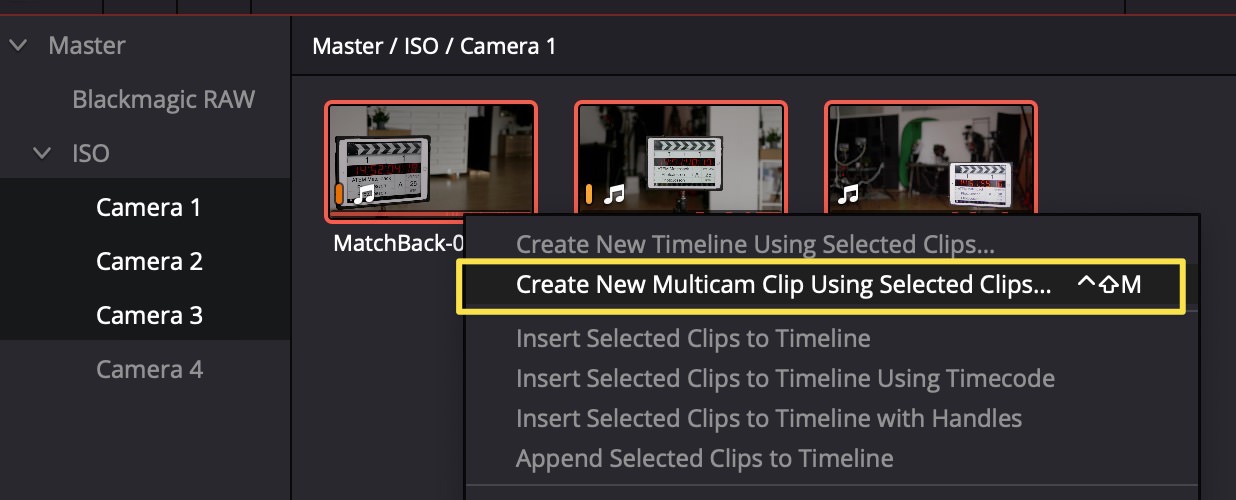
3/ Create a new multicam clip from the ATEMISO video files.
Select all the video clips at once, and choose “Create New Multicam Clip Using Selected Clips”.
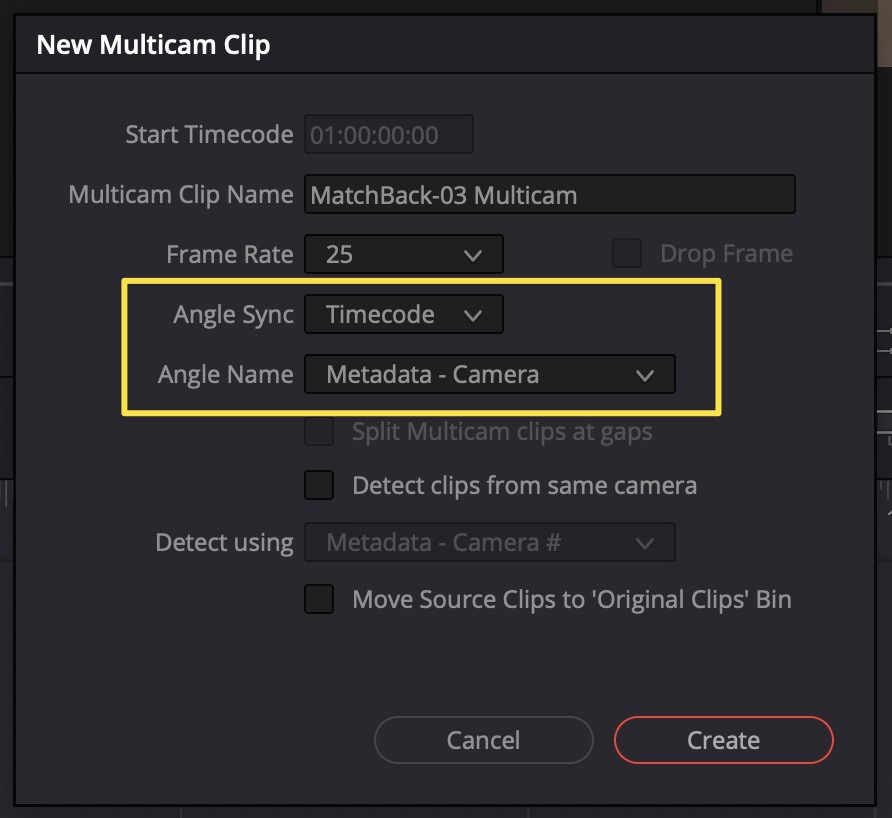
Set the Angle Sync to be based on timecode, and the Angle Name to be based on Camera name.
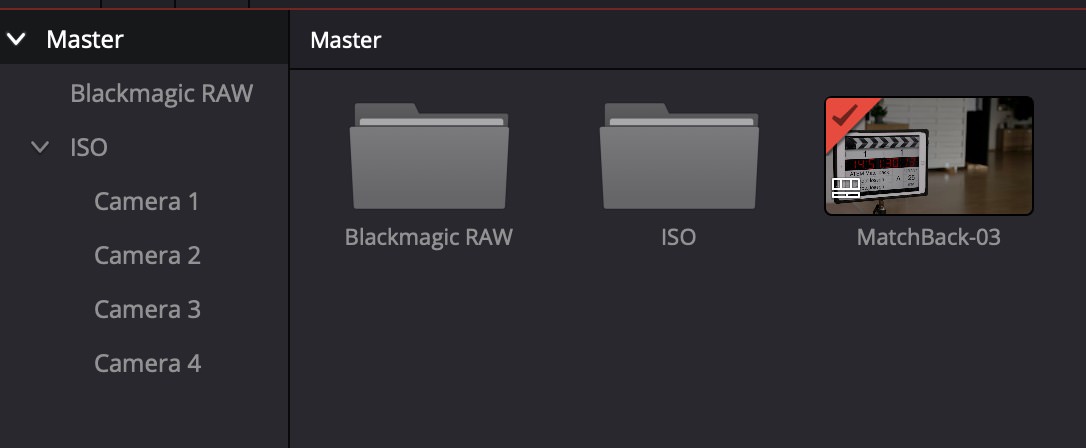
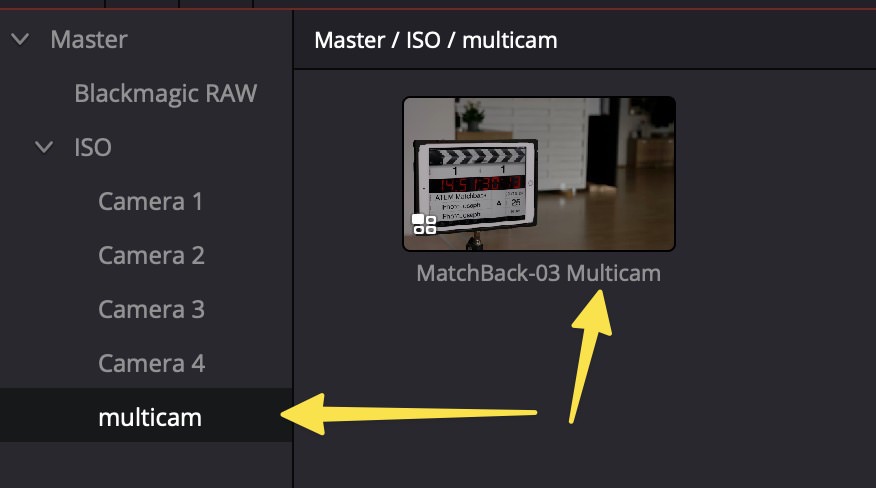
4/ Place the new multicam clip in a separate bin by itself.
Create a new bin, and name it “multicam” so you can identify it later. This is extremely important, and important that the multicam clip is the only clip in the bin.
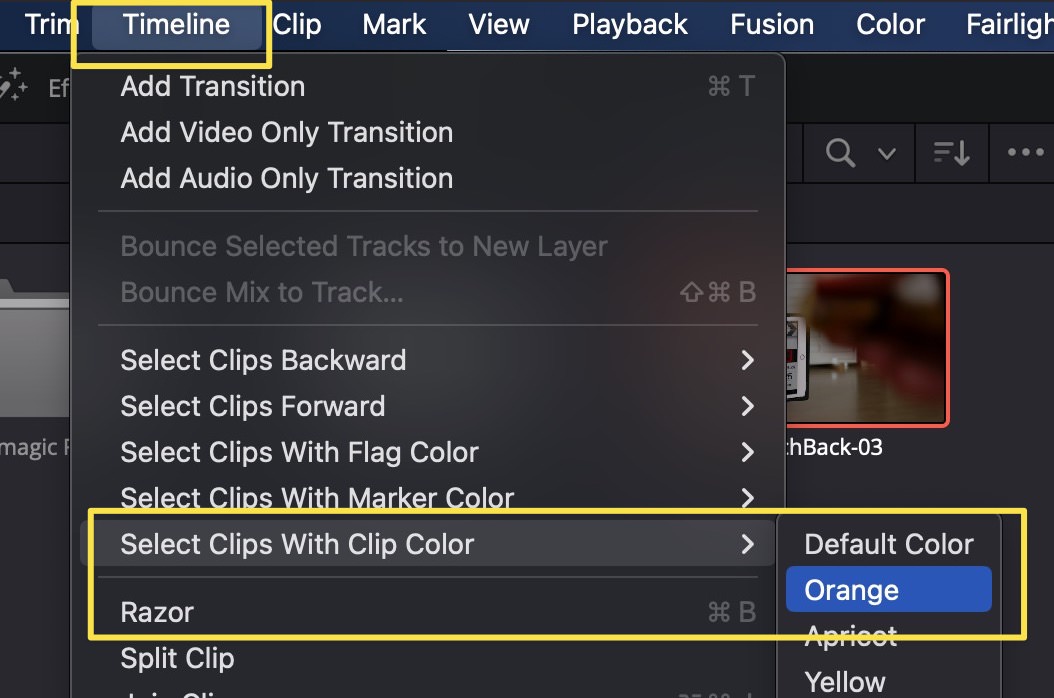
5/ On the original timeline, select the first color (Orange) clips.
Open the ATEM-generated timeline, and from the menu, choose “Timeline > Select Clips with Clip Color > Orange”.
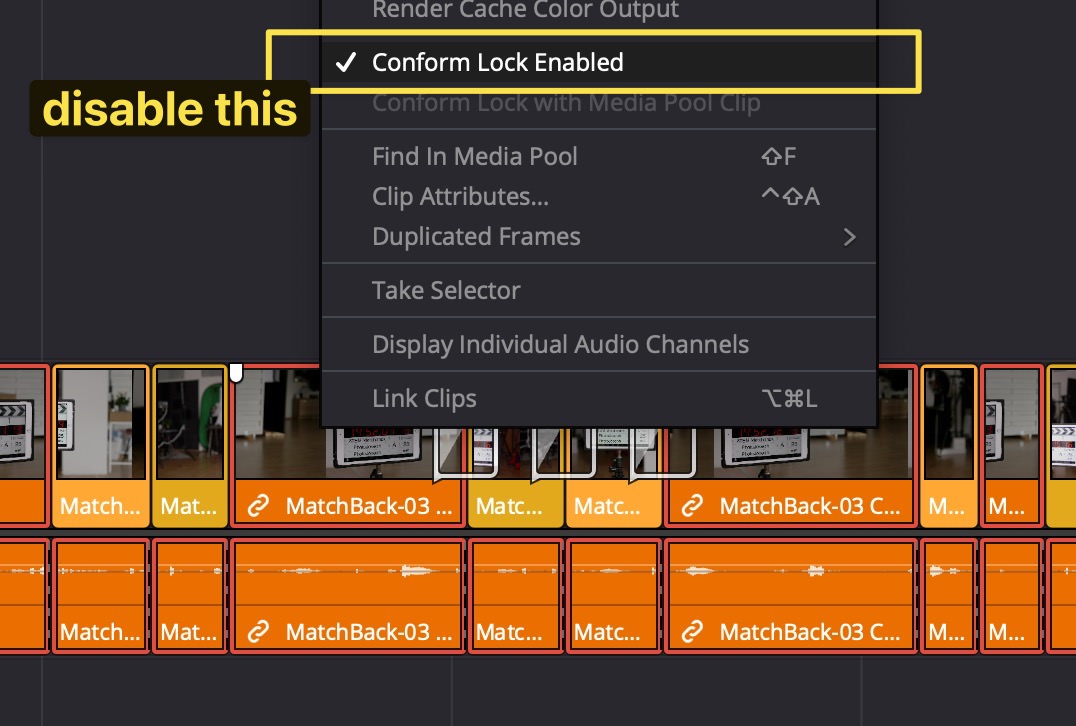
6/ Disable “Conform Lock Enabled” on the selected clips.
Right click on any selected (Orange) clip in the timeline, and choose “Conform Lock Enabled” to disable it.
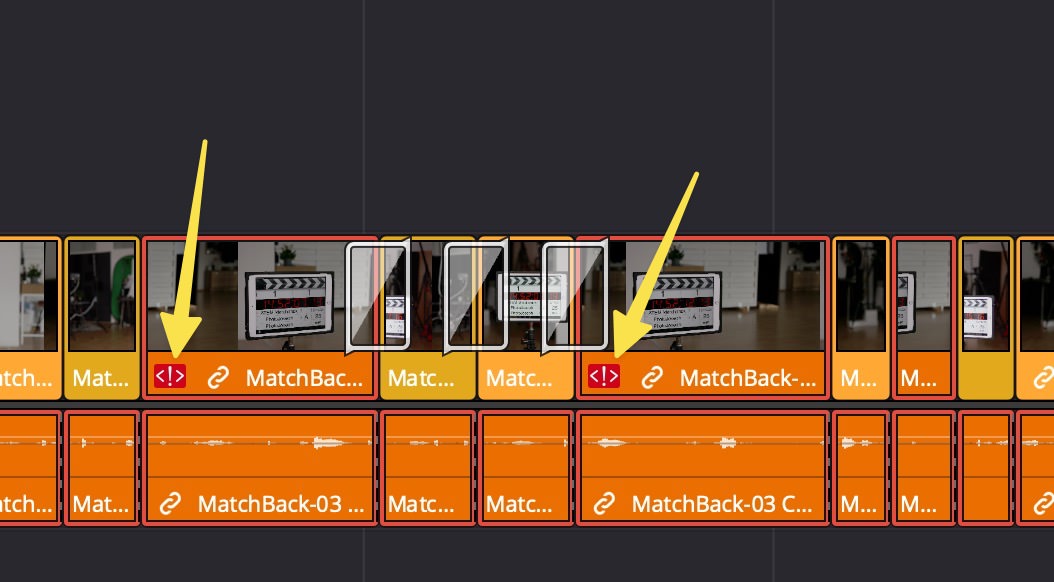
A red <!> warning symbol will appear on all the orange clips.
7/ Set the multicam clip to Camera 1.
Right-click on the multicam clip in the Media Pool, and choose “Switch Multicam Video Angle > Camera 1” (it should already be there). Verify that audio is also set to Camera 1; you won’t need to change that again.
8/ Reconform the timeline from the multicam bin.
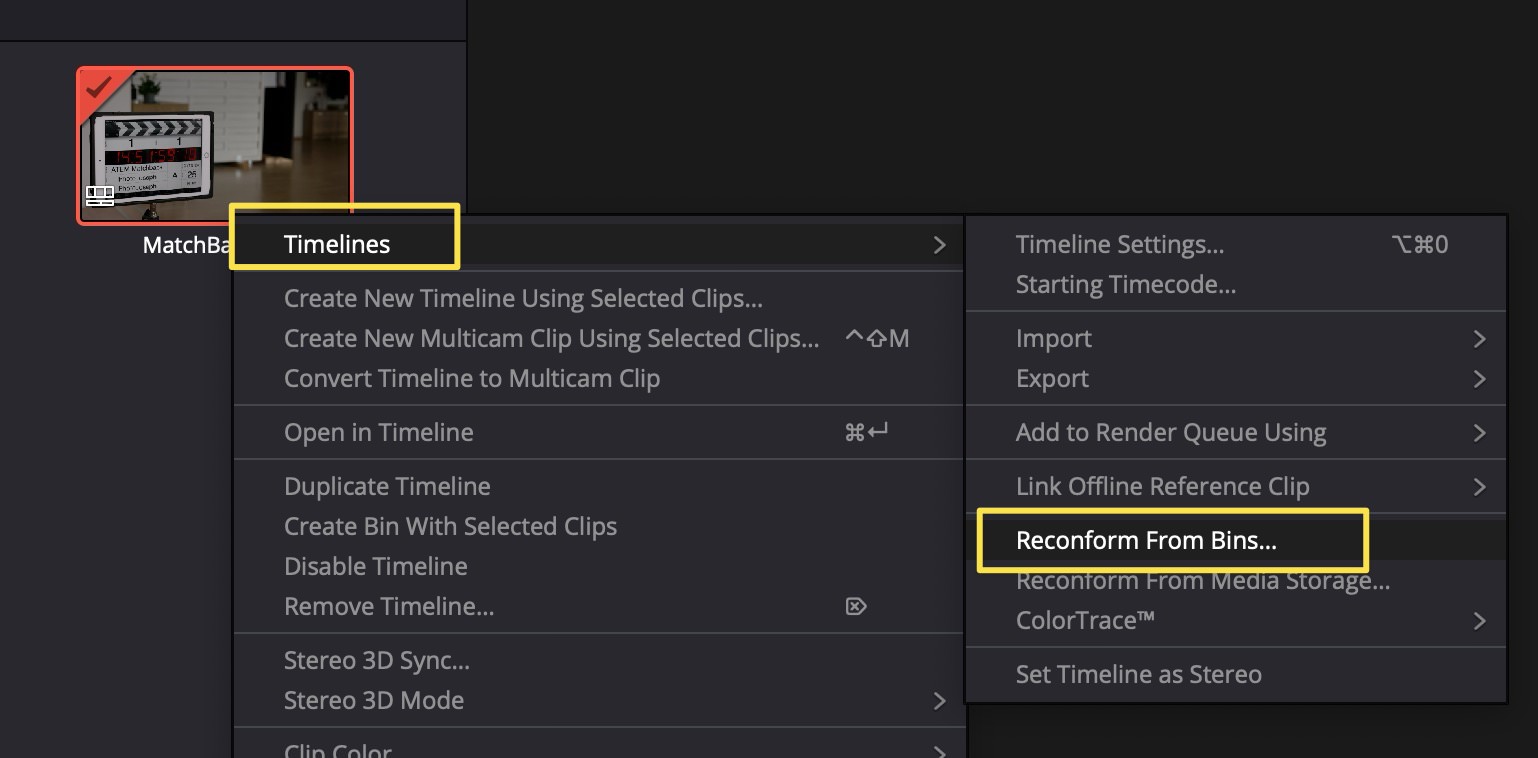
This is where the magic happens! Right-click on the timeline the Media Pool (the timeline icon; not in the open timeline itself), and choose “Timelines > Reconform from Bins”.
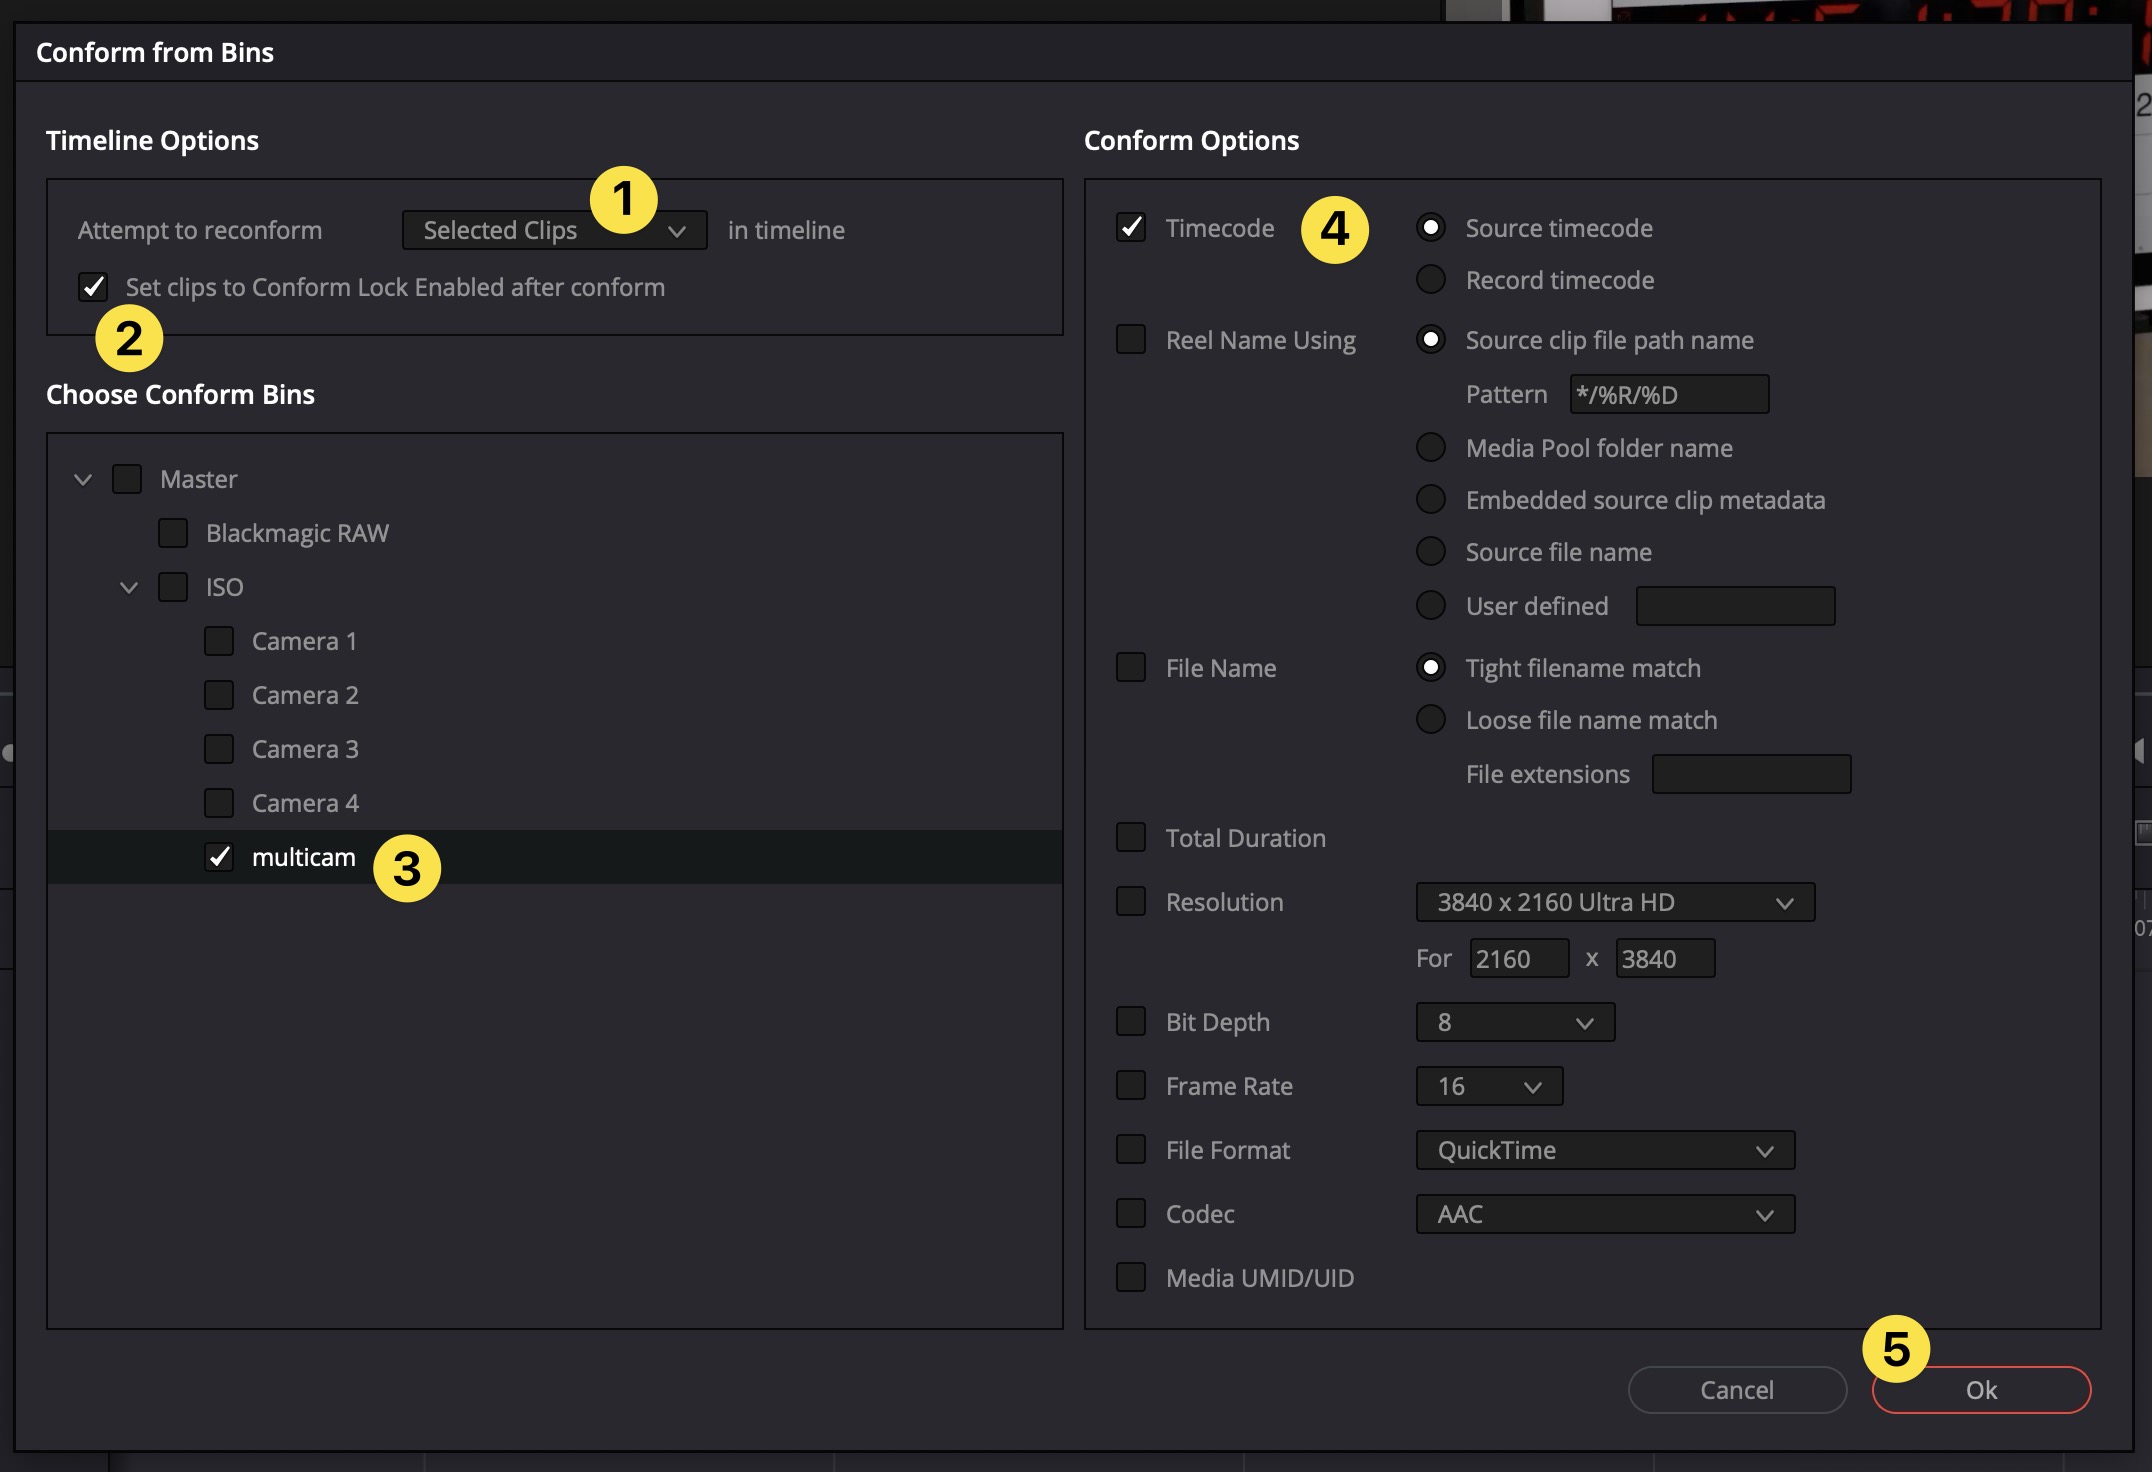
(1) Under “Attempt to reconform”, set it to “Selected Clips”. (2) Enable “set clips to Conform Lock Enabled after conform”. (3) Under “Choose Conform Bins”, deselect everything except your “Multicam” bin. (4) Finally, under Conform Options, only “Timecode: Source Timecode” should be enabled.
Click OK, and this will replace all the flat Camera 1 clip on the timeline with the multicam clip, set to Camera 1.
9/ Repeat for all remaining camera angles.
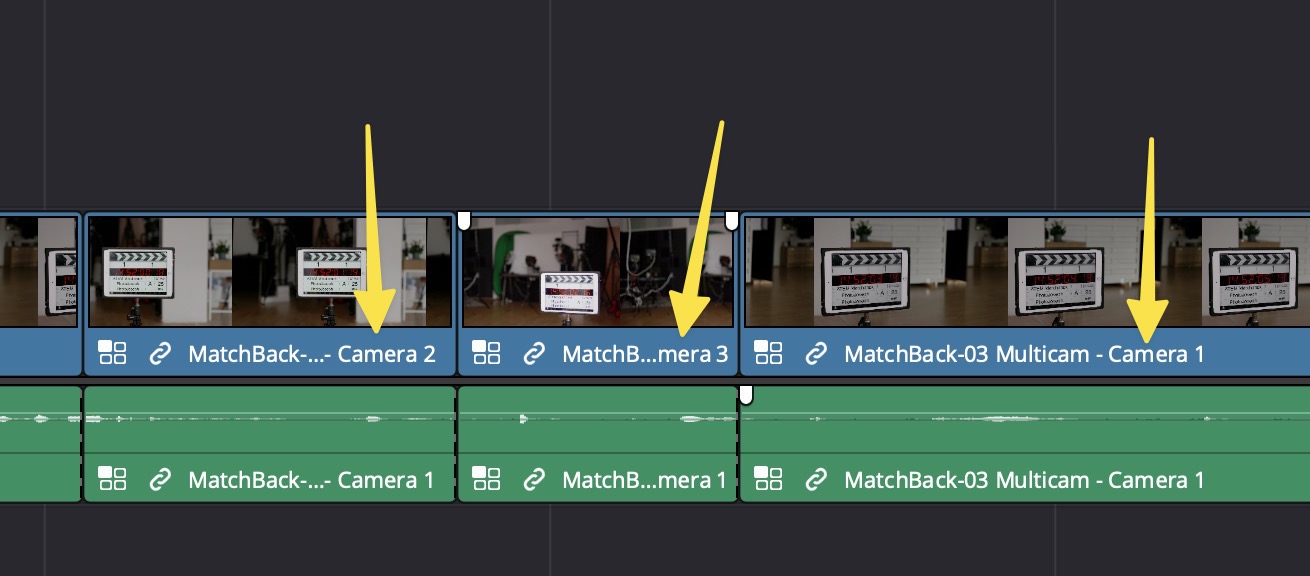
Do this again for each camera angle. Be sure to select the next color in line, and be sure to change the camera angle in the multicam clip to whichever camera angle you’re currently swapping out, before you conform.
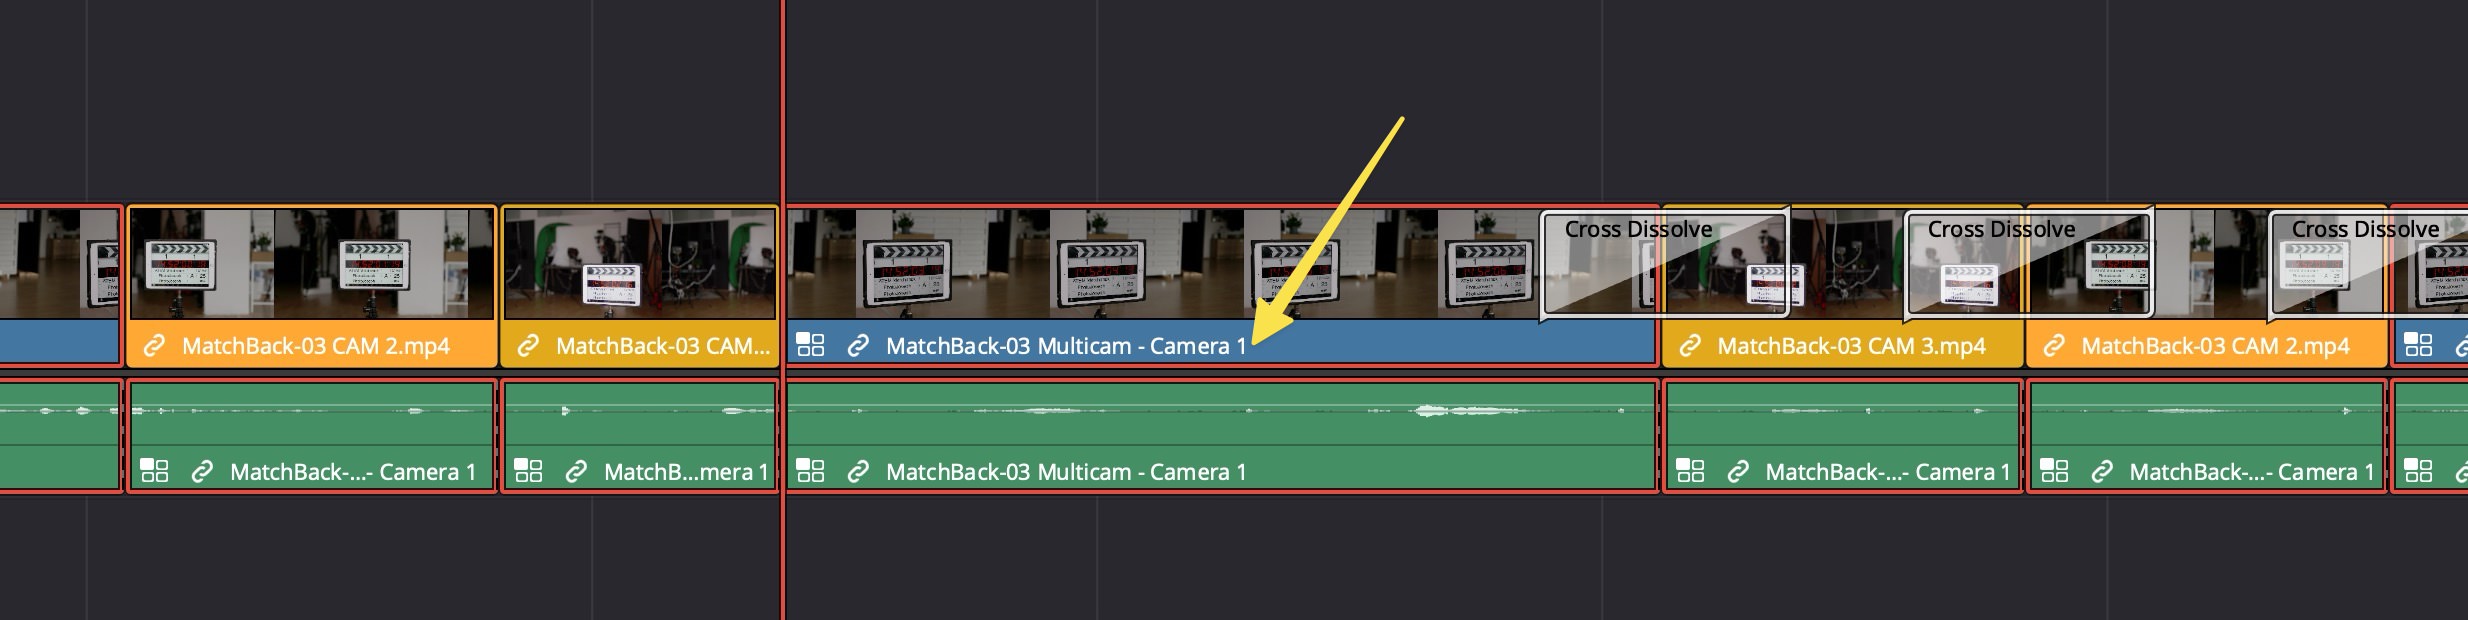
Now, your timeline is a true multicam timeline. Every flat camera clip has been replaced by a multicam clip, already set to the correct camera angle!
Replace with Camera Originals
Now that you have a true multicam timeline, it’s time to replace the 1080p video files with your camera originals. While the following steps aren’t the only way to do this, I believe this is the safest way to do it, and ensures that even if somehow a clip gets out of sync, you can easily go back and verify it, as the ATEM-generated files are never deleted.
1/ Create a Compound Clip for each camera angle in the Multicam clip.
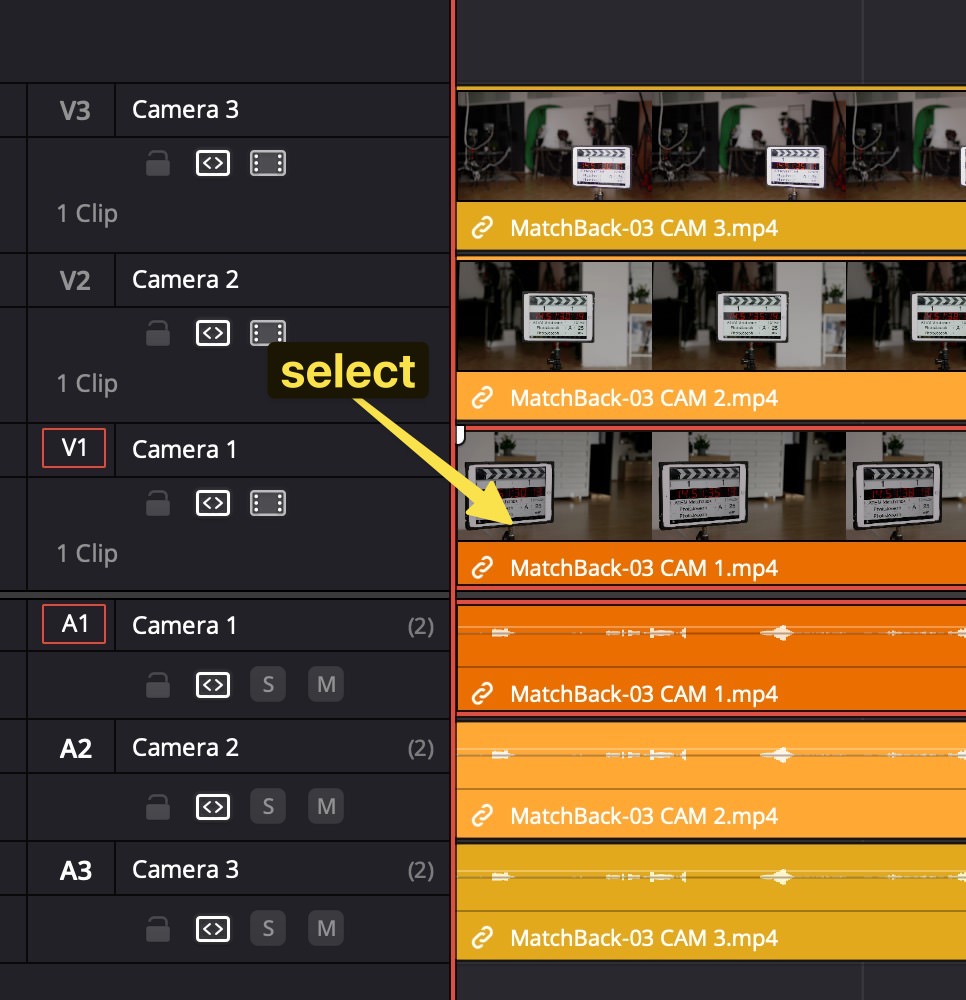
Open the multicam clip again, so you see all camera angles stacked on top of each other. Select the first camera angle clip…
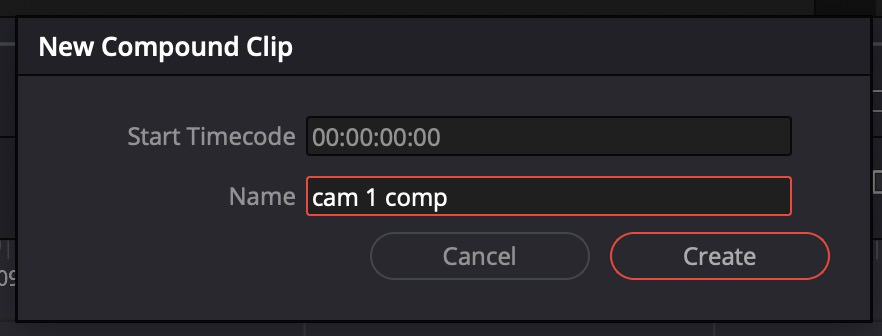
and choose the menu “Clip > New Compound Clip…”,
and name it something like “cam 1 comp”. Repeat for all camera angles.
2/ Import your camera original footage
Now it’s time to import your camera originals. If you have lots of angles you may want to name them now to make it easier to keep track as you go.
3/ Open each Compound Clip and align the camera-original with the ATEM-generated file
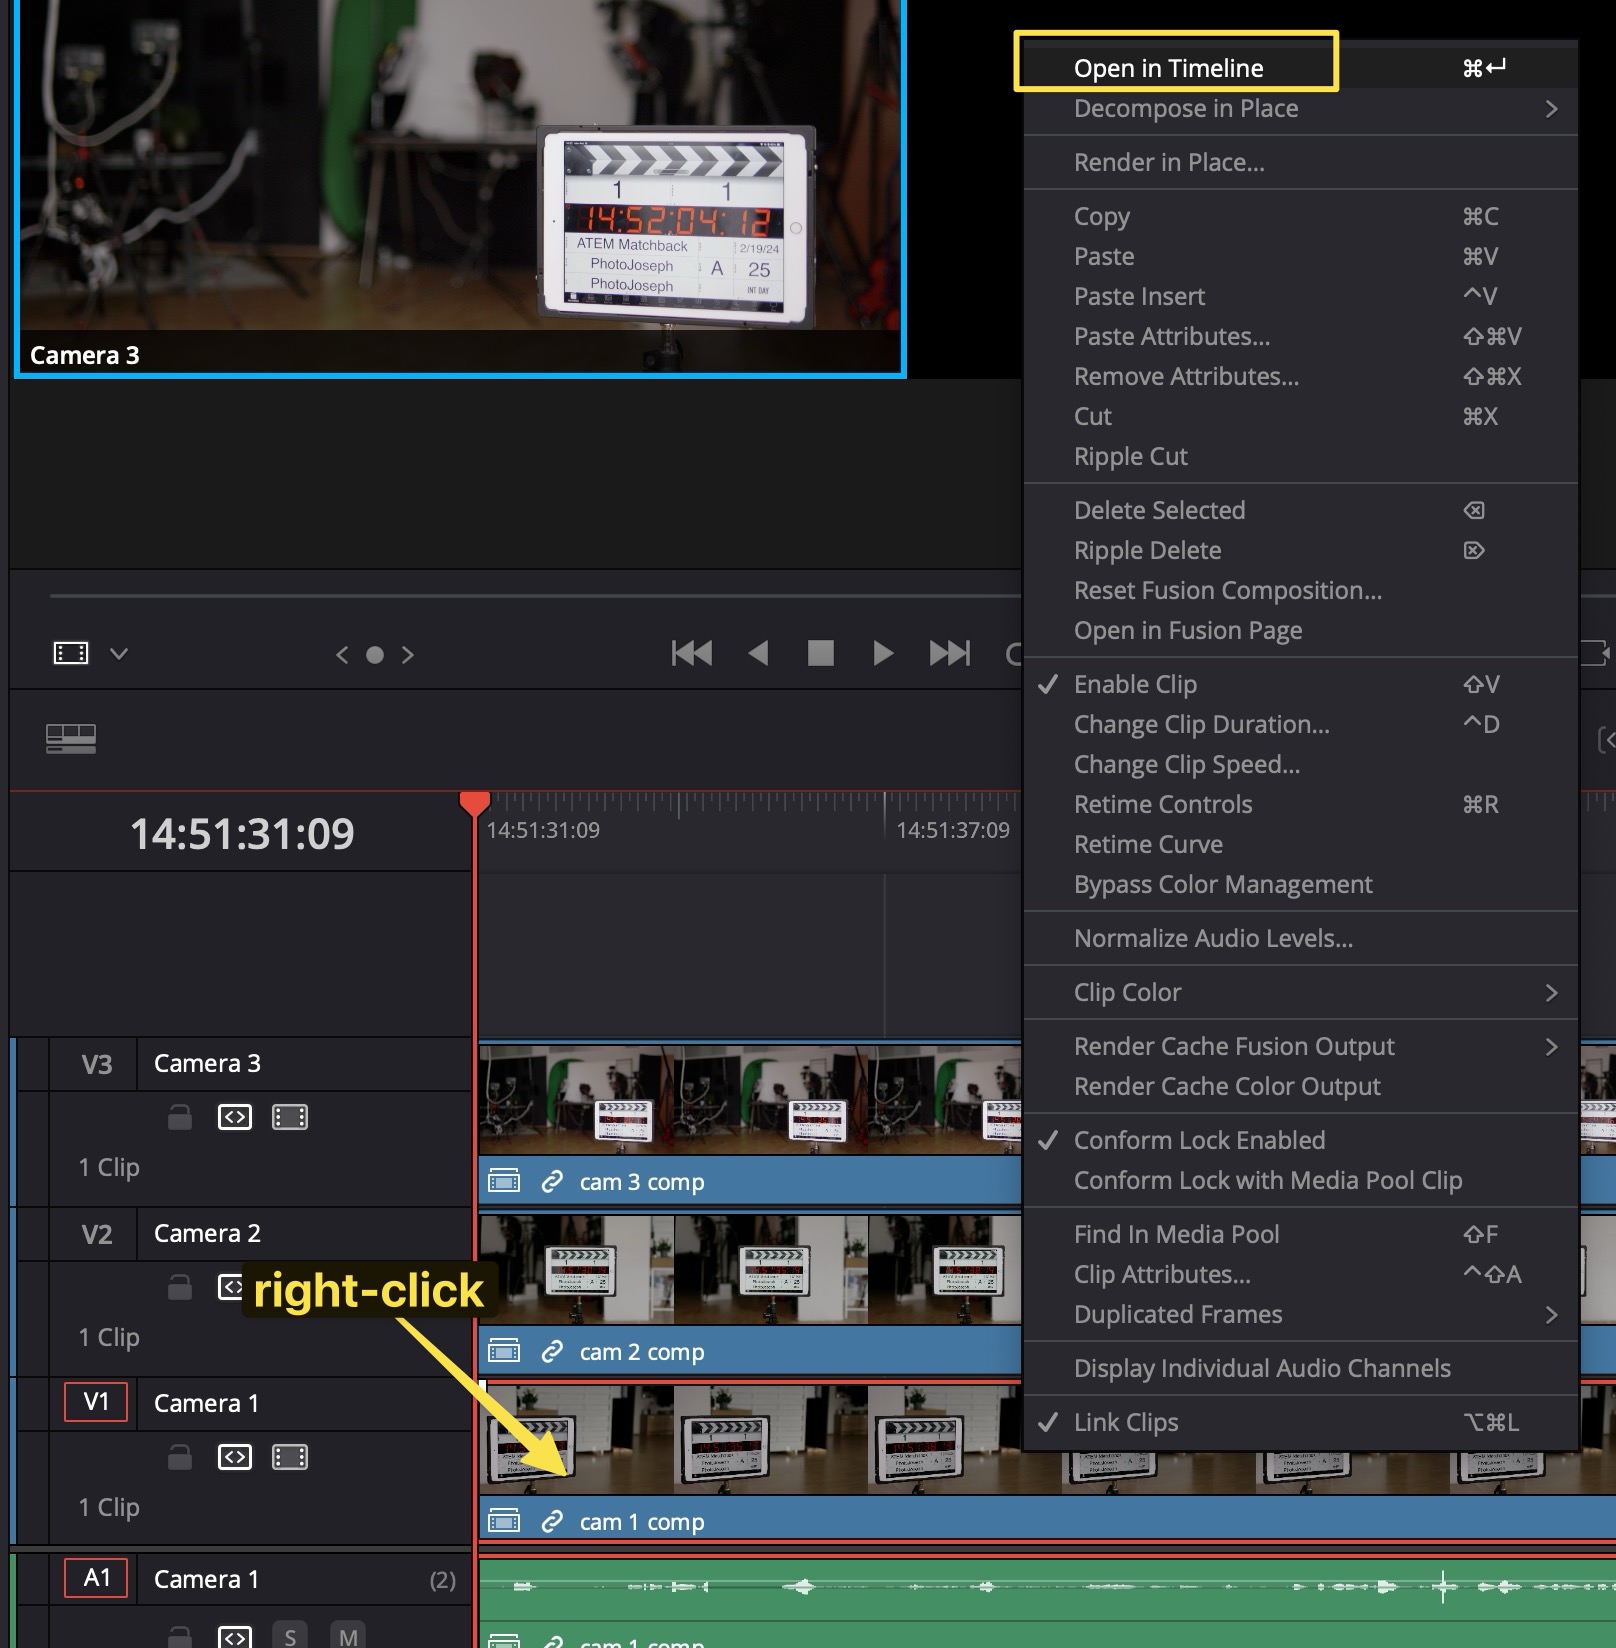
Right click on the first compound clip (“cam 1 comp”) and select “Open in Timeline”.
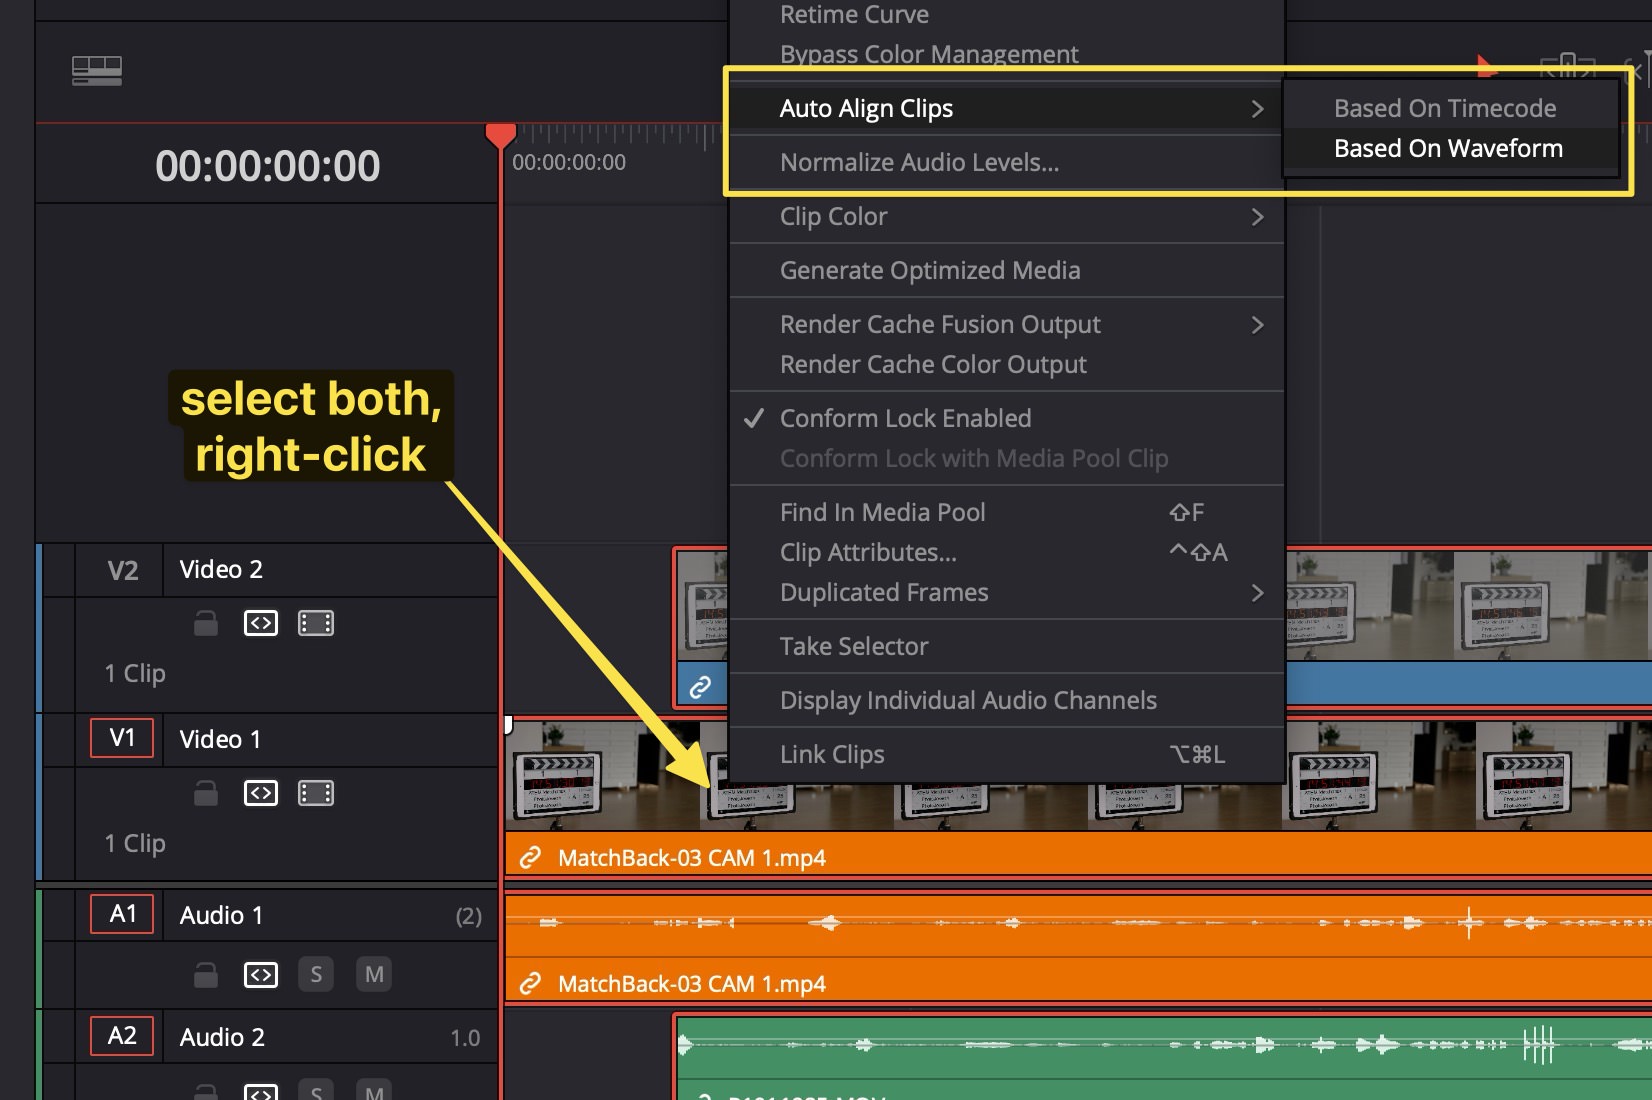
Drag the matching camera-original file on top of it, onto V2. You can manually align the clips visually or audibly (looking at the waveform), or what’s even easier (and which I discovered after making the video), is just select both clips, right-click, and choose “Auto Align Clips > Based on Waveform”. Resolve will analyze the audio waveform of each clip, and move the new clip on V2 to align with the original on V1.
Note that the clip on V1 (the ATEM video clip) must not move. It will be lined up at the start of the Compound clip and needs to stay there.
4/ Repeat this for the other camera angles
Repeat this process for each additional composite that you made!
Now you’re done! You now have a full resolution version of your live show, at the highest quality that your cameras can generate.
A Note About Cameras with Varying HDMI Delay
One amazing advantage of this process is that you can now compensate for cameras with varying HDMI delays. If you’re using all the same cameras, then this doesn’t matter. But if you aren’t, then this might. All HDMI cameras have a slight delay between realtime and what comes out the HDMI port. Some cameras have very little (as little as a single frame), most have between three and seven frames delay, and some like GoPro cameras may have well over ten frames delay. Wireless cameras could easily have half a second delay, depending on the wireless HDMI technology you’re using. For a live production, there’s nothing you can do about it. But now, in the re-edit, you can compensate for that delay. If you have something visual to align to at the beginning of the show (such as a timecode display), then you can offset the most-delayed cameras to bring them in sync with the least-delayed cameras. By slipping the camera-original in the compound clip, you can move it so it’s in sync with the other cameras instead of with the ATEM recording, making everything line up perfectly. That’s pretty amazing.
Conclusion
This workflow offers unparalleled flexibility, allowing you to match camera original files from any camera to your ATEM-generated Resolve project file. Whether you're using Blackmagic cameras or not, this opens up new possibilities for your production workflow. Make sure to watch Alex's video for a deeper understanding of the first part of this process, and check out my ATEM playlist for more tips on getting the most from your ATEM hardware. Thanks for reading, and see you in the next post!
The music is from MusicBed! Get your first month free when you purchase an annual subscription by using my coupon code PHOTOJOSEPH at checkout! https://geni.us/MusicBed
Reply from @FXTradingTV on Wednesday, April 24, 2024 - 9:31pm
I have a nightmare I can’t see multicam on either iPad laptop or monitor I’ve got hdmi out in atem iso plugged into computer or iPad how do I tell it to show me the 3 cameras I have all plugged in
Reply from @garretreed9709 on Thursday, April 11, 2024 - 12:48am
Conveniently I saw Alex’s video this morning which helped me follow through with an ISO file we just recorded. Note I can appear really smart with my colleagues even though you two did all the heavy lifting. Thank you!!
It if you record log on cameras won’t it show up in log form on the atem mini pro iso? How do I make it log on the camera but have a “normal” 1080p image on the atem?
Reply from @photojoseph on Monday, April 8, 2024 - 7:40pm
On the LUMIX cameras, you can choose for the LCD and/or the HDMI out to have a LUT applied so it looks “normal”, but the recording will be Log. I don’t know what other manufacturers cameras can or can’t do.
Ok, I followed this and it worked for half my show. I stopped the cameras in the middle for about 10 min and then started again. I see all my cuts but when I try to reconfirm from bins it isn’t doing anything to the clips that are in the 2nd half. What am I missing?
@photojoseph thanks so much for the help. I'm not sure why they won't sync automatically but I just did it manually. They are all black magic cameras so I'm not sure what the issue is. Time code helped.
Reply from @photojoseph on Thursday, March 14, 2024 - 6:08am
That’s not going to work for the conform. You had that checkbox “place clips from same cameras on one track” (something like that; I’m not looking at Resolve now) enabled? It must have put them somewhere or it would give you an error. You could manually place them and do the math for the distance between clips (when cameras were off) but that should not be necessary.
@@photojosephit appears to only add the 1st group of clips even though I selected all. I tried just selecting the 2nd half clips and that worked. So now I have 1 multicam clip for the 1st half and another one for the 2nd. Do I have to edit them separately and then stick them together?
Reply from @photojoseph on Thursday, March 14, 2024 - 5:52am
Ok! When you made the multicam, did you select all the clips, and enabled the option to put clips from the same camera on one track? Did you open the multicam and verify that all the clips were there, with a 10 minute gap where the camera wasn’t rolling?
Reply from @JohanVelthuis on Saturday, March 9, 2024 - 10:07am
Very nice. This also means that after this you can color correct the multicam clip, which in a lot of situations is much faster. It would still be better of course that BM changes the firmware that this is the default behaviour of an ISO recording project.
Reply from @photojoseph on Saturday, March 9, 2024 - 5:13pm
Aha, gracias. This video will be on the Spanish channel soon! I haven’t used the GoStrean before. It does look very interesting but without ISO recording (which no other switchers have), it’s not as interesting to me. Thank you for following both channels!
Reply from @zonaactivatv on Saturday, March 9, 2024 - 2:10pm
@@photojoseph No, thank you for your kind reply. I'm not promoting anything. I was just wondering if you had approved it? I am your follower on your channel in Spanish. but I see that you upload more videos here. Regarding the product. I only see reviews in English. I understand English very little. and what I have seen seems to be a better product in some points than the atem. I have the extreme atem, I love it. an abarazi, greetings from Ecuador
Reply from @photojoseph on Saturday, March 9, 2024 - 9:02am
I assume you’re just here to promote another product since that switcher doesn’t offer an ISO record function which is what this video is about. I’m sure the GoStream is a nice product, but without ISO recording, in context of discussion on this video, the Osee scores a 0/10.
Reply from @maicovimuto6341 on Thursday, March 7, 2024 - 12:25am
Do you know if you record with the Atomos Sumo19SE, that it creates a multicam clip straight away to use in Resolve? I saw your other video on the Shogun 7 from 3 years ago, and in Final cut it's an instant multicam. Either way, I guess this workaround should also work with the Sumo19se?
Reply from @maicovimuto6341 on Thursday, March 7, 2024 - 11:19am
@@photojoseph You misinterpreted me I think, in your own video with the Shogun 7 it looks like there is an instant multicamclip in FCPX straight from the XML file. That's why I was wondering if that was correct, or whether you did it personally in post, but didn't put it in the video. Either way, still amazing that you and Alex found this workaround!
Reply from @dvdaltizer on Wednesday, March 6, 2024 - 12:58pm
seriously amazing. isn't it crazy this has been possible all along? just took brilliant minds to figure out this loophole. great work Joseph! using this tip on a project now and thrilled!
Im a complete beginner, so I might be missing something. Don't I have to delete the original A/V track in the compound clip I created to ensure I get the 4K out? Or am i just relying on that the top track is rendered first? Would there be any repercussions to deleting the old ATEM 1080P track?
@@photojoseph Thats amazing, thanks for the hard work and sharing this with us. I've been recording in-camera 4K, and manually replacing, syncing and editing it before render.. This will make a big difference for me. Cheers
Reply from @photojoseph on Tuesday, March 5, 2024 - 8:16pm
Only the top layer of video is visible. All audio would be audible so you’d need to mute the original audio track; I neglected to show that but that will be figured out quickly. The only reason to retain the original video is to have a known sync track, but yes once everything is in place it’s safe to delete.
Reply from @Eddy04tv on Tuesday, March 5, 2024 - 12:43am
This video is amazing! I started fiddling with Multicam Recently, but now being able to do all this with 4K to match the ISOs from the ATEM is just lovely. I'll need to figure out the camera part though, cause my camcorder doesn't allow me to record 4K while sharing content to the ATEM.
Reply from @fabianseas2275 on Monday, March 4, 2024 - 5:56pm
DOOOOPE! I was really thinking on how to do this months ago! This video save my life haha! Thanks Joseph and Alex, I'm following your wotk since 2020 with the atems keep going. Cheers from Costa Rica
Reply from @andylikeswords on Wednesday, February 28, 2024 - 9:28am
Been dying for a 4K solution forever on this without buying BMCC, and you've totally made my night. Well worth the little bit of work. Can't wait to try this.
Reply from @AmateurBlonde on Tuesday, February 27, 2024 - 3:18am
This is great. A lot cheaper than Tentacle Sync, although a pretty complex procedure. I'm grateful you made this comprehensive tutorial. I'm adding it to my bag of tricks. The WWII clicker is great. I can think of many applications for that. One thing about it is that it's not as alarming to actors/talent as a slate. I'll be sure to save this and Alex's video for future recall. Thank you!
Reply from @DatingPodcast on Monday, February 26, 2024 - 8:49pm
00:00🎥 The video discusses a crucial workflow for ATEM Mini Pro ISO and ATEM Mini Extreme ISO users, enabling re-editing of live shows using DaVinci Resolve project files and ISO streams of each camera input. 00:54🔄 The presenter, along with YouTuber Alex Pettitt, has developed a method to match camera originals from any camera with ATEM-generated Resolve project files, allowing flexibility in recording formats and camera types. 02:19🎬 Alex Pettitt's contribution involves turning flat clips in ATEM Resolve project files into true multicam clips, enhancing the re-editing process for ATEM users working with multiple cameras during live shows. 03:44🔄 The synchronization process involves recording in the ATEM, recording in each camera, and using clear cues like audible clicks to sync the clips manually. 04:12🖥️ After recording, copying ATEM and camera original files to the computer is the initial step for further re-editing using DaVinci Resolve. 06:10🔄 Swapping out ATEM files with camera originals involves creating multicam clips, disabling conform lock, and reconforming from bins for each camera angle. 08:27📏 Checking and adjusting project settings in DaVinci Resolve, including resolution and frame rate, is crucial for ensuring proper alignment of camera originals with the ATEM project. 10:10🔍 Aligning 4K camera originals with 1080p ATEM footage involves creating compound clips, importing originals, and manually syncing using visual and audible cues. 12:55🔄 The presented workflow extends flexibility to include high-quality audio recorded separately and synced to a camera angle, providing users with ultimate flexibility in post-production.
Reply from @photojoseph on Saturday, February 24, 2024 - 10:46pm
If it appears on the timeline, it works. Standard PiP shows up (USK, if memory serves). Pretty sure supersource doesn’t but I haven’t looked at that in ages.
Reply from @Coruway on Saturday, February 24, 2024 - 4:54pm
Could this multicam clip be used to color correct the cameras original clip? This is a technique (correcting the master clips and creating a good start poin t for different camera shots). I've used in FCP and its a main hesitation I've had in the Resolve multicam. I have seen ways to enter the color mods on the color coded and selected clips, But being able to modify the master clip is what I've been looking for. Great technique you outline that might let me move away from FCP Multicam clips. Thanks for the billiance here.
Reply from @photojoseph on Sunday, February 25, 2024 - 6:17am
I’m not totally sure I follow. But let me see if I do. To grade a Resolve multi cam project, you can either grade each cut one by one, or open the multicam clip and grade each angle once. Either way works. And you can do both; do a base grade inside the multicam then finesse each cut (or just the ones that need it) on the timeline. Is that what you’re asking?
Reply from @gallo.s.chingon on Saturday, February 24, 2024 - 12:34pm
this opens up a LOT of possibilites. I can carry 4 sony cameras and lenses in the space it takes 2 BMPCC and lenses. important considering I never check bags.
Reply from @dr.outdoor on Saturday, February 24, 2024 - 10:25am
a small tip regarding sub-frame audio aligning: you CAN do that! make sure, you trim off a little footage in front and at the end, then you can nudge fine-grained with ALT-LEFT and ALT-RIGHT cursor key, but you have to cut front & back, so you have wiggle room! Also use the menu: Trim->Slip Audio
Reply from @photojoseph on Saturday, February 24, 2024 - 10:40am
@@dr.outdoor aha, gotcha. Yep, totally fair. I actually originally scripted an explanation of why the audio and video won’t line up properly unless you’re shootings with genlocked cameras but nixed it because I felt it was too esoteric for this video. Those who already know that will know that’s how to get perfect alignment; those who don’t won’t likely care or at least not want the lecture in this video. It’s my biggest struggle in making videos like these; deciding what to leave out!!
Reply from @dr.outdoor on Saturday, February 24, 2024 - 10:35am
@@photojoseph that's absolutely true... still, since you are working in a multicam clip with more other "new" 4k clips, you will have to align audio in a later stage to the new videoS, and here, the ALT-LEFT/RIGHT might come in handy again...
Reply from @photojoseph on Saturday, February 24, 2024 - 10:31am
But wouldn’t that just slip the audio, potentially putting it out of sync with the video? I’d prefer that the new audio stay aligned with the new video, since the new audio is what will get used.
Reply from @photojoseph on Saturday, February 24, 2024 - 11:12am
As long as you’re in the same frame rate there should be no drift. But if there were, you could compensate with a few slice and nudges inside the multicam clip.
Reply from @SuperMouseDV on Saturday, February 24, 2024 - 7:03am
Did you disable the the other audio tracks. I know if I don't do that, the AUDIO is sometimes over modulated as having multi clips with the same audio it gets really Loud or the is a slight offset and you hear it..
Reply from @photojoseph on Saturday, February 24, 2024 - 9:06am
I did not talk about audio (I should have) but yes 100% you want to disable the original audio track. As mentioned at the end, you could even bring in high quality audio via an 32-bit float recorder if you really wanted to get the best of the best.
Reply from @dustmicks1 on Saturday, February 24, 2024 - 12:40am
So I do not have the ISO version but I was wondering if you would know why I get a little bit of a buffering effect when I run my r6 4k 24fps. for the most part its all good but at some points it looks like its buffering, laggy for a sec. If anyone could answer this.
Reply from @dustmicks1 on Saturday, February 24, 2024 - 12:37pm
@@photojoseph this is happening when I am recording to an ssd but it even happens when I am not recording or going live. Just looking at the previews it will do this weird buffering thing.. It’s very hard to explain with out seeing it. I was not aware that you can change frame rates in your atem board. I will look into that.
Reply from @photojoseph on Saturday, February 24, 2024 - 9:09am
Is the ATEM set to 24p? While it can convert frame rates it’s best to feed it the native signal frequency. If you’re talking about buffering while streaming then that’s an internet problem.
Outstanding. I'm also impressed with YouTube recommending this exactly as I am working on a project like this! Sometimes the universe delivers. Thanks @photojoseph!
Reply from @ThisIsLeeBird on Friday, February 23, 2024 - 3:37pm
Imagine it being 50 years since Timecode was created and we still had to clap and do stupid things to sync audio and video or multiple video clips because it wasn’t standard yet on every camera and audio interface. Oh wait…..
Reply from @retlwiz on Friday, February 23, 2024 - 1:59pm
You're right - it wasn't clickbait - well done, guys. This indeed is massive for the ATEM Mini range - I have an old project I can try this out on straightaway and had given up using BM cameras anyway.
Reply from @DesigntoSwiftUI on Friday, February 23, 2024 - 12:38pm
Amazing video. What do you use to zoom in and out when are screen recording.also I record my audio from my rodecaster pro bc the audio isn’t great coming from the atem. Do you know of an easy way to swap out audio I normally have to go through a whole process. I also want to be able to edit multi cam on the edit tab but I know that’s not possible as far as I know.
Reply from @photojoseph on Friday, February 23, 2024 - 6:25pm
1. Screenflow 2. Swap out audio the same way I swapped out video here. Just record the entire show and line it up with the ATEM audio track. 3. What I showed here is the edit page. Do you mean the Cut page? I never touch it; don’t know.
Reply from @yemmyrichard7511 on Thursday, February 22, 2024 - 10:57pm
BOOM...that is it. When Alex released his video a few days ago, I asked for the possibility of this process in my comment....while I have been thinking it may not be possible eventually... you took the baton and finished it off.💥💥💥 Thanks to you and Alex
Reply from @igorvuk4454 on Thursday, February 22, 2024 - 6:29pm
You dont even need to connect the cameras to atem, only the microphone 😊 you can have wireless atem setup but you will have to switch without seeing what goes on in a way
Ive tried this before but I had it more complicated, I was replacing iso files and had to align the timecodes on them and that really was a lot of work
Reply from @photojoseph on Sunday, February 25, 2024 - 8:56pm
@SlimboCanavi interesting. You’re the second person to talk about switching a show but not live streaming it, and not even connecting the cameras. Fascinating!
Reply from @SlimboCanavi on Sunday, February 25, 2024 - 8:45pm
Genius idea. If you use lumix box cameras, you could monitor all of the cameras over wifi in lumix tether as you switch with the atem. Maybe record a tentacle sync into the mic 1 so the ISO just records black files with camera timecode burnt in. You'd have to set up a black multicam project like in this video and then finally swap out the files via the audio timecode. I avoided doing many live shows for this reason - I didn't want to invest in wireless transmitters or lay long cables. This is perfect! Thanks again for the idea
Reply from @davinchewk on Thursday, February 22, 2024 - 6:14pm
Does the multicam clip work on the cut page? I've grown to love the speed editor and would hate to sacrifice the sync bin feature if the multicam clip doesn't work with the multicam buttons on the speed editor on the cut page.
Reply from @photojoseph on Thursday, February 22, 2024 - 6:43pm
No. The original non-multicam timeline is designed for the cut page. I am pretty sure proper multi cam clips don’t work in the cut page. I could be wrong though; in not a fan of the cut page.
If you're using blackmagic cameras, replacing clips is not so difficult, you can just replace ISO files with original raw files from cameras as they are already perfectly synced, but this is a real game changer for everyone not using bm cameras with atem. And of course, the fact that you can have multicam sequence instead of the original atem timeline is priceless. Thank you guys for doing this! 🎉❤
Reply from @photojoseph on Thursday, February 22, 2024 - 12:13pm
Actually, if you have BMD cameras, all you have to do is put the RAW files in the folder and Resolve finds them, and treats the RAW as originals and the 1080p as proxies. But of course you can regenerate proxy files once you build these new sequences if you need them. Yeah this is super cool for sure! So glad Alex figured out the first half.


Comments from YouTube