A Modified Mobile Workflow in Aperture

I just had an unusual set of circumstances that required a complicated Aperture workflow I’ve never used. I had to put some thought into how I was going to do it, so I thought I’d make it easy on everyone else and describe what I came up with.
I recently shot an editorial assignment for ESPN The Magazine (I’ll post a link when it’s published). I had over 99 GB of images from this assignment. The deadline was three days past the shoot so I had some time to get the images edited and sent. I also had another out of town assignment leaving a day after my return. I would not be able to do the work using my normal workflow on my iMac at home.
I needed to be able to take this huge shoot on the road, but at the same time, I didn’t feel comfortable leaving without having this work backed-up. Plus, I needed the CF cards for the next shoot.
My normal mobile workflow is much less complicated. I import to a referenced library on my MBP, do my work and send the images. When I return to my office, I then copy the images to a hard drive, import the library to my archive library as a project and Locate Master Files.
Here’s how I solved the problem
After a long day of shooting and driving, I created a new Aperture library on a portable FW800 hard drive and imported the images with my iMac running this library.
I chose a managed over a referenced library for one very good reason. When things get complicated with moving images from one drive to another and maybe another, the potential for problems increases. If I were to make a mistake and copy the wrong folder of images or trash the wrong folder, it would be a major headache squaring it away. A managed library keeps everything together and eliminates most human error potential.
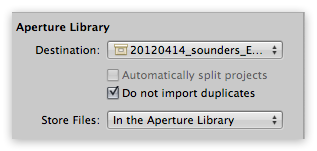
Since I would be leaving the house with this hard drive I wanted the data backed-up. So I set Aperture to import into the library as managed, but also sent the images to a back-up drive on import.
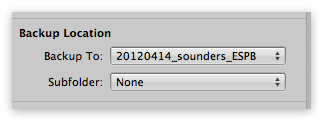 In the Import window select Backup Location in the Import Settings drop down menu.
This means that when I got up in the morning ready to head out of town again, I would have a managed Aperture library with all the images and two backups of those images on two separate drives (I had ChronoSync do send a back-up to my Drobo in the middle of the night). This would also allow me to format and use my CF cards.
Once I had edited, captioned and sent the images to the magazine, I had to get this library into my 2012 archive library.
Since the images are managed on the portable drive I did all the work on, I had a decision to make. I could do this two ways. I could Relocate Masters to my 2012 images storage drive then trash the back up. Or, I could import the managed library to my 2012 referenced library, then Relocate Masters.

Knowing the final destination for the images would be on my 2012 image hard drive, I felt there would be less potential for having offline images to import the managed library, then Relocate master images and then trash the backups. Of course, I’d have to make sure to create new backups of the final image folder.
At the end of the process, I’ll have this shoot located in my 2012 archive library as a project, the referenced images will be in a folder on my 2012 image hard drive and backed up to my Drobo. The selects will be uploaded to an online service for safe keeping.
To summarize, here are the steps:
- Create a new managed library on a portable drive.
- Import images both to the managed library and to a back-up location.
- Do all work needed in this library on the portable drive.
- When finished Import the managed Library as a Project.
- Relocate Masters to regular hard drive. (Of course, you may want to keep them managed, so skip this step.)
- Follow-up with a new back-up.
- Trash original back up because you don’t need a duplicate of the images you just relocated.
Comments
on April 27, 2012 - 6:49am
Hi Joseph,
Interesting post.
A little off topic but, regarding backup, I recently used Google docs “drawing” to try and visualize my storage/backup solution, and think it came out Alright :)
Have you tried describing your own workflow in a visual why?
On topic when doing work On your mbp with fw800 how bad is it to work with large raw files?
on April 27, 2012 - 2:55pm
Hi, I actually wrote the post. I have no problems with performance using the OWC FW800 drive. It’s a high performance hard drive and well suited to the task.
on April 30, 2012 - 11:50am
Hi Thomas,
Sorry for the mixup. I read the article and posted from my Iphone on the train ride to work and missed the “author part”.