Using 3rd Party Apps with Aperture

The App Store is filling up fast with awesome little applications that, like iApps, do just one or two things — but do them really well. The app Snapseed from Nik Software that I mentioned a few days ago is one of those.
The problem with many of these apps for Aperture users however is that they don’t simply “save”, but only “save as…”. The ability to simply “save” means from Aperture you can Open in Editor, (for example Photoshop), do your work then simply save and close the image, and it’s automatically updated in Aperture. It’s one of those fantastically simple features in Aperture that opens it up to just about any app you like.
But as soon as you can’t simply “save” — as you can’t in Snapseed — that process breaks. You now have to “save as…” to some other location, import that into Aperture manually, merge it back to your project, etc. etc. and the process, while not particularly hard, is just annoying.
Automator to the rescue
Reader Jon Parsons of Jon Parsons Photography sent over his workflow which makes this process a lot easier. I’ve modified his steps a little as he had an extra step in there, plus I’ve modified for Referenced master users, and added a tip on how to easily switch between External Editors, but other than that he gets credit for this technique.
By the way, this has the potential to get even easier through AppleScript. If it can, I’ll certainly let you know here.
What it’ll do
In brief, you’ll create a dedicated folder for all those “Save as” images, and attach a script to it that will automatically import photos added to that folder into Aperture. Unfortunately it has to add them to a dedicated project, so you’ll need to manually move them to your current project (assuming you want to keep versions together), but otherwise this is quite clean.
Setting up Aperture
First let’s make it easy to switch External editors. I gave this tip once before, but it’s worth repeating. You probably know that to switch editors, you just go to the menu Aperture > Preferences… > Export > External Photo Editor: and choose the one you want. But digging through your entire Application folder can get tedious, so I’ve set up a folder of aliases to the apps I’m using from Aperture. I also keep that folder in the sidebar, making it quick to get to at any time.
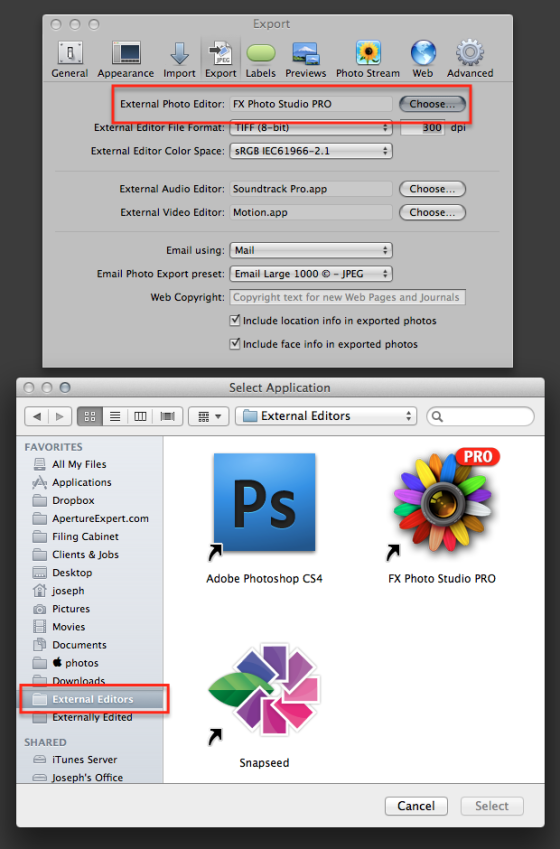
As you can see above, just click on the Choose button next to External Photo Editor: and then using the handy-dandy External Editors folder set up in the sidebar, quickly navigate to the app you want to use, and click Select.
Unless you’re sending to Photoshop, you may as well set the filetype to TIFF (8-bit). Many apps won’t read PSD files, so you could just get an error, and you’re not saving back to this format anyway when working with alternative apps, so just keep it simple.
Next up, you’ll need a Project in Aperture that’s dedicated to importing these externally edited photos. I called mine simply Externally Edited (clever, no?) and that sits at the top of my Library list.

That’s all you need to do in Aperture, and this is all a one-time setup.
Building the Automator Script
Now to build the Automator script itself. Do check out Jon’s script as well as he has some important variations.
Launch Automator, and choose to create a Folder Action.

At the top of the empty space, select what folder you’re going to attach the Action to.
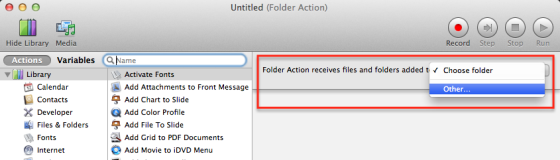
You can choose an existing folder, or create a new one and attach to that. You can put this anywhere, but here’s what I did and why it’s important.
I work with a referenced library, meaning all my masters sit on a Promise RAID and are all in a folder titled Aperture Masters 01. (For those of you who are wondering what happened to the Drobo, I dropped it a while ago due to a legacy of problems and moved to the Promise. Never been happier with external storage. But that’s another story for another day.) Since all my Masters are already referenced, I want to keep these newly created files referenced as well. So next to my year folders (I keep all images in a yyyy/mm/dd folder hierarchy) I created a folder called Externally Edited. If you work referenced, I recommend you do the same. If you’re working managed, it doesn’t really matter where you put this folder, as it’ll get cleared out after every import (you’ll see…).
So select the Choose folder as in the screenshot above, navigate to your Aperture masters storage folder, create a new folder and name it appropriately, and choose that. This step attaches the action you’re writing to that folder for you, so there’s not need to do that later on.
Now to build the script itself. It’s only two steps.
First, locate the action Get Folder Contents and drag that in. It’s easy to search and find the Action you need, like this:
;) (click to view larger)Do the same thing for the Action Import Photos, which is an Aperture action (you’ll know it’s the right one by the Aperture icon).
(click to view larger)Do the same thing for the Action Import Photos, which is an Aperture action (you’ll know it’s the right one by the Aperture icon).
;) (click to view larger)By default, it’ll set itself to Choose Project: (top project). If your newly created project Externally Edited happens to be at the top of your list like mine is, then it’ll already be selected. If not, just click on the drop-down menu to find it.
(click to view larger)By default, it’ll set itself to Choose Project: (top project). If your newly created project Externally Edited happens to be at the top of your list like mine is, then it’ll already be selected. If not, just click on the drop-down menu to find it.
Also notice in the screenshot above that I’ve set it to Import by Reference. When you do this, the Delete the Source… option is unavailable (for obvious reasons). If you’re working Managed, however, disabled the first option and enable Delete…, as that will keep that folder nice and clean for you.
Save this, and name it something clever so you can find it again later if needed. By the way, these actions are stored in the folder ~/ Library/ Workflows/ Application/ Folder Actions/ in the event you’re looking for it later!

That’s it, you’re ready to go!
Give it a test run!
If you want to just test it one step at a time, drag a picture into your Externally Edited folder in the Finder. It’ll take a few moments, but you’ll see a little gear spinning in the menubar, and eventually Aperture will come to the front and the photo will be imported.
 The gear menu means it’s working!
Now let’s do it for realz…
Select a photo in Aperture to edit. If you want to switch editors, hit Command-, to open the Preferences, and then choose another editor. Once ready, hit the shortcut Command-Shift-O (open in editor) and a TIFF will get created and then opened in your app of choice. Do your work, and when done, click the Save As… button (or whatever your app offers), navigate to your Externally Edited folder, and save it there. Within a few moments, Aperture should automatically come back to the front with your new photo imported!
Cleaning up in Aperture
At this point you’ll probably want to drag the photo from the Externally Edited project in Aperture back to wherever you were working, and if you’re sorted by date, you should see it pop right next to the original image. If you want to stack it with the original photo, do that now. You can also promote it to Stack Pick. (If you’re not familiar with the inner-workings of Picks, check out this post). Finally, you’ll probably want to delete that extra TIFF file that is now just taking up space. Typically Aperture would delete this for you on return to Aperture if it wasn’t saved over, but that doesn’t seem to happen with this workflow. If it does for you, please let us know in the comments what app you’re sending it to.
Video training on this topic…
I ended up broadcasting a Special Edition Live Training Session 013 specifically on this topic. It’s already available online; $2 as always!
Comments
on January 27, 2012 - 2:35am
Good article Joseph, and I also enjoyed the video.
It’s got me wondering though. Is there a way to automate changing the external editor.
I’d like to be able to easily change between exporting PSDs to photoshop, or TIFFs to one or more other editors.
Although I’m a programmer by profession, for some reason I haven’t been able to grok Automator.
Is there a way to add such automated ‘macros’ to Aperture?
on January 27, 2012 - 2:40am
Rick,
Believe me, we’ve tried. There are no hooks, in either Automator or AppleScript, that allows us access to that switching mechanism. We simply have to wait for Apple to recognize that we want to use more than one app, and let us simply choose Open in > app 1 or app 2 or app 3. Frustrating, for sure.
Fingers crossed.
@PhotoJoseph
— Have you signed up for the mailing list?
on January 27, 2012 - 5:18am
Joseph,
Very useful post. Thanks. I’m curious, though, I use and love Nik’s complete Aperture plug-in set and I love Snapseed on the iPad, but can the desktop version do anything the plug-ins can’t? If not, wouldn’t this make the above workflow irrelevant for Nik’s products (not for other 3rd party apps)?
Thanks again,
-John
on January 27, 2012 - 5:22am
John,
Good question. I don’t know the answer, and that’d be a great question to post to Nik Software. What I will say though is that even if all the features and capabilities are there, being a more limited set, it’s going to be quicker and easier to work in Snapseed. It’s a different experience (as you will see in the video if you haven’t watched it yet), and I’d simply suggest that if you love it on the iPad, you’ll love it on the desktop, too. Like any tool, you’ll find places to use it.
@PhotoJoseph
— Have you signed up for the mailing list?
on January 27, 2012 - 3:15pm
Joseph,
thanks very much for this article.. this makes the process of using third party apps not nearly as annoying and time consuming. Your steps for creating the automated script were very easy to follow. As you said, Apple could make things a lot easier if it was possible to have more than one external editor. Are we simply waiting for them to realize this is a function we need/want or is there some reason it’s not possible..?
Thanks,
Tim
on January 27, 2012 - 3:44pm
Timothy,
I’m no engineer, but it has to be possible. Hopefully in the next release (although keep in mind that this will NOT help the non-round-trip problem with apps like Snapseed).
@PhotoJoseph
— Have you signed up for the mailing list?
on January 29, 2012 - 6:46pm
thanks for the article, this is very useful. I have a question. Is there a reason why you use 8bit files to edit in an external editor, eg Photoshop, rather than 16bit?
cheers
Paulk
on January 30, 2012 - 3:33am
Paul,
Unless I’m doing extreme adjustments, there’s no point in going to 16-bit. Before I send the file to an external editor, I’ve already adjusted the RAW image bringing all usable data into the 8-bt window. So giving it 16-bits of space to work in is just a waste, unless as I said I’m doing something extreme.
There was a good discussion on 8-bit vs 16-bit in the forum post that kicked off this article, “Should You Scan Negatives to JPG or TIF for Aperture?”. Have a read there, and if you have anything to add please do comment on the linked forum post.
@PhotoJoseph
— Have you signed up for the mailing list?
on February 22, 2012 - 12:22am
Hi.
Very good description and use of course.
I’m using it with Snapseed and everything works fine. No left files.
Hans