You are here

Tips

Open in Editor or Plug-in… Again

PhotoJoseph's picture
March 6, 2011 - 9:23am

Scroll to the end for a video version of this tip!

A conversation in the User Forum about a complication with 3rd party plug-ins inspired this post. The reader was having troubles opening a photo into a plug-in a second time, and after some back and forth we resolved the issue and it pointed out what could be argued as a bug or a feature in Aperture 3. Which of course makes it great “tip” fodder ;-)

Editing with a plug-in or external application

Aperture has a fantastic plug-in architecture, with loads of developers making some very cool plug-ins for the app. If you’re short on ideas, head on over to Apple’s Plug-ins page and see what’s on offer.

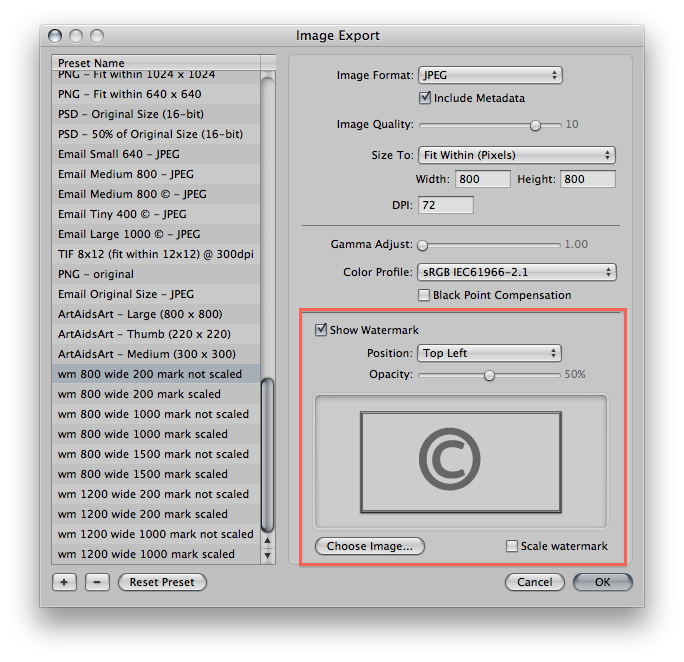
Since these 3rd party tools can’t make adjustments using Aperture’s own adjustment capabilities (and if they could, we wouldn’t need them!), when you want to edit a photo from Aperture in one of these plug-ins, Aperture has to first render any adjustments you may have already made into a new file, and send that over to the plug-in. The format of the new file is determined in your preferences; you can make it a TIF or PSD, at 8-bit or 16-bit. This new TIF or PSD becomes a new “Master” file (so you can still always, always go back to your original photo). Once you are done doing whatever you’re going to do to the photo and it’s sent back to Aperture, it will have a little “target” icon on it, denoting that it’s been opened in an external editor (this could be an actual application like Photoshop, or just a plug-in—they are the same thing as far as Aperture is concerned).

In the following screenshot, we see a photo that’s been opened in Photoshop. I added some horrible color treatment to it to make it obvious to differentiate here. Believe me, it gets harder and harder to figure out what to do with Photoshop with every release of Aperture!

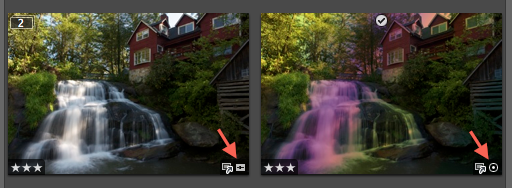
The little “target” logo means the photo has been opened in an external editor

See the slider badge on the bottom right of the first thumbnail? That tells us that some adjustments have been added in Aperture. Then, see the target badge on the second thumbnail—and notice that the slider badge is missing? The target means it’s been externally edited, and the lack of the slider badge means that the adjustments applied in the image on the left were rendered into a new master before being sent to Photoshop.

Share

Watermarks in Aperture 3—Demystified (part 1)

PhotoJoseph's picture
March 3, 2011 - 12:03pm

Did you know that Aperture can watermark your photos on export? Don’t feel bad if you didn’t; a lot of people don’t know it’s there. It’s a feature that has remained essentially unchanged since v.1, and to be honest it’s not that straight forward. It appears simple enough, but can do strange and confusing things on export.

I’ve been using essentially the same watermark for years (I just kept changing the year on it) and probably just got lucky in making one that worked so long ago! So I decided that once and for all, I’d figure out what is and isn’t happening in Aperture when you choose to watermark your images.

Also, one of the frustrations for many is that you need to create the actual watermark file outside of Aperture—and frankly, not everyone owns Photoshop. So part of this adventure was to find a way to create a watermark file for cheap, or even better, for free.

I succeeded.

The Easy Part

To enable watermarking, all you have to do is open the Export presets, and turn on watermarking for one of the presets, and add a PNG or PSD file to it. That’s it. Of course, it’s not really that easy, but here’s where the work is done.

The Image Export settings in Aperture 3 reveal the Watermark options

So really, all you should need to do is choose an image, decide where to put it, and off you go. But notice that little Scale Watermark option? Bizarre behavior. What opacity works best? What kind of file works best? All of this and more is what we’re gonna cover here.

Share
This book was written for the budding photographer, the proud new owner of a Canon dSLR, or the dSLR user who’s never gotten that dial on top of their camera out of the fully automatic, “green square” mode. If you’re ready to step up your game, this book’s for you.
$9.97
Share

Importing Your Photos (part 1)

Live Training Session 001

The very first “Live Training” begins to explore the extensive import window in Aperture 3.

Duration: 01:03 hr
Included with membership
Share

A User Tip—Now a Podcast!

PhotoJoseph's picture
February 27, 2011 - 4:20pm

Reader Kenneth Lim wrote a great tip he called the “Reverse” Vibrancy Slider today, and I loved it so much I made a video of it. Don’t forget about the User Tips area, and be sure to post your favorite tips, too. Maybe I’ll make yours into a video as well!

Check it out here…

Share

The ApertureExpert Podcast—It’s Here!

PhotoJoseph's picture
February 25, 2011 - 8:00am

The ApertureExpert Podcast is not a traditional podcast; we’re not on a weekly schedule, nor is it an interview show. It’s simply a visual version of the tips that are posted on the main ApertureExpert Tips page (that’s this one).

These new podcasts allows you to read a tip, watch a tip, or do both—whatever suits your nature. And best of all, it’s all free!

Share

Pages

You may login with either your assigned username or your e-mail address.
Passwords are case-sensitive - Forgot your password?
randomness