Understanding Luminance vs RGB in Auto Levels & Curves, and Assigning Keyboard Shortcuts in Aperture 3

Aperture 3 is full of fantastic Adjustments that you can apply to your images. It’s also full of fantastic keyboard shortcuts. And better still, you can make your own keyboard shortcuts for nearly any command that you like. But what happens when there’s no command to apply a keyboard shortcut to? Why, you make one, of course!
In this tutorial, we’ll look first at understanding auto Levels and auto Curves, then at creating Adjustment Presets for them, and finally at applying Keyboard Commands (shortcuts) to the lot of them. Let’s get started!
Understanding Luminance vs RGB in Auto Levels & Curves
What’s the difference between Auto Luminance and Auto RGB? When you click an Auto button, the Black (In) and White (Out) points are set to the first instances of data on the histogram—the points are contracted to touch the beginning and end of the histogram mountain. This is easiest to see on a severely under- or over-exposed image, where the histogram may begin or end well away from the “wall” (the edges of the display area, which are displayed as 0.00 and 1.00 in Aperture). When you click an Auto button, the Black and White point lines will move automatically to the beginning and end of the histogram.
When you choose Auto Luminance, the Black and White points are moved to meet the Luminance histogram. However if you select Auto RGB, the Black and White points are moved independently for each of the Red, Green and Blue channels. The easiest way to see this is after applying Auto RGB, select the Red, then Green, then Blue channels from the Channel drop-down (this applies to both Levels and Curves) and see how the histogram—and the Black and White points—are different in each one.
There’s actually a bit of clipping that happens when you apply an Auto adjustment in Aperture. If you go to the Preferences… > Advanced you will see Auto adjustment Black Clip and White Clip. By default these are set to 0.10%. Typically it’s acceptable, even desirable, to clip the tiniest bit off the top and bottom end of the whites and blacks in the image, in exchange for a richer, brighter photograph. Imagine an image that’s relatively dark but has a specular highlight in it. That highlight is probably peaking way beyond the top of White in the histogram, and if you don’t clip it, that will remain the whitest white in the image. But if you cut that off, the “new” whitest white will likely be something that was originally a bit darker—now brought up to white, and brightening the entire image. Go ahead and set these Clip numbers to 0.00% and try the Auto button again. It’s quite likely that you won’t see the Black and White points move at all. Now set it to 10.0% (the maximum), and see how much it clips. Be sure to set it back to 0.10% when you’re done, which is a good, safe number for most users.
So how do you choose which to use; Auto Luminance or RGB? You try them both. You typically won’t know which will give a more desirable result until you try them. Auto RGB will almost certainly shift the colors of your image; Auto Luminance will not. However the color shift may be pleasing to you, resulting in something more in-line with what you had in mind.
The only way to know which is “best” is to try both. The presets and corresponding keyboard shortcuts we’re about to make will allow you to try both Auto Luminance and Auto RGB for both Levels and Curves with just a few clicks!
Building Auto Levels & Auto Curves Adjustment Presets
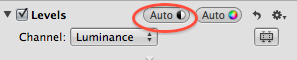
Select any photo in your Library (it doesn’t matter which) and from the Adjustments tab, scroll down to Levels and click the Auto-Luminance button.
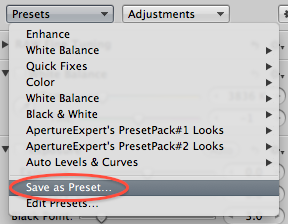
Next, save it as a Preset. To do that, go to the Presets menu (in the Adjustments tab), and select Save As Preset…
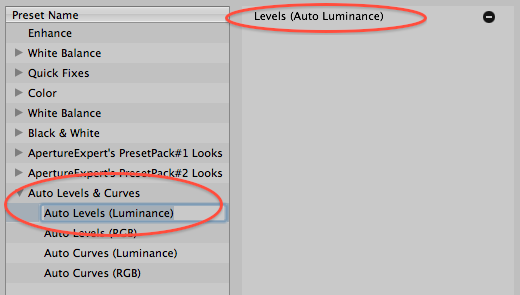
In the Adjustment Presets window, name the new preset appropriately. Notice here I’ve also created a Preset Group (using the Gear menu at the bottom of the Adjustment Presets window), and named it “Auto Levels & Curves”. I named this first preset “Auto Levels (Luminance)”. Verify that you are in fact creating an Auto preset by looking at the adjustments listed on the right; it should say “Auto Luminance” now.
Reset the image adjustments on your sample image, and repeat this process three more times, for the Levels (Auto RGB), then Curves (Auto Luminance) and Curves (Auto RGB). Each time save the preset as outlined above, naming them appropriately.

Assigning Keyboard Shortcuts to Your Presets
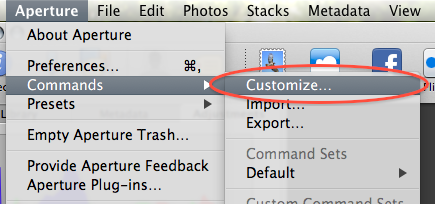
Now that you have four new presets built, it’s time to add keyboard shortcuts to them. To modify the keyboard shortcuts in Aperture, go to the menu Aperture > Commands > Customize…
That will open the Keyboard Command Editor, which allows you to modify any existing keyboard shortcut in Aperture, or to add new ones.
NOTE: If you’ve never customized your keyboard before, it will ask you to duplicate the existing set and name it. You can have multiple keyboard command sets in Aperture, and switch between them at will!
;)
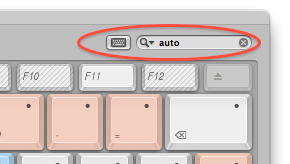
First, find the commands you just created. If you named them like I did, then searching for “auto” will reveal them all.
Once you’ve located your four new commands, how do you decide what keyboard shortcut to apply? I looked around for enough space for four new shortcuts that made some sense (figuring the more sensible they were, the easier they would be to remember later), and came up with Shift-L for Auto Levels (Luminance), Shift-; for Auto Levels (RGB) (because it’s immediately to the right of the L key), then Shift-C for Auto Curves (Luminance), and Shift-V for Auto Curves (RGB) (again V because it’s to the immediate right of C).
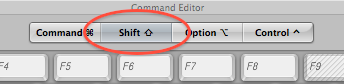
To assign them, first click the Shift button on the Command Editor to reveal all Shift- keyboard combinations free and in use. You should see that Shift-L, ;, C, and V are all empty.
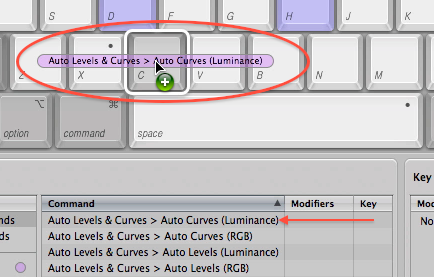
Next, start dragging commands to their appropriate key on the keyboard. In this screenshot below, I’m dragging Auto Curves (Luminance) to the C key.
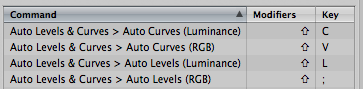
Once you’ve completed all four, you should see them listed in the Command list, like so:
Using Your New Presets
All four of these new presets can be viewed, along with their instant previews, from the Preset menu. Notice however that (at least on my system; please let me know if you see otherwise) the newly assigned keyboard commands don’t show up on the list. But go ahead and tap them; they do apply.
;)
You might be wondering why bother building keyboard shortcuts for these when you can see the instant preview from this list, and could compare them here before applying one. While that’s somewhat the case, the truth is that these previews are quite small, and the differences between the effects quite subtle, so seeing them on the preview is unlikely to be sufficient. And of course, you may find that there’s one command you regularly use, so having a keyboard shortcut applied to that can only speed things up.
Let me know what you think in the comments, and if you have any other always-used presets that might merit a keyboard shortcut applied to it!
More like this
- Store
- Forum
- Forum
- Forum
- Forum
Comments
on October 2, 2010 - 1:41am
Joseph,
Thanks for this tip. I just created these presets and this will be a time saver once I get used to the keyboard shortcuts. I have one comment though on the steps needed to create the keyboard shortcuts. You first have to create a new keyboard shortcut set in order to make changes. I had not made any changes and was still using the “default” set and I got an error saying I couldn’t modify the default set. So I just made a copy of the default and then your steps worked as written.
The keyboard shortcuts don’t show up in the preset menu for me either but they still work.
Tom
Thomas
on October 2, 2010 - 5:08pm
Thanks Tom, I updated the post!
@PhotoJoseph
— Have you signed up for the mailing list?
on October 6, 2010 - 10:30am
Joseph,
Thanks for the great post. I love to know more about how the auto buttons described here compare to those the exposure brick’s auto button. It seems exposure’s auto is very different.
Thanks!
Bob
on October 30, 2010 - 11:41am
Is there a way to make a shortcut to make the preset replace existing adjustments? That way, it would be faster to go from preset to preset without using apple-z to undo the previous adjustment. The existing option to do that normally is to hold down option while clicking the preset, but not sure if it’s possible using a keyboard shortcut.
on October 30, 2010 - 10:02pm
I don’t believe there is, sorry.
@PhotoJoseph
— Have you signed up for the mailing list?
on October 29, 2011 - 3:51pm
For me, auto-levels with the clipping set to zero still does a lot of clipping. Any idea why that is? I don’t see the same behavior with auto-curves.
on November 2, 2011 - 4:10am
Mark,
Are you talking about using auto-levels from the presets built as described in this article, or just in general?
If in general, please start a conversation in the forum and we can address it there.
Thanks
-Joseph @ApertureExpert
@PhotoJoseph
— Have you signed up for the mailing list?
on November 5, 2011 - 8:58pm
Joseph, I’m still a little confused. After watching your curves training session 011, I wonder how the above mentioned curves presets work if you add the option to change between luminance and RGB under Greyscale in the gear menu. That would give you four curves options instead of two. Then, I still don’t understand the fine differences between these four options. After watching your lesson 011, I am now mainly interested in optimizing my work with curves (and less in levels). Can you explain further? Thanks for the great website !!!
on November 6, 2011 - 3:33pm
Ulli,
When I wrote this post, I wasn’t yet aware of the option under the gear menu, which is why it isn’t discussed here. This post is over a year old; it’s entirely possible it wasn’t even there at the time.
However I recently looked at this myself, and while I didn’t look too closely, what I thought I saw on first glance was that the gear-menu selection of RGB or Luminance is not saved as part of the preset, and actually is just sticky (meaning it stays where it was last selected, regardless).
If you have a chance to try it (make new presets with each option enabled, and see if it applies those selections), do let us know.
-Joseph @ApertureExpert
@PhotoJoseph
— Have you signed up for the mailing list?
on November 6, 2011 - 4:53pm
Thanks Joseph, will do so and report back.
on April 2, 2021 - 1:12am
Hello,
I’m looking for any piece of information that would clarify the explanation given in Aperture’s Help concerning the “Auto RGB Separate” option. Apple says it adjusts tonality by evaluating each channel separately.
Also, touching on the other Auto option: “Total luminance”. Apple explains it adjusts tonality by summing up the luminance values of all channels. Does that mean it adds the sum of the separate luminances to the initial luminance of the image?