Digital Camera RAW Update 4.08 for Aperture and iPhoto, with Leica M Monochrom Support!

It’s time for another Camera RAW update, and this one includes one that a select few people have been very, very anxious for — the Leica M Monochrom.

Digital Camera RAW Compatibility Update 4.08
As always, just run Software Update or launch the App Store to get the latest software, or you can also get to it at support.apple.com/kb/DL1674.
Here’s the list of newly supported cameras.
- Canon EOS 70D
- Fujifilm X-M1
- Leica M
- Leica M Monochrom
- Nikon COOLPIX P330
- Pentax 645D
- Sony Cyber-shot DSC-RX1R
- Sony Cyber-shot DSC-RX100 II
The Leica M Monochrom is that camera you’ve heard about that only shoots in B&W, and I have to admit that I’ve had one in my hands for a few days. The timing was complete coincidence, and I’d been shooting RAW+JPEG with the camera, but boy am I excited to see how the in-camera JPEG (which is just amazing) compares to the RAW decode by Aperture. The RAW decode by Lightroom is definitely good, although the camera adds sharpening which is superb to the JPEG file. That means the Lightroom decode actually looks a little soft.
So here we go… the very first photos I shot with the Monochrom were of my assistant Stephen, and I’ll start with the in-camera JPEG. Be sure to click the image to see the full size photo in a new window and zoom to 100% (feel free to download it to have a closer look). These images were shot through the Leica Summicron-M 50mm f/2.
Leica M Monochrom in-camera JPEG
Here’s what the camera delivered as a JPEG, so it has already sharpened the file and adjusted the curve to create a dynamic looking photo. This image looks absolutely fantastic.
 Leica Monochrom in-camera JPEG. Sharpening is automatically applied and the image looks fantastic.
Leica M Monochrom Lightroom-decoded DNG
Next let’s look at the DNG that was sent to Lightroom for conversion, then exported as a 16-bit TIF and reimported into Aperture. Needless to say this workflow sucks, and ironically I was in the middle of writing up the most “efficient” way to do this. I’ll finish the post eventually as it’s useful for any non-Aperture supported format that Adobe does support, but anyway… here’s the result of DNG to Lightroom to Aperture.
 Leica Monochrom DNG decoded by Lightroom (then saved as TIF and brought back to Aperture)
The image is clearly flatter, which is expected as the in-camera JPEG conversion is typically going to punch the image up a bit. RAW is by nature flat, designed such so that you can play with it in post and do whatever you like. That said, I’m not sure I’d call the JPEG superior. While this RAW conversion may be less contrasty, you can also see more details in the shadows, and his face is brighter. I’d still crush the blacks a bit for my personal taste, but the image is very clean. Also (and you’ll see this side by side in a moment) there is no sharpening (or less sharpening) applied here, so the image looks softer at 100%.
Leica M Monochrom Aperture-decoded DNG
Now for the latest addition, brought to you by the Digital Camera RAW Update version 4.08, and the letter M.
 Leica Monochrom DNG decoded by Aperture
Aperture’s conversion is more contrasty, and personally is closer to how I’d treat the final file. I do feel it’s a bit hot on the face, and I’d probably scale that back a bit. I could easily swing either way on which is a more useful starting point (between Aperture and Lightroom), since both will need to be tweaked a little, but I’m leaning towards Aperture on this one. I checked closely and the face is NOT blown out, but Aperture has definitely stretched the limits.
Of course this is just one single image, so you may see very different results on other photos taken with this camera.
Side by side comparisons
Now let’s see them side by side. These are Aperture screenshots, first zoomed out, then the next two the photo is zoomed to 100% and panned to different parts of the image. Be sure to click on the screenshot below to see it at 100%, and pay close attention to the sharpness (again the JPEG will be the sharpest as it’s been sharpened in-camera), and the details in the highlights and shadows.
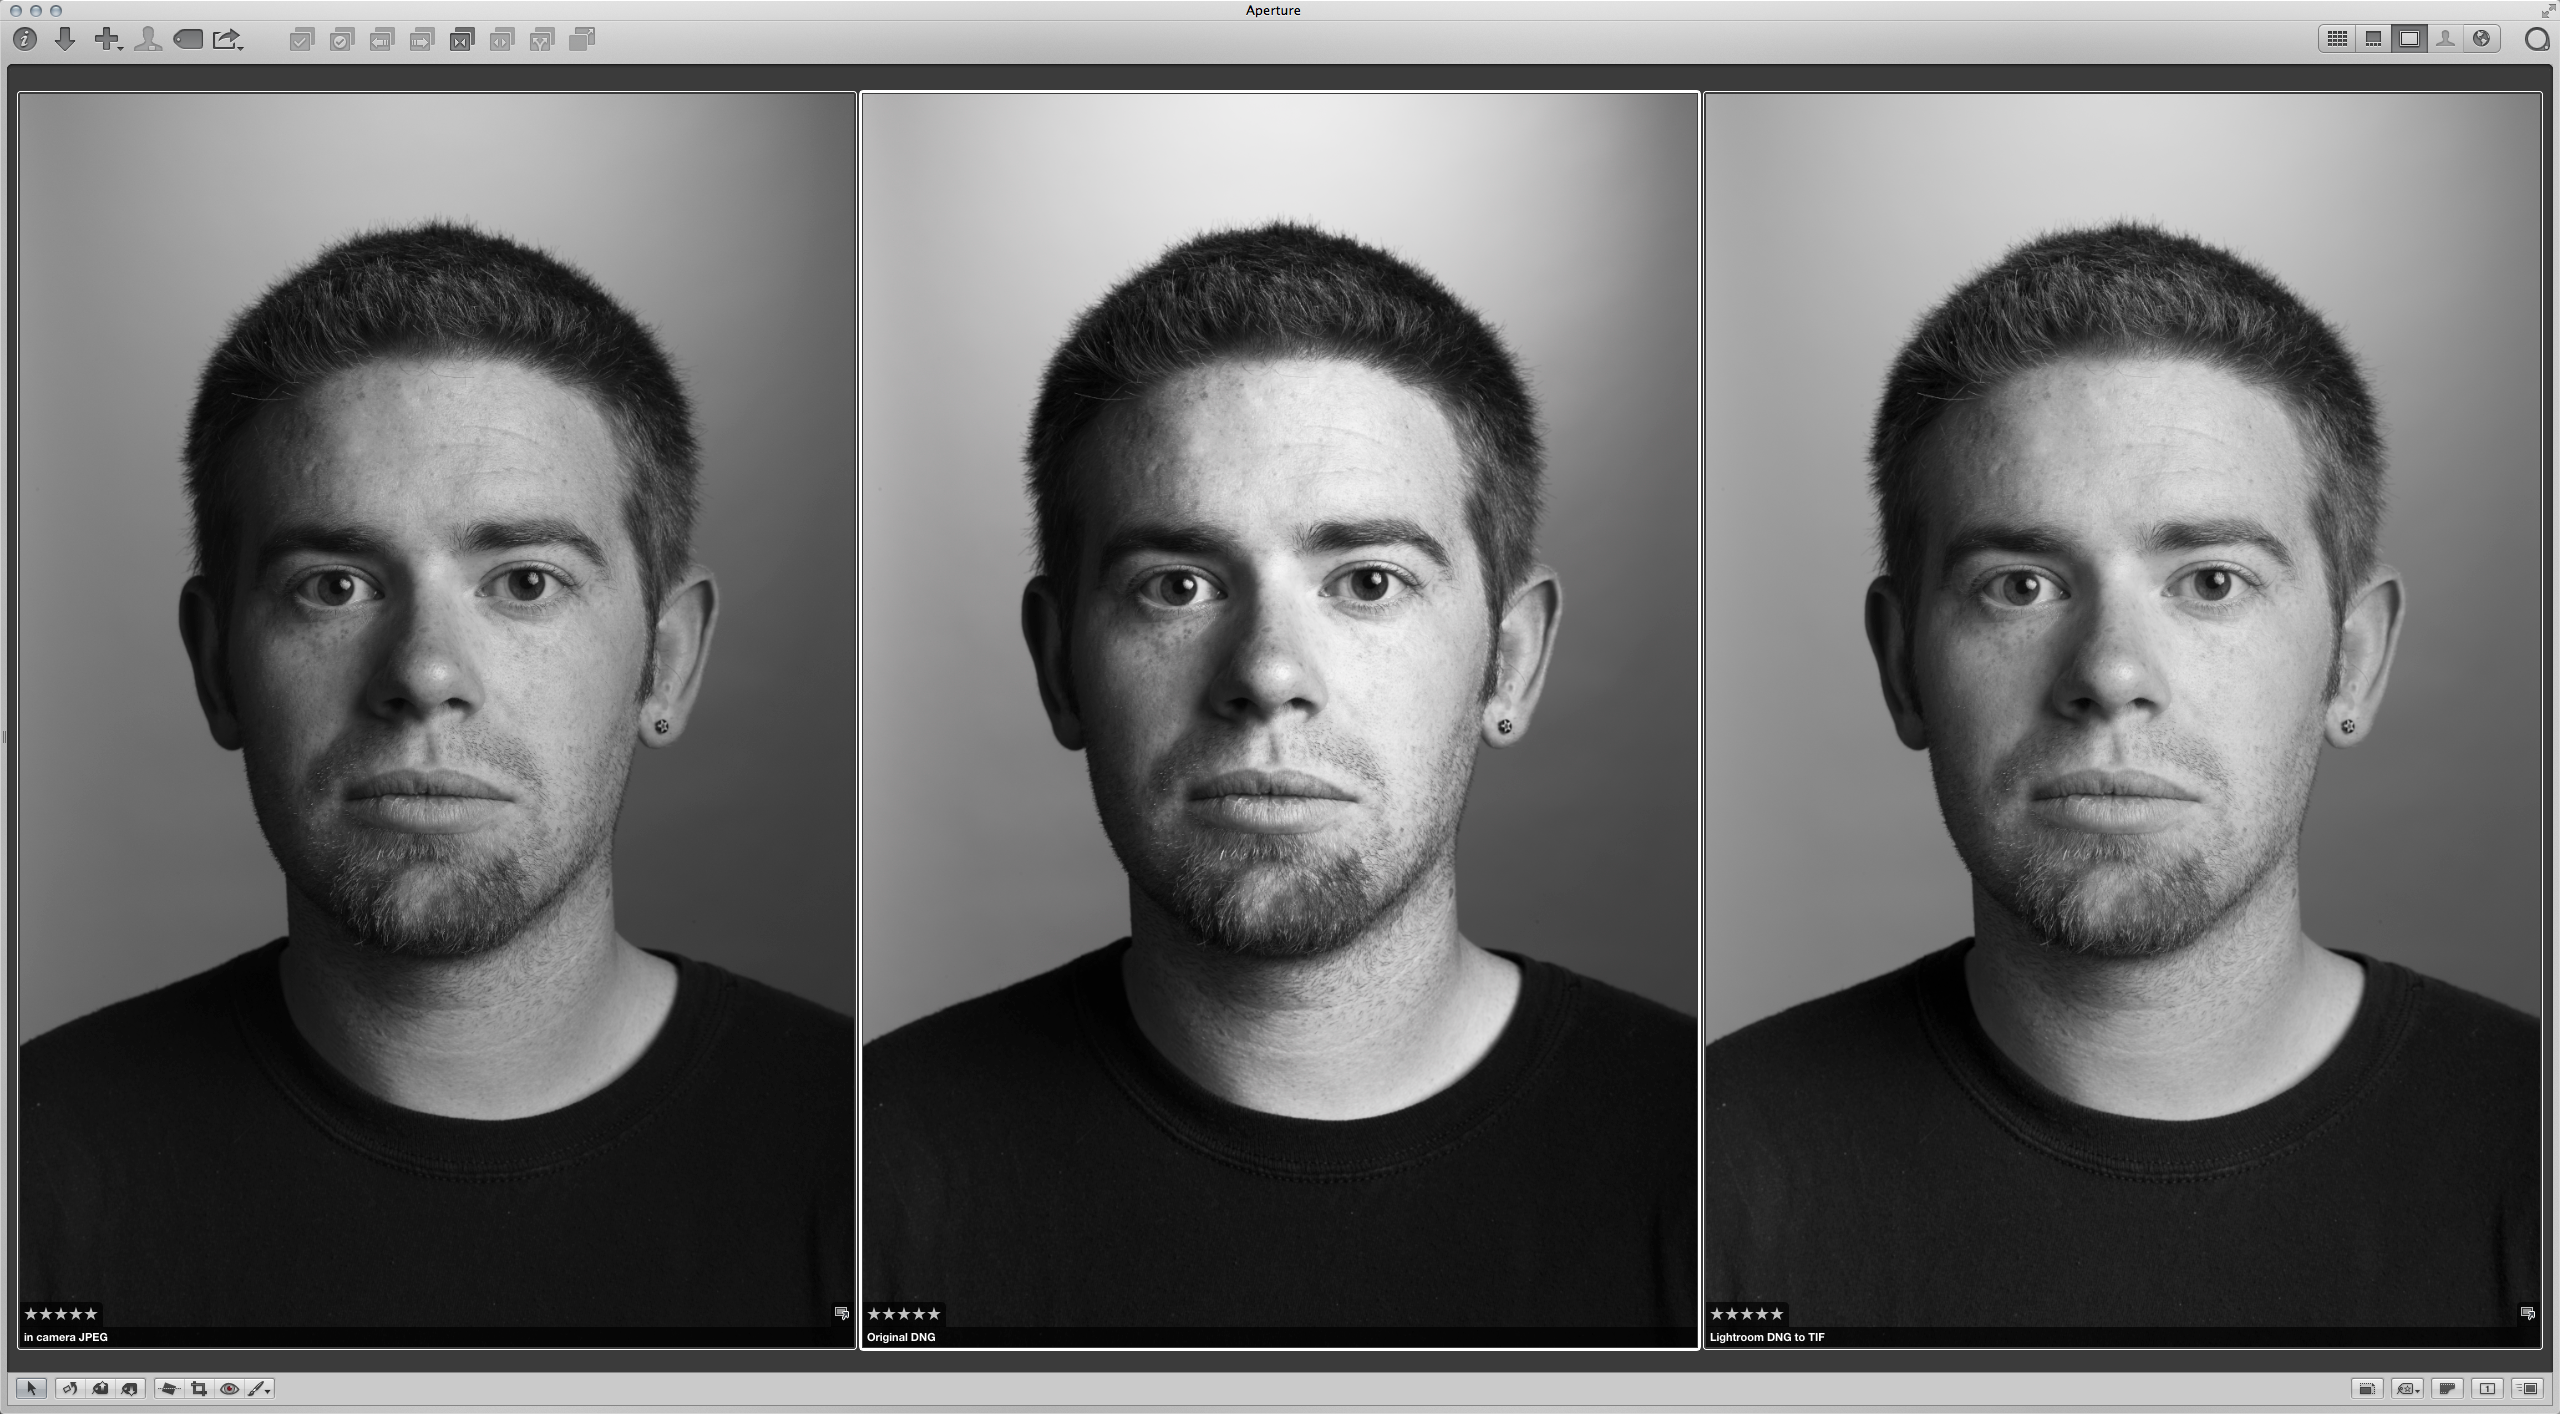 In-camera JPEG on the left, Aperture converted DNG in the middle, and Lightroom DNG on the right
Next in the first close-up, you can really see the sharpness difference between the JPEG and the two DNG conversions. The eyelashes and eyebrows show the sharpening the most clearly. I think it’s remarkable how sharp the JPEG is here. You can certainly add sharpness to the DNG files as well, but we’re just seeing them straight out of box here. You can also see a dramatic difference between all three in the brightness. Look at the skin between his eye and nose, and that’s where Aperture makes it the brightest. Look closely though and you’ll see no detail is lost.
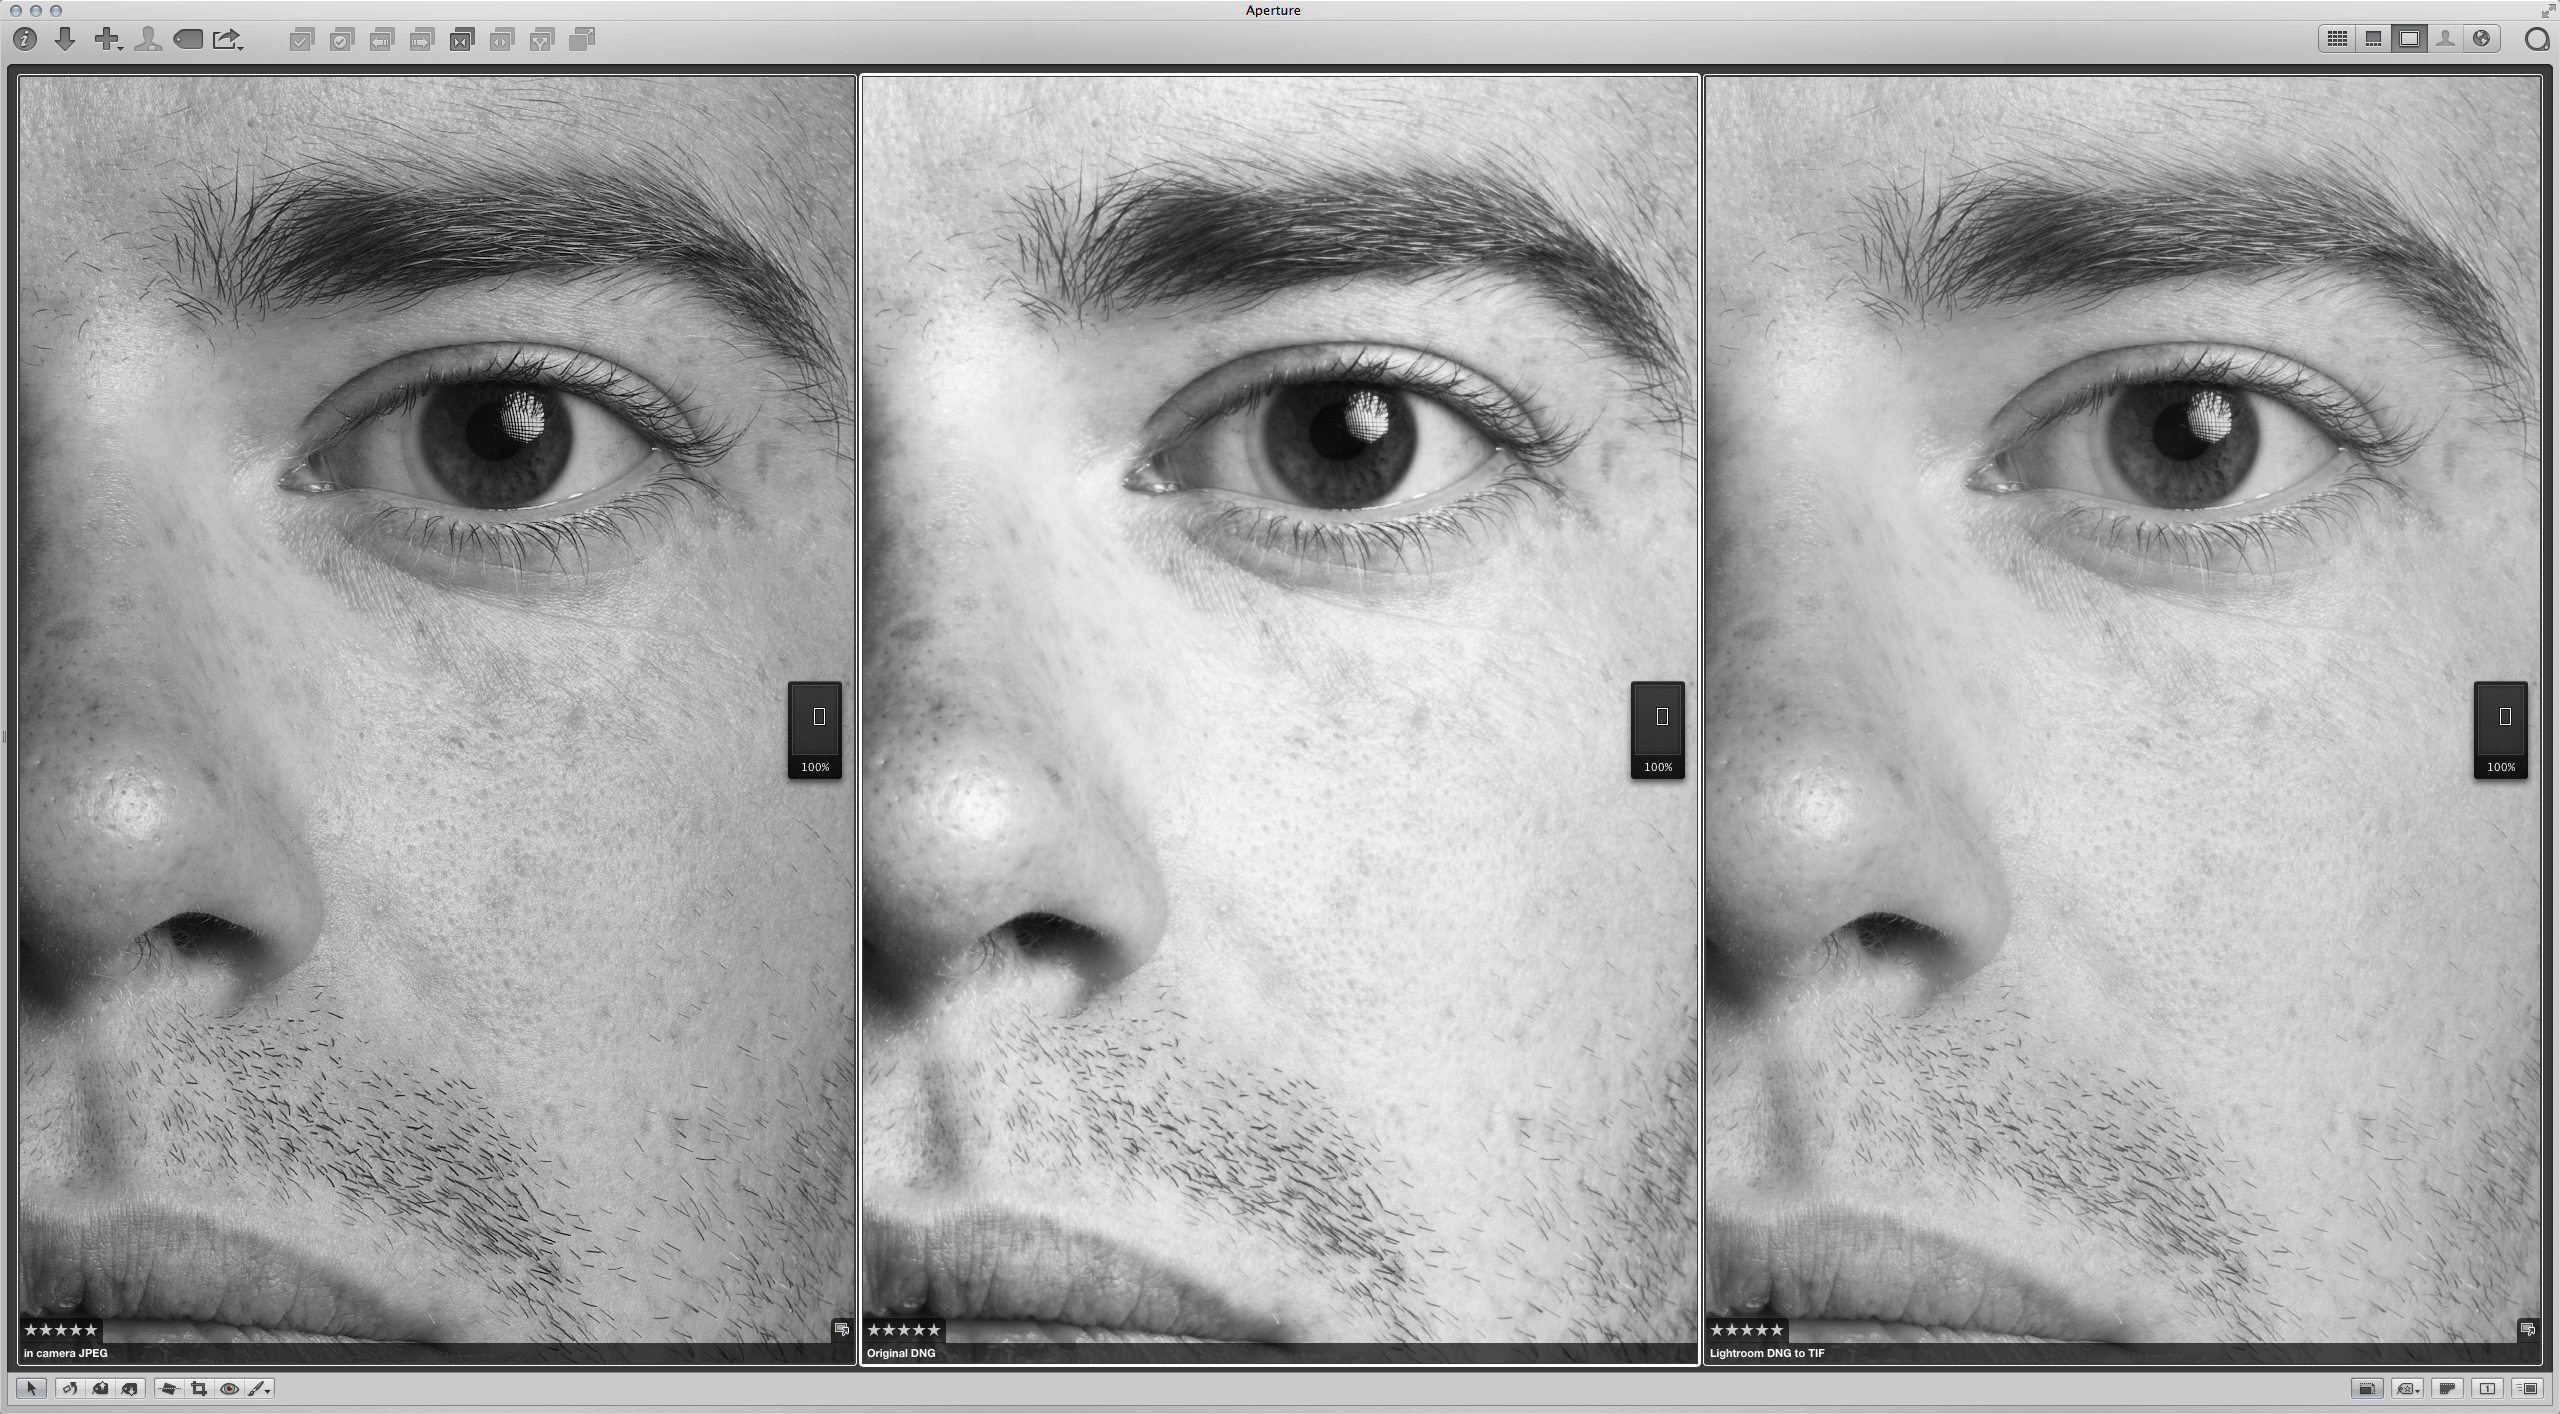 In-camera JPEG on the left, Aperture converted DNG in the middle, and Lightroom DNG on the right
In the second close-up, we’re looking at a shadow part of the image. Here the JPEG and the Aperture DNG are very similar, yet the Lightroom one is noticeably lighter. That shadow brightness is something I’d pull back personally, but then again I’d probably pull the highlight brightness back on the Aperture version.
 In-camera JPEG on the left, Aperture converted DNG in the middle, and Lightroom DNG on the right
Overall these are three considerably different interpertations of the same image. None are wrong, and it’s tough to say which is the “most right”, but there are obvious differences.
Whatever your opinion of the result, the important thing is… it’s finally supported!!
Missing Metadata
Curiously the lens model doesn’t show up in the Aperture metadata for either the JPEG or the DNG file. However it does show up in the TIF which was the Lightroom converted DNG. Somehow Apple is missing this data in the file; clearly it’s there as the Adobe apps are seeing it. Odd.
 On the left is the TIF from the Lightroom converted DNG. On the right is Aperture, missing important lens metadata
Still seeing unsupported images?
If you’ve updated and relaunched Aperture but are still seeing the “unsupported images” message on photos that should now be supported, select them and go to menu Photos > Reprocess Original…. That should kick it into gear.
Is your camera now supported?
Is your camera on the list? Any experiences, good or bad with this new update, let’s here about it in the comments!
More like this
- Tip
- Tip
- Tip
- Tip
- Tip
Comments
on August 24, 2013 - 4:12am
My camera is on the list - Canon 70D. Well it’s almost my camera. Shipping next week from B&H. Here’s another example of Apple shipping RAW updates for a camera before the general public can even get their hands on it. (They’ve also done this for some of the Digital Rebels). I know there’s exceptions, but Apple has certainly stepped up their game in adding RAW support for new cameras.
I thought I would need to shoot RAW+JPEG for awhile. I’m looking forward to trying it out next week with the 70D.
Thomas
on August 24, 2013 - 3:38pm
Joseph,
Thank you for the write up and comparison. I am very happy to see this camera finally being supported. Got mine in December 2012 and have over 5000 images shot RAW+JPG. Now finally will be able to treat the images the way they deserve.
A few observations:
Try changing the Boost under the RAW Fine Tuning in Aperture. You will see a variation of contrast and dynamic range. Found that quite useful in images that appeared to have blown highlights. Then I can change Black Point and Contrast to achieve the final look I want on my photograph. I still like the way Aperture renders the image with more contrast. This is how I like when shooting film.
Regarding the lack of lens information, it seems this is a Leica problem (Leica M9 also does not provide this info). Even some versions of Lightroom could not identify the lens and then a fix was released. It appears that this info is not in the usual location on the EXIF file but rather on a comment field of some sort. I am so happy to finally have the RAW support that this is really minor for me.
Cheers
Rafael
Rafael
http://www.mydarkroom.ca
on August 25, 2013 - 8:38am
I’d second the use of the boost slider in the RFT block. It’s very useful for taming highlights. But it seems pretty rare for people to delve into it.
Andrew Macnaughton
on August 27, 2013 - 10:13pm
something fun I discovered is that if you tweak the WB with a monocrome file in Aperture, you get some potentially interesting toning effects…. obviously Aperture treats the file as an RGB file with all the channels set to the same value.
Playing with the RGB curves has a similar effect…. a sort of split toning is possible, though the histogram does start to look a bit lumpy
cheers
K