This “ATEM (mini) Tips” series of short video tutorials for your Blackmagic ATEM hardware includes tips for all users, from beginner to advanced. Scroll down to see more in the series!
This is a collection of all PhotoJoseph LIVE shows, from the PhotoJoseph YouTube channel. Additional episodes are listed below!
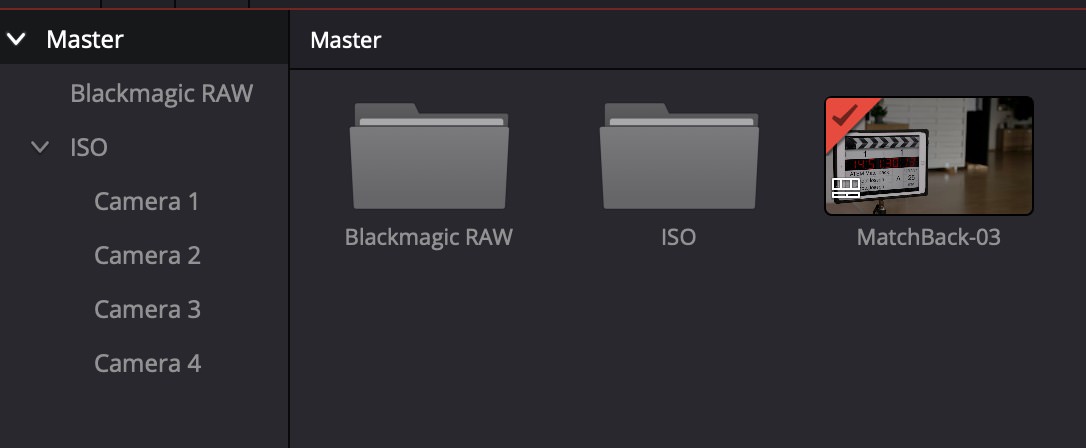
the MOST IMPORTANT ATEM VIDEO you’ll watch… how to use ANY camera original in ATEM ISO re-edits!
Photo Moment - February 21, 2024
This is real. We've found a way to replace the 1080p ISO clips from ATEM Mini/Extreme Pro ISO's DaVinci Resolve project files with the camera original clips – from ANY camera. Don't use Blackmagic cameras? No problem. This is no longer a limitation. You can now re-edit your live shows at the highest quality and resolution that your cameras can record.
With the ATEMISO models, you can record your live shows to an SSD, capturing not only the program, but also DaVinci Resolve project files and isolated video streams of each camera input for later re-editing. If you use Blackmagic cameras such as the Blackmagic Pocket Cinema Camera 4K or 6K, you can easily replace the ATEM-generated 1080p video files with camera-original 4K or 6K RAW files. This workflow is fantastic, but limited to Blackmagic cameras. Or at least, it was. Not anymore. Let me explain how…
Fellow YouTuber Alex Pettitt figured out the first part of this setup; he discovered how to convert the flat Resolve project file generated by the ATEMISO into a true multicam project. This allows you to much more easily re-edit your live show, with actual multicam clips. This was a huge discovery; as far as anyone knows, he was the first to figure this out. I then realized that from there, it was relatively trivial to replace the 1080p low resolution ATEM-generated files with full resolution camera-originals, no matter what camera they came from.
The Setup
As you’ll see in the video tutorial, I'm using a straightforward setup with the ATEM Mini Pro ISO and three cameras. This will work with any number of cameras that your ATEM supports. Do ensure that your ATEM settings and your camera settings are using the same frame-rate (i.e. 29.97 or 25). You'll need a clear cue, like a clicker sound, at the beginning of each shot for easy manual synchronization later (although after I made the video I realized that you may not need that — Resolve can sync these via waveform; more on that later). Start recording in the ATEM as usual, and also start recording in each camera, and produce your show like normal. After the live show, copy the ATEM files and camera original files to your computer, and begin this seemingly complicated, but actually quick and easy, process:
Convert to multicam
This first step is what Alex figured out; this is how to convert your “flat” multicam timeline into a true multicam project, where you can easily swap camera angles during the re-edit. It sounds tedious, but it really does go quickly once you have memorized the steps.
1/ Open the ATEM-generated project file in Resolve.
Double-click the ATEM-generated project file or import it from inside Resolve. It will automatically adapt whatever your default project resolution settings are, but it’s also good to check that your project is set to the resolution of the camera original clips you’ll be working with later. In most cases, that’s going to be UHD (3840×2160). Even if you set this after you import the project, the change will ripple through where it matters.
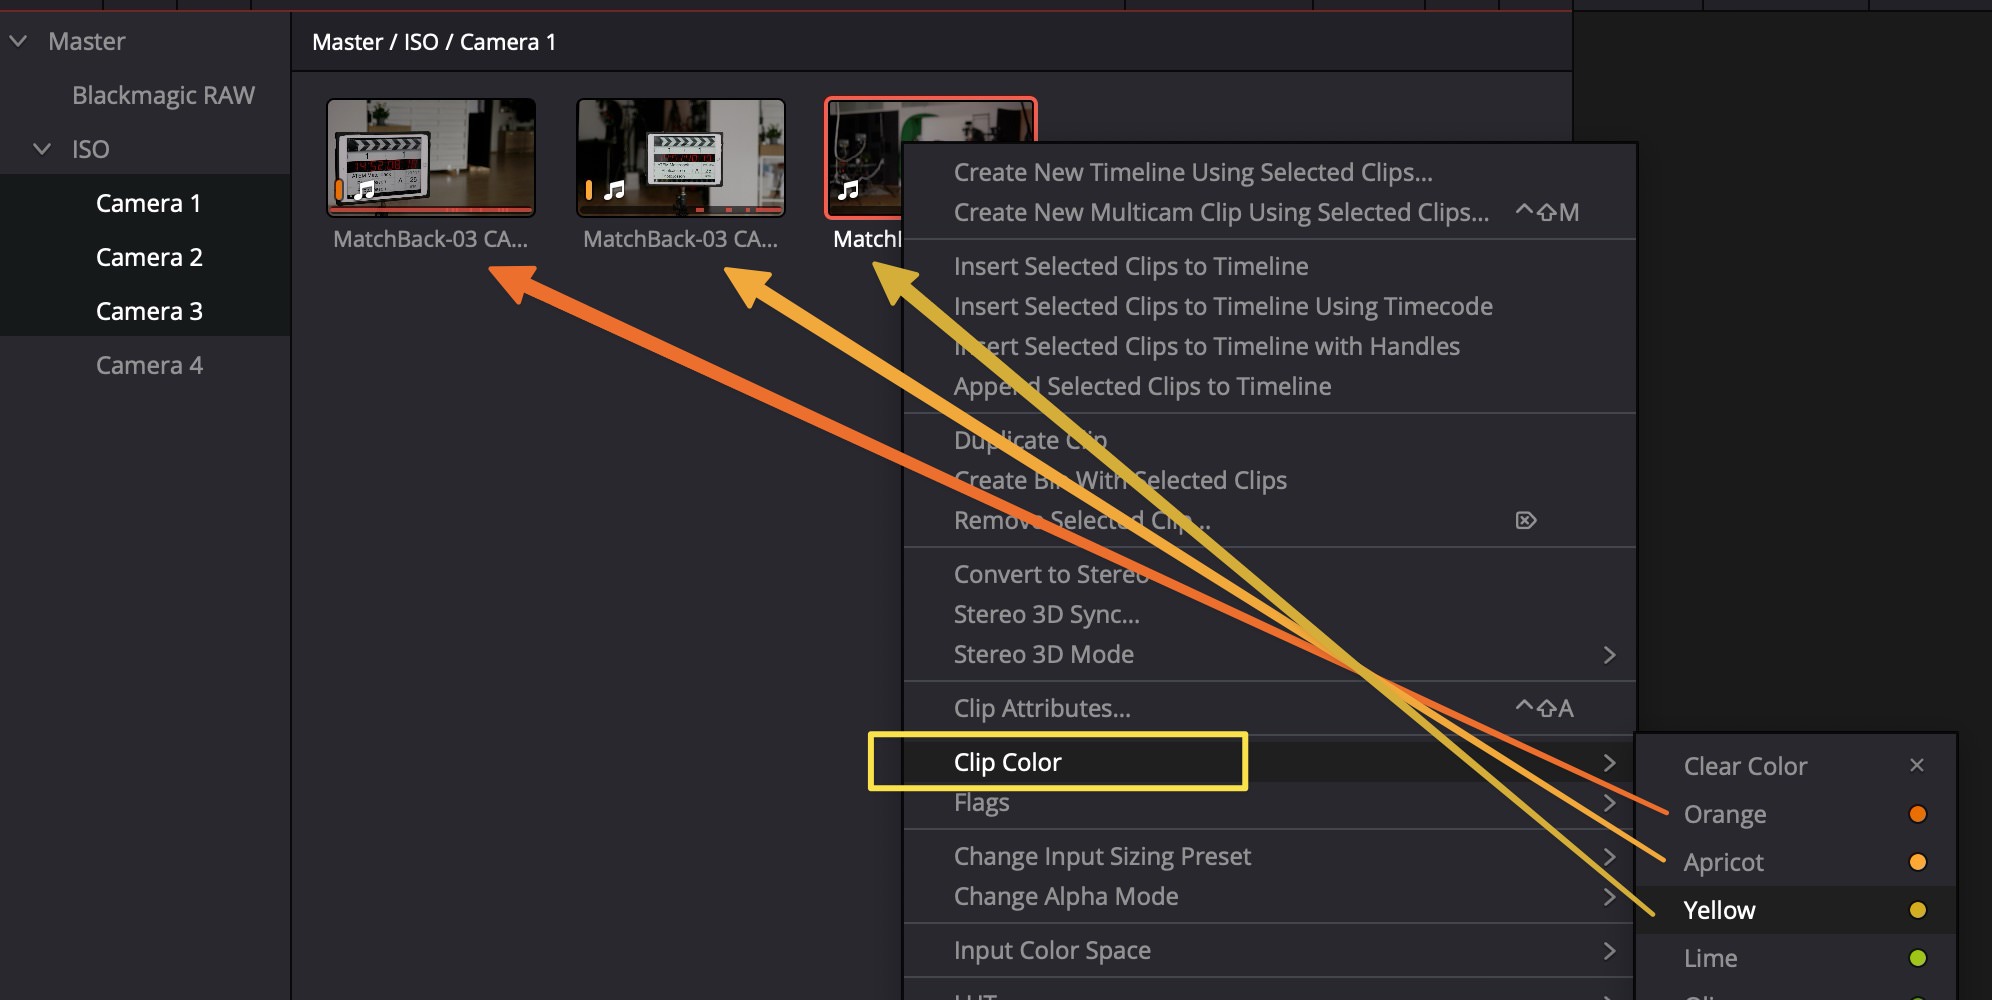
2/ Color code the ATEMISO camera clips.
Right click on each camera angle individually, and assign a color. I advise doing them in order of the color drop-down to make it easier to find them later; so CAM 1 becomes Orange, CAM 2 becomes Apricot, CAM 3 becomes Yellow, and so-on.
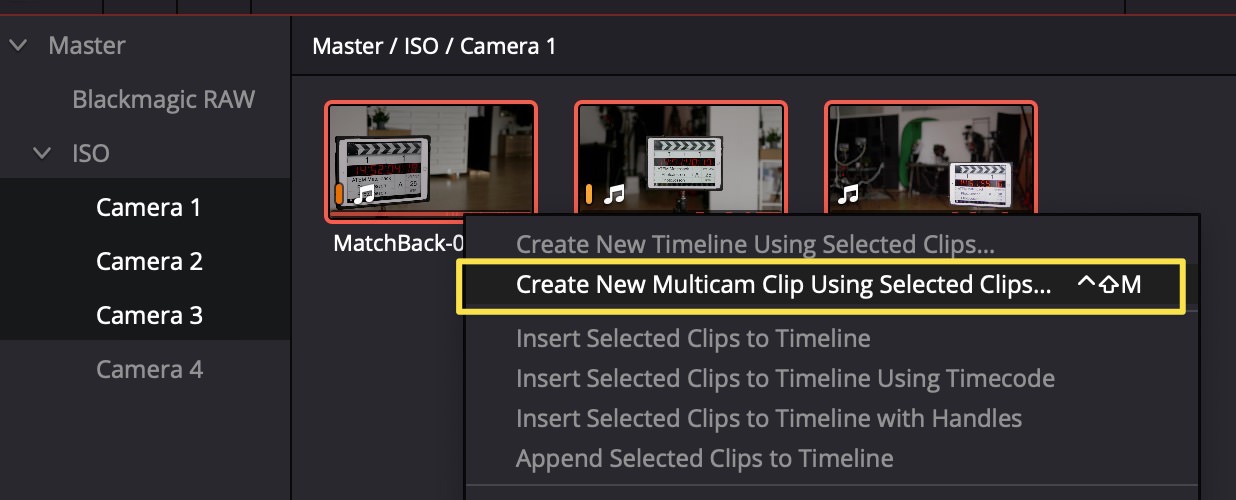
3/ Create a new multicam clip from the ATEMISO video files.
Select all the video clips at once, and choose “Create New Multicam Clip Using Selected Clips”.
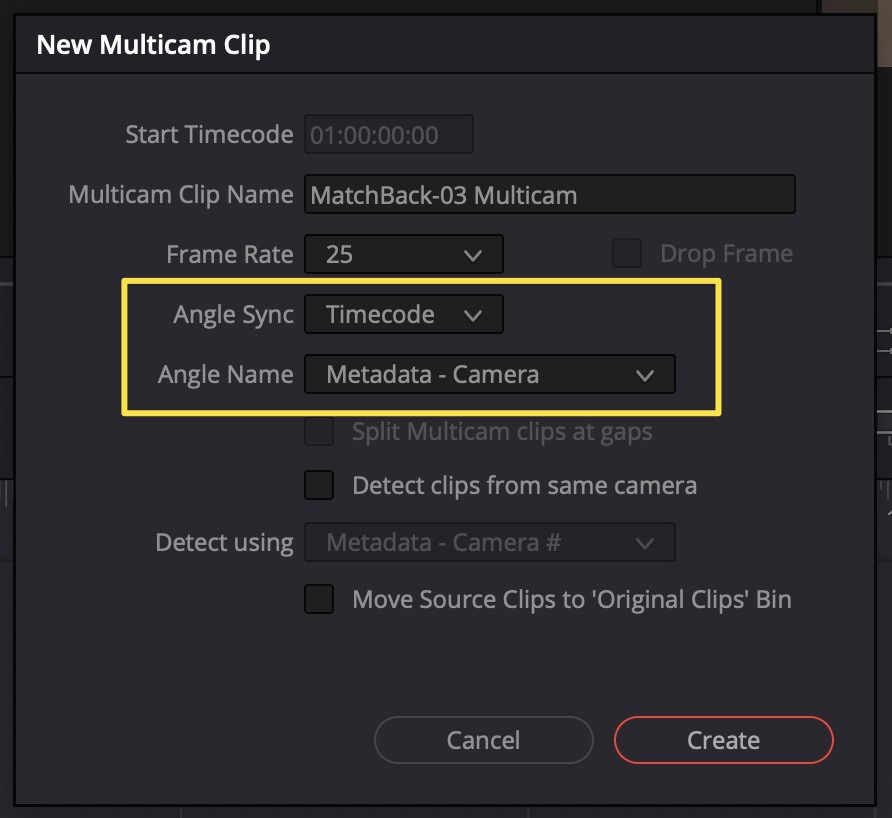
Set the Angle Sync to be based on timecode, and the Angle Name to be based on Camera name.
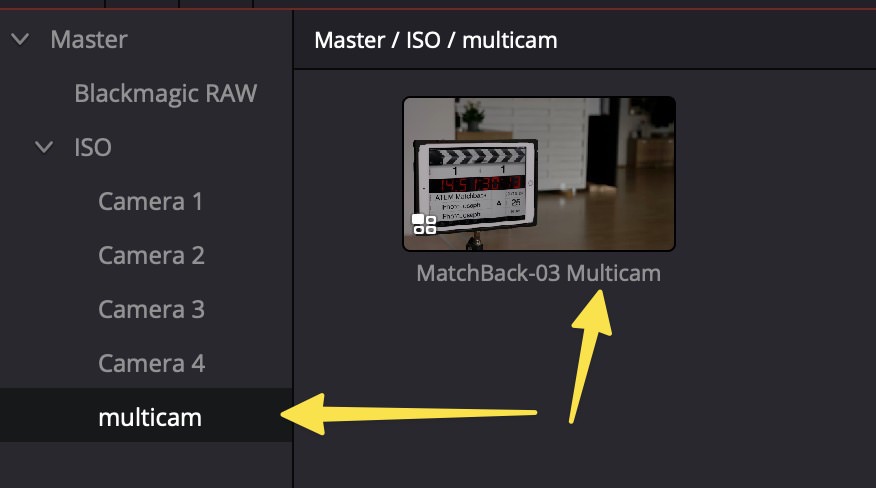
4/ Place the new multicam clip in a separate bin by itself.
Create a new bin, and name it “multicam” so you can identify it later. This is extremely important, and important that the multicam clip is the only clip in the bin.
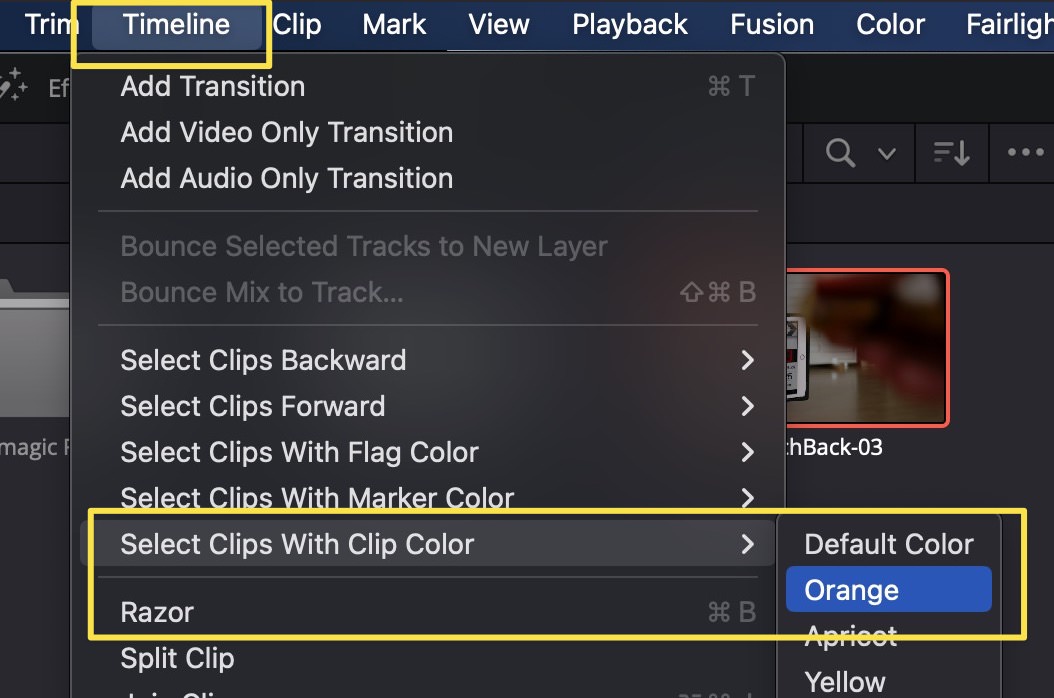
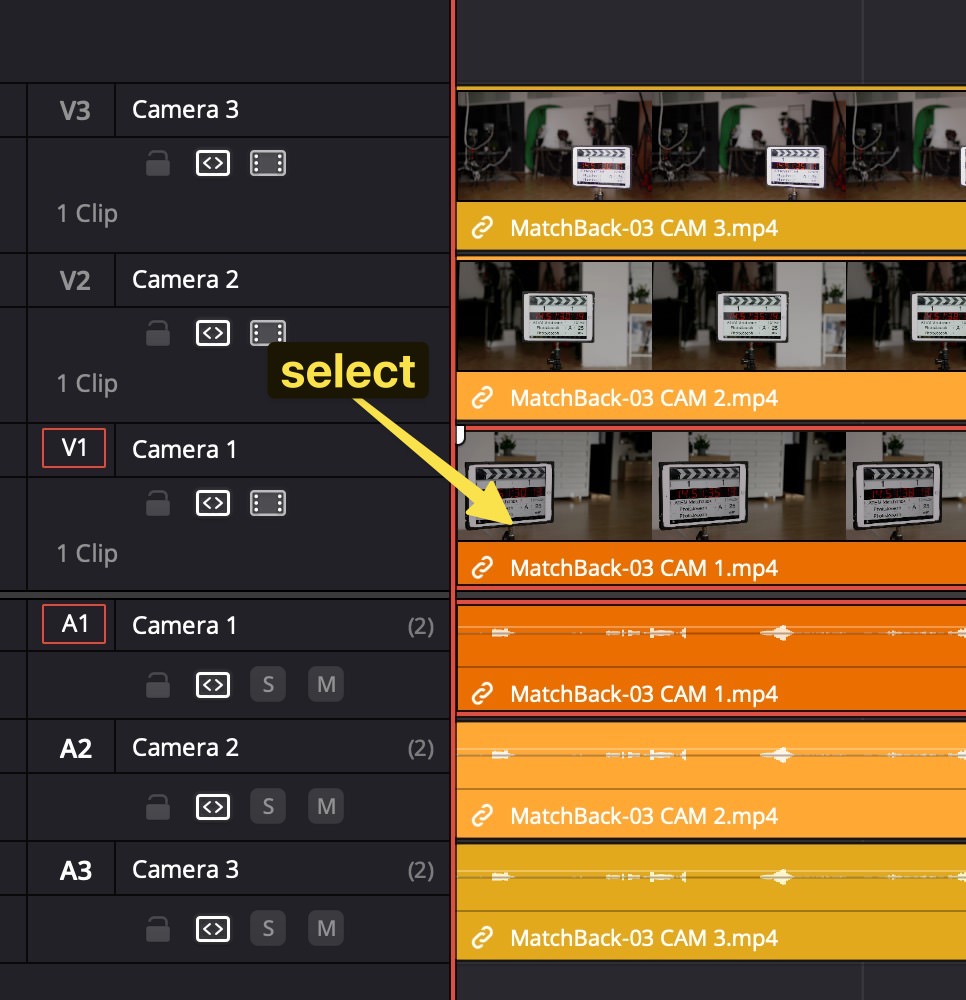
5/ On the original timeline, select the first color (Orange) clips.
Open the ATEM-generated timeline, and from the menu, choose “Timeline > Select Clips with Clip Color > Orange”.
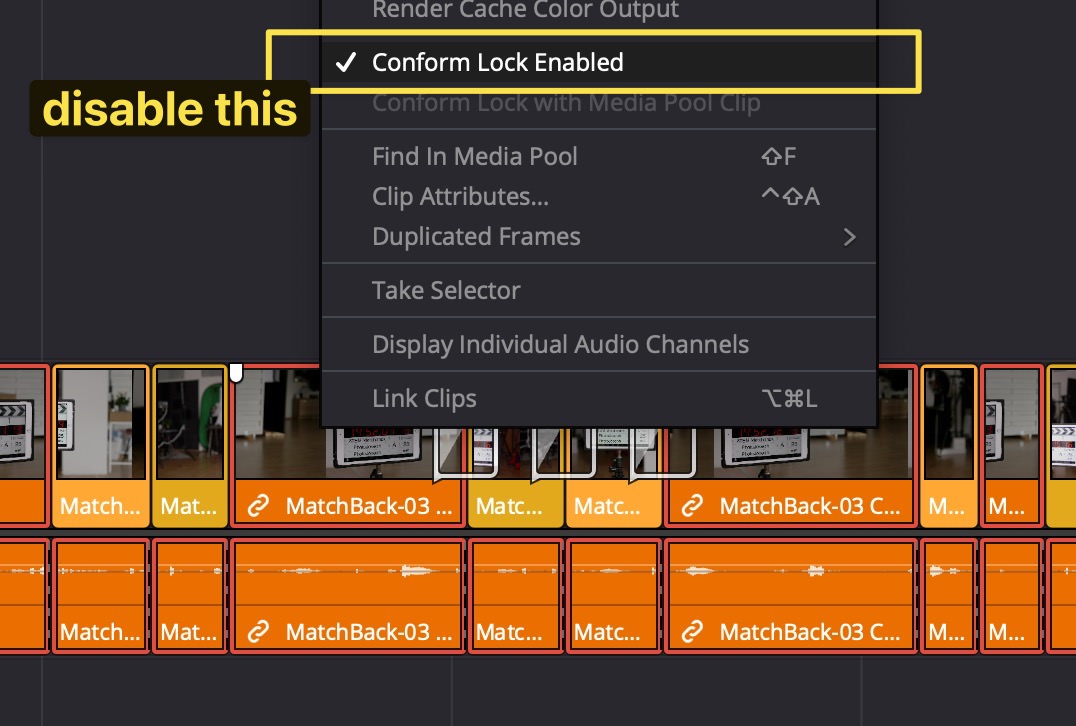
6/ Disable “Conform Lock Enabled” on the selected clips.
Right click on any selected (Orange) clip in the timeline, and choose “Conform Lock Enabled” to disable it.
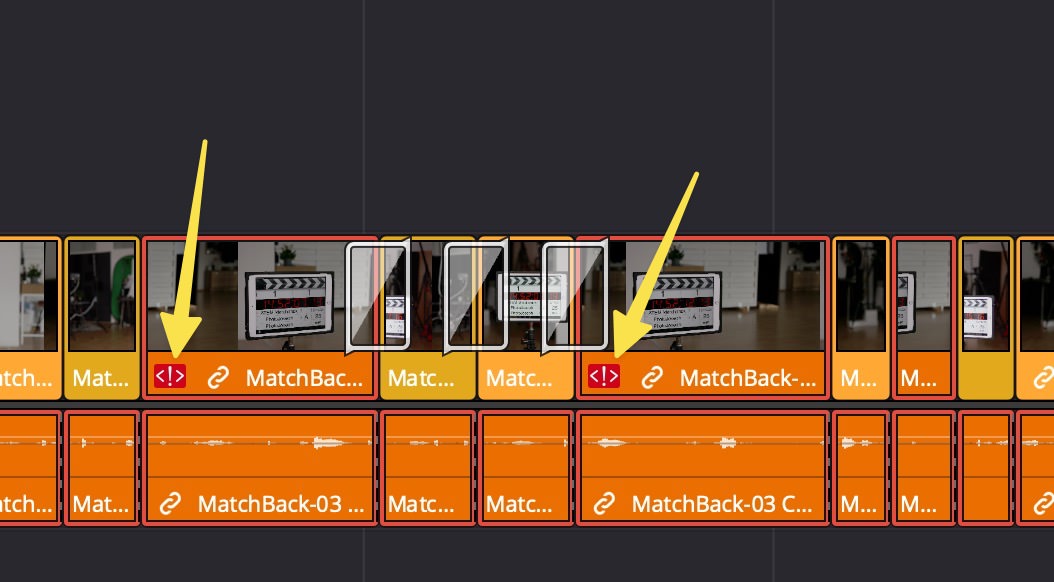
A red <!> warning symbol will appear on all the orange clips.
7/ Set the multicam clip to Camera 1.
Right-click on the multicam clip in the Media Pool, and choose “Switch Multicam Video Angle > Camera 1” (it should already be there). Verify that audio is also set to Camera 1; you won’t need to change that again.
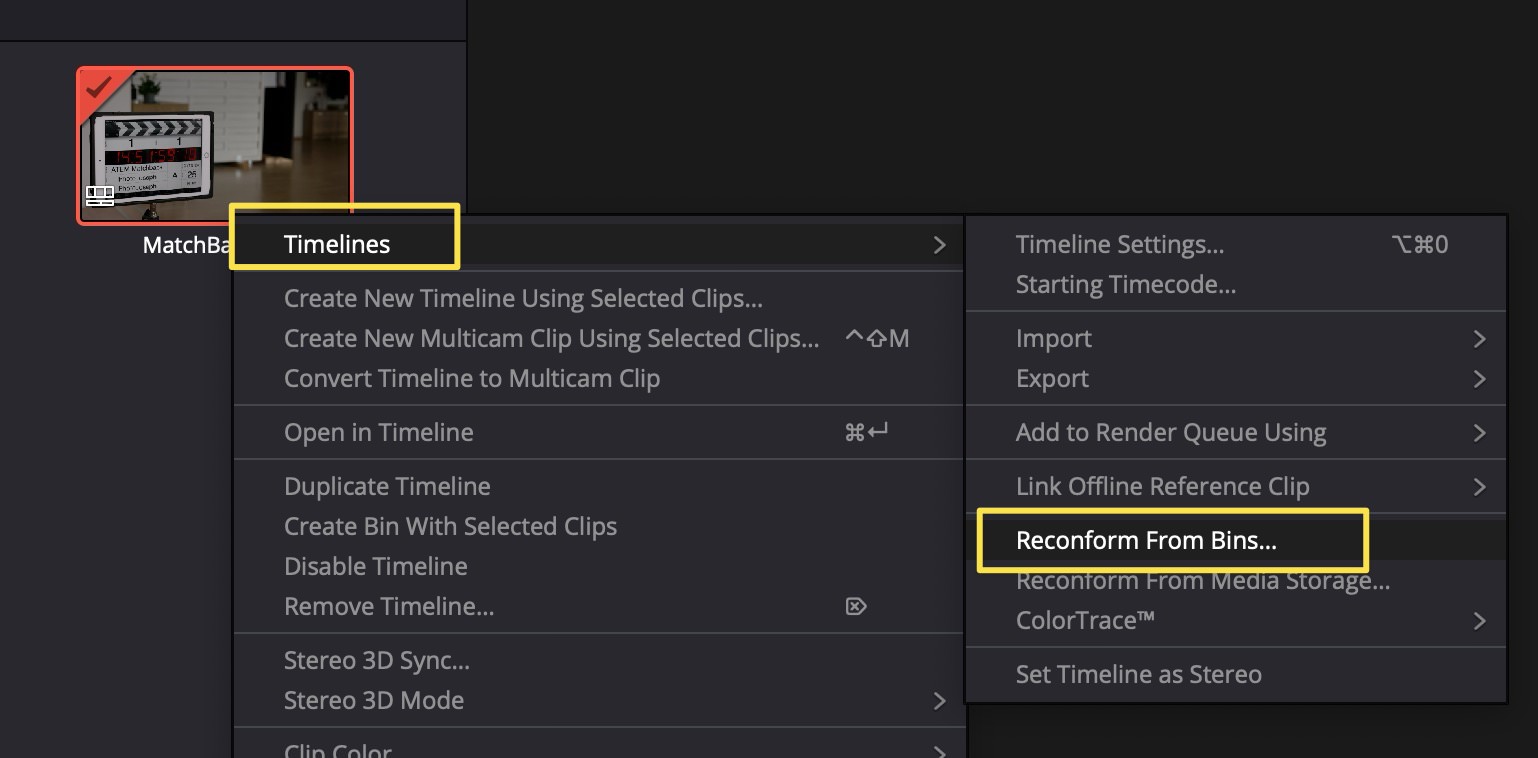
8/ Reconform the timeline from the multicam bin.
This is where the magic happens! Right-click on the timeline the Media Pool (the timeline icon; not in the open timeline itself), and choose “Timelines > Reconform from Bins”.
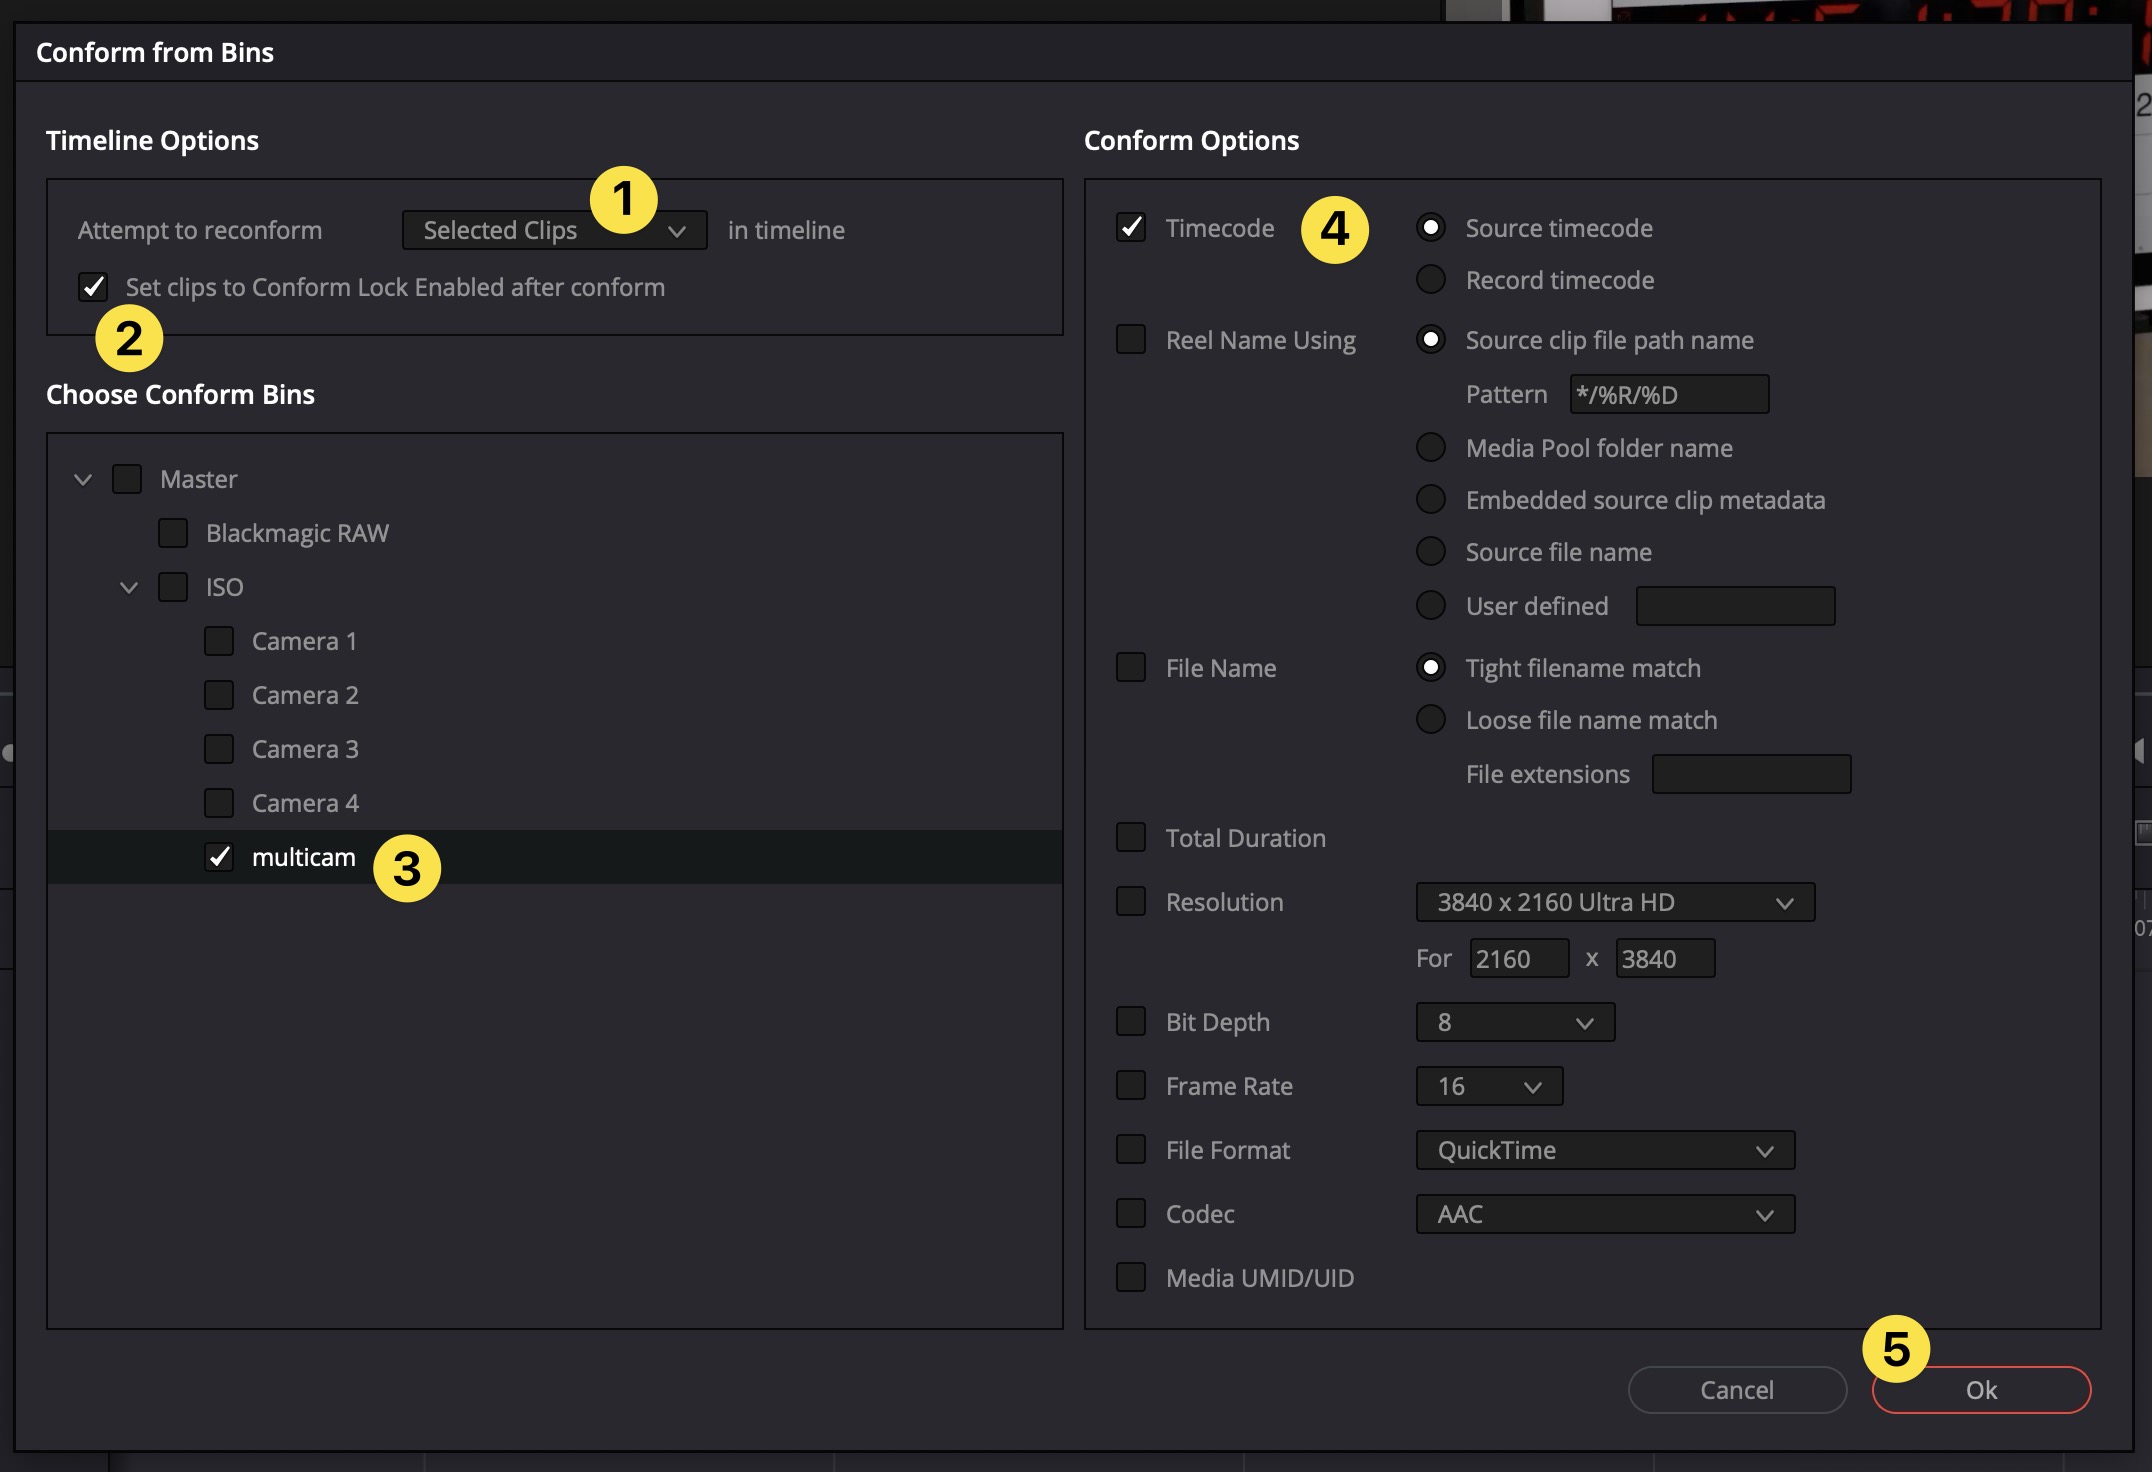
(1) Under “Attempt to reconform”, set it to “Selected Clips”. (2) Enable “set clips to Conform Lock Enabled after conform”. (3) Under “Choose Conform Bins”, deselect everything except your “Multicam” bin. (4) Finally, under Conform Options, only “Timecode: Source Timecode” should be enabled.
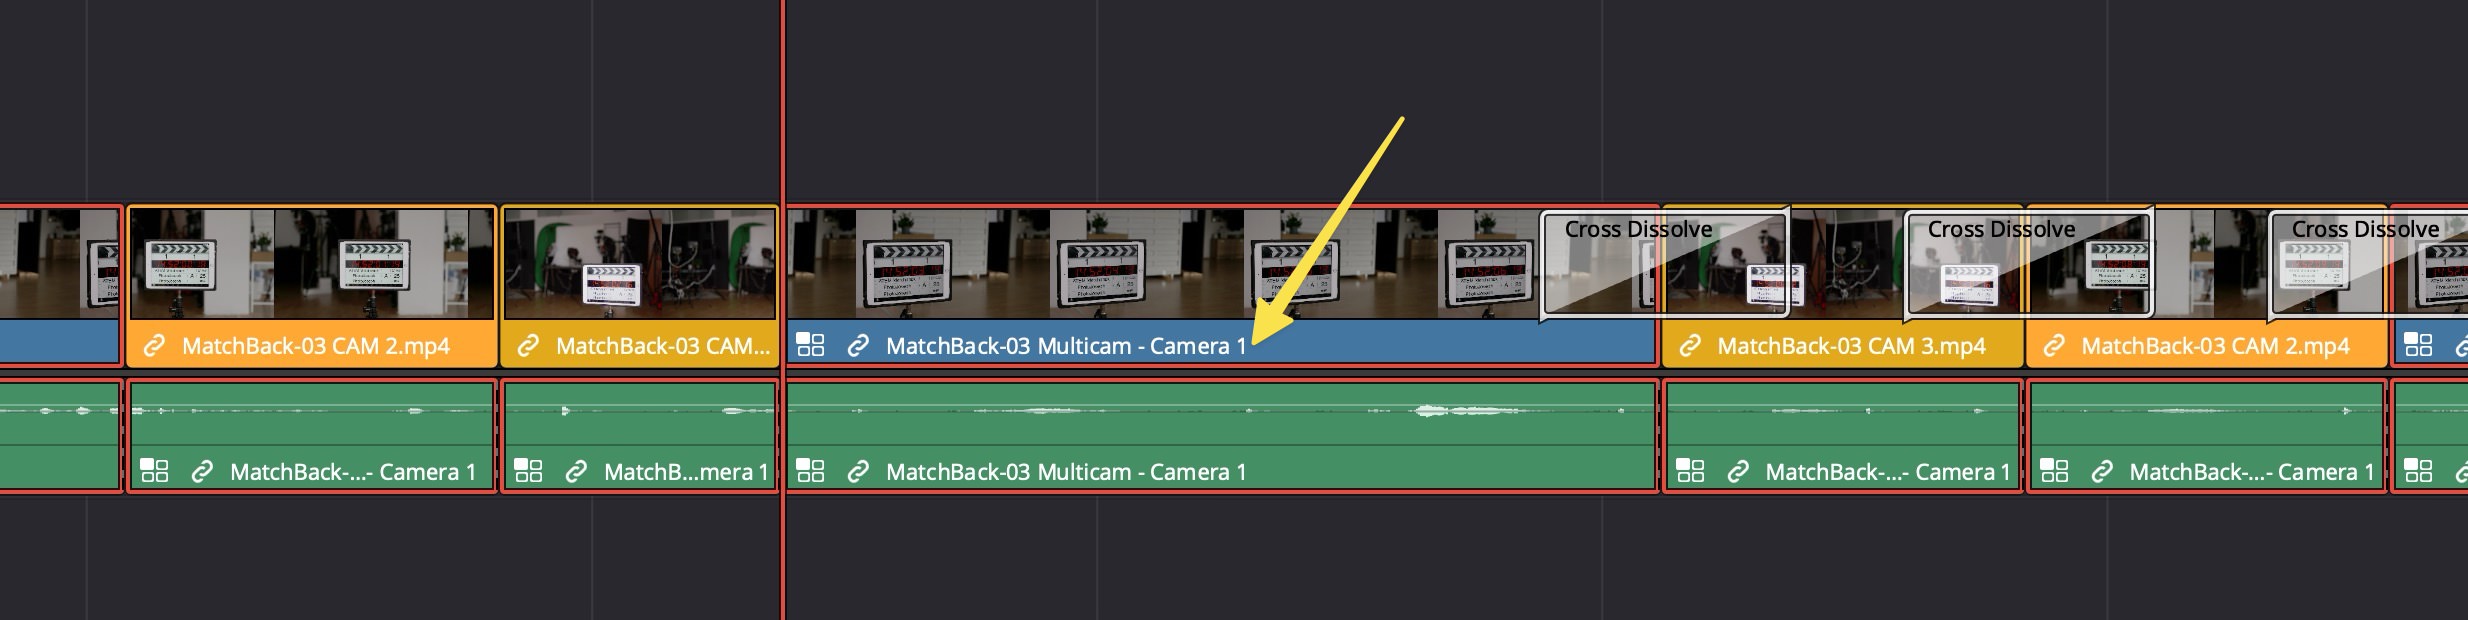
Click OK, and this will replace all the flat Camera 1 clip on the timeline with the multicam clip, set to Camera 1.
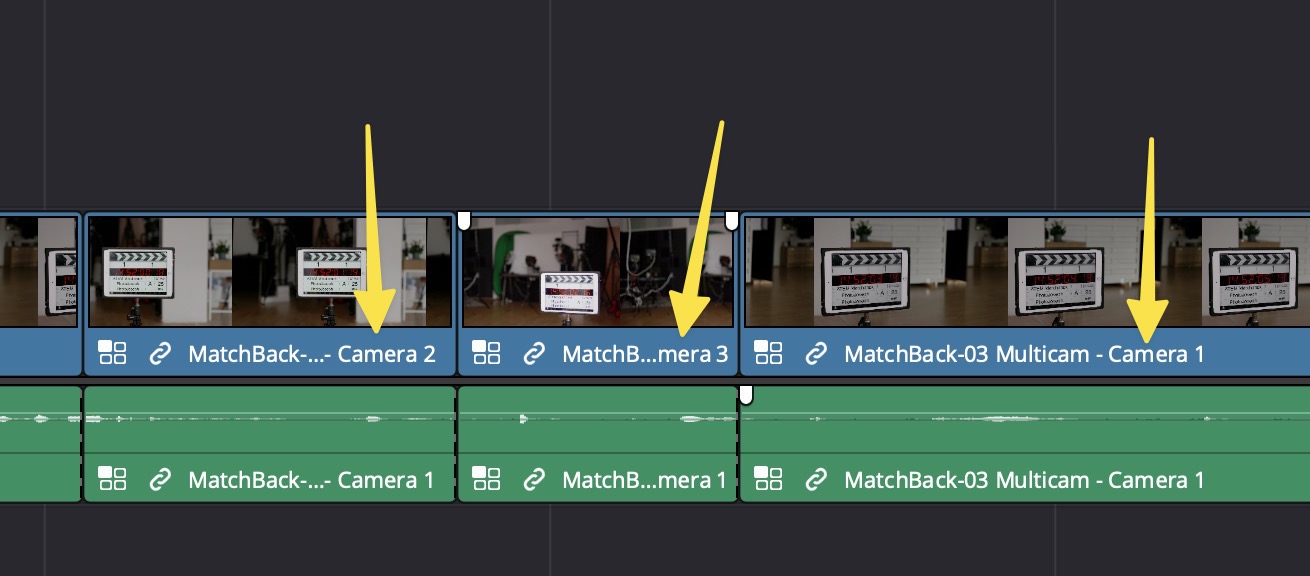
9/ Repeat for all remaining camera angles.
Do this again for each camera angle. Be sure to select the next color in line, and be sure to change the camera angle in the multicam clip to whichever camera angle you’re currently swapping out, before you conform.
Now, your timeline is a true multicam timeline. Every flat camera clip has been replaced by a multicam clip, already set to the correct camera angle!
Replace with Camera Originals
Now that you have a true multicam timeline, it’s time to replace the 1080p video files with your camera originals. While the following steps aren’t the only way to do this, I believe this is the safest way to do it, and ensures that even if somehow a clip gets out of sync, you can easily go back and verify it, as the ATEM-generated files are never deleted.
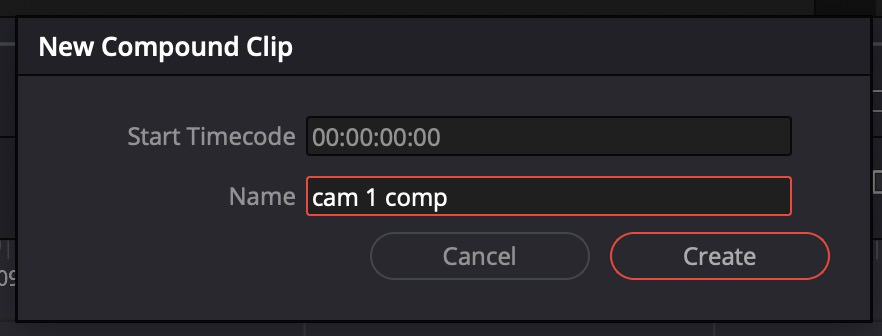
1/ Create a Compound Clip for each camera angle in the Multicam clip.
Open the multicam clip again, so you see all camera angles stacked on top of each other. Select the first camera angle clip…
and choose the menu “Clip > New Compound Clip…”,
and name it something like “cam 1 comp”. Repeat for all camera angles.
2/ Import your camera original footage
Now it’s time to import your camera originals. If you have lots of angles you may want to name them now to make it easier to keep track as you go.
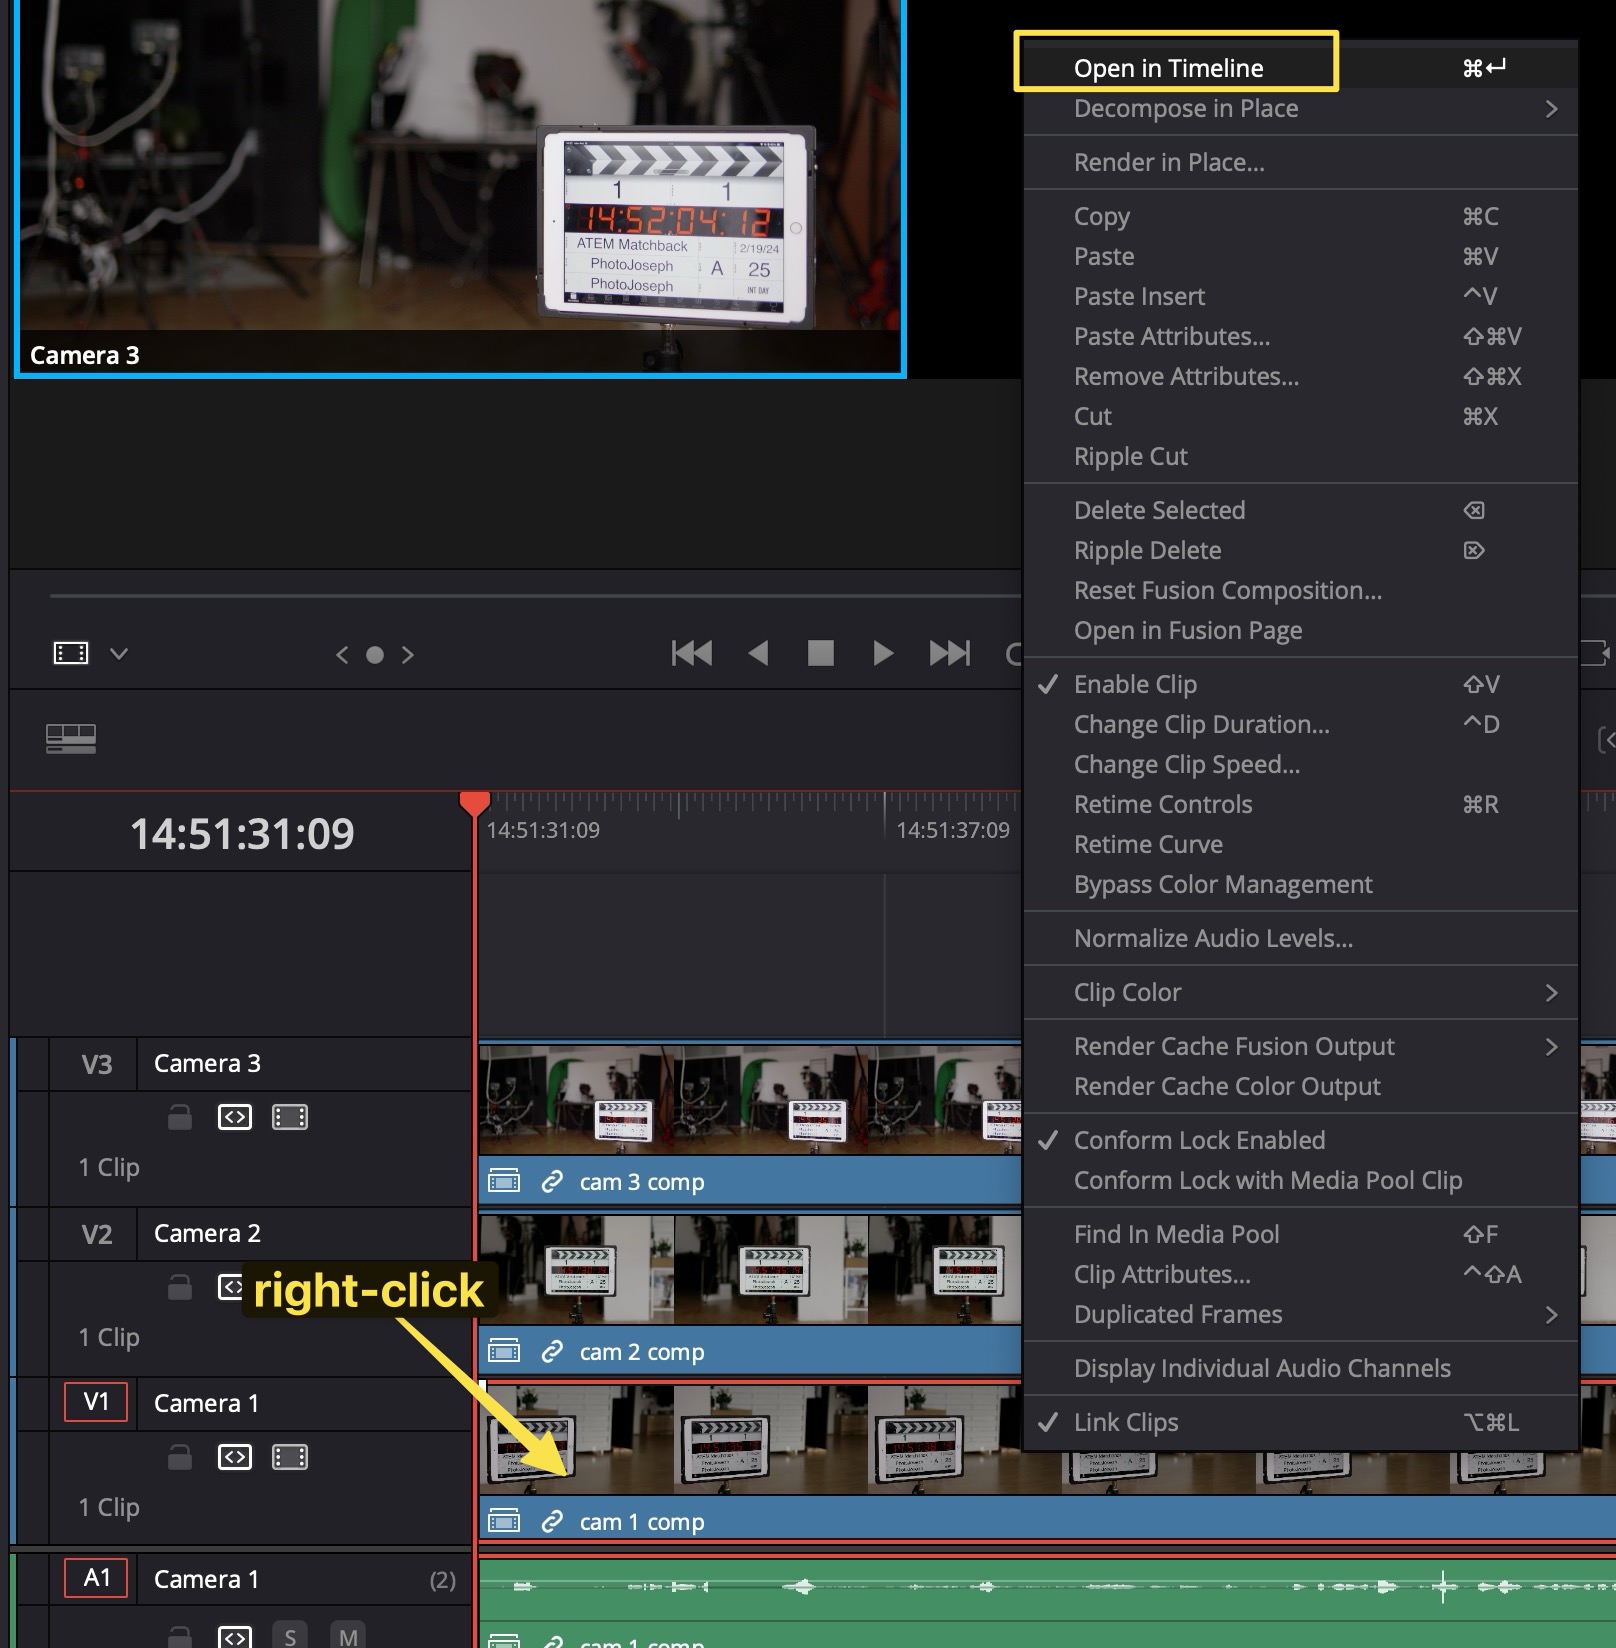
3/ Open each Compound Clip and align the camera-original with the ATEM-generated file
Right click on the first compound clip (“cam 1 comp”) and select “Open in Timeline”.
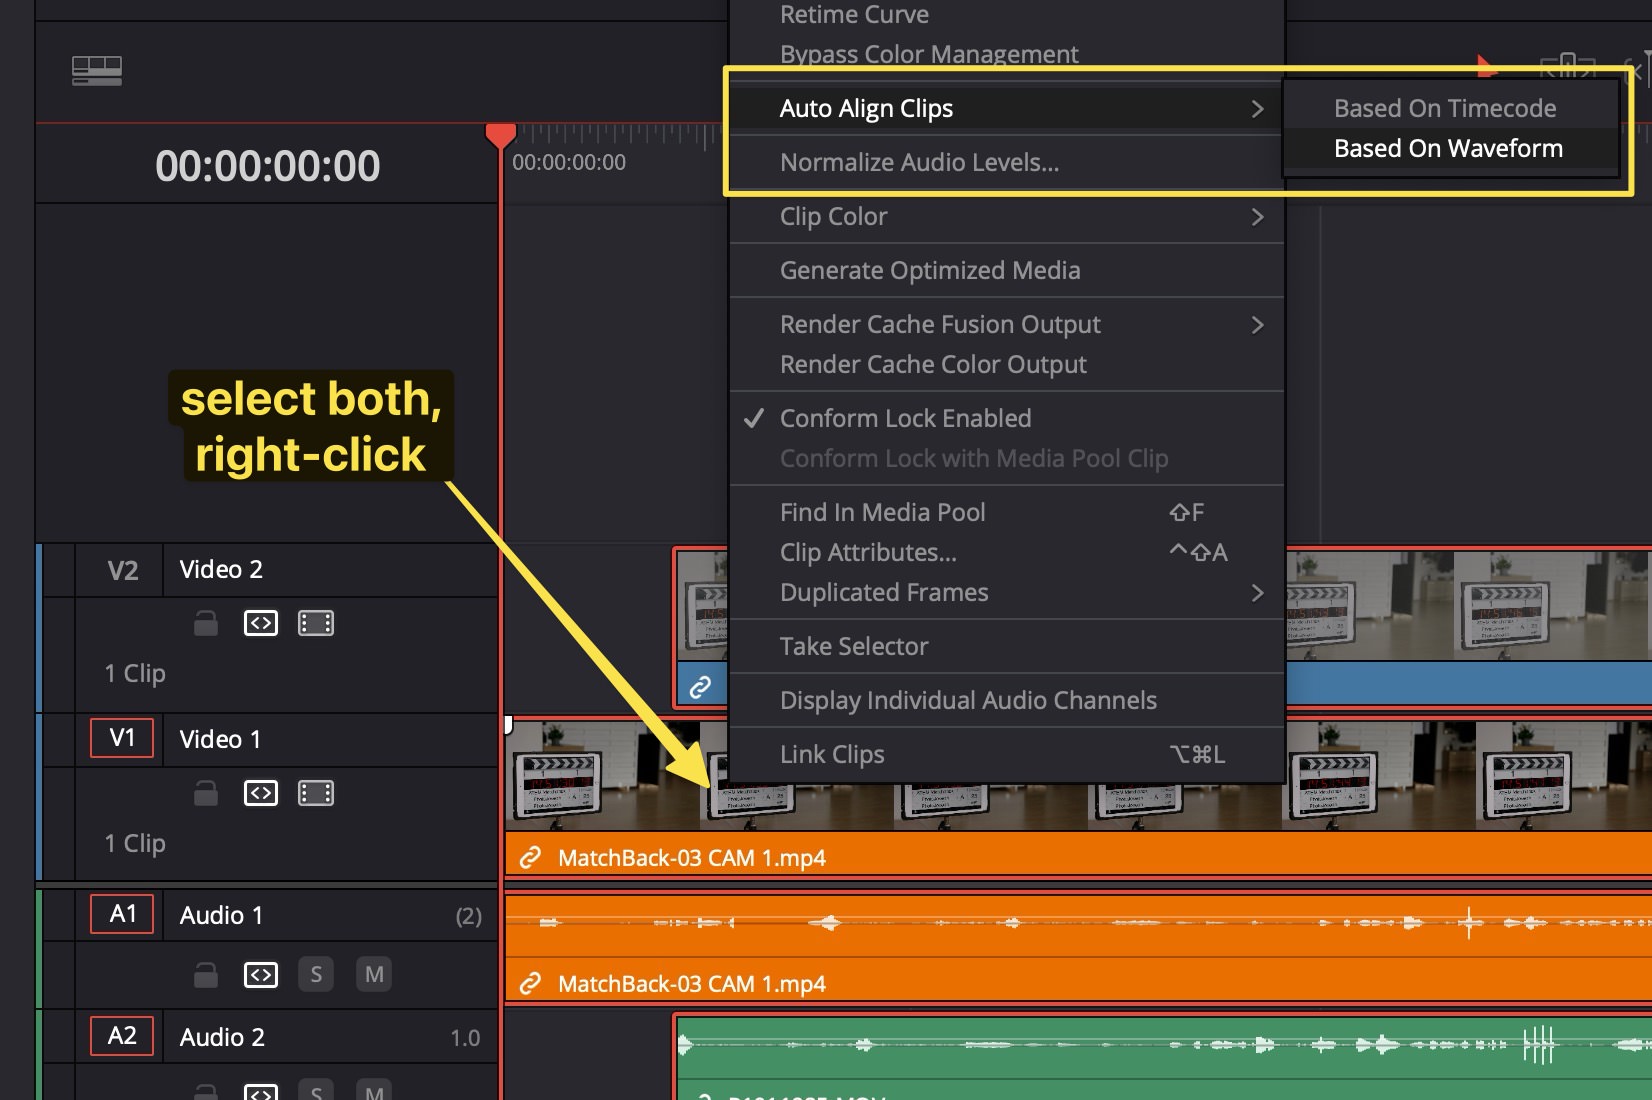
Drag the matching camera-original file on top of it, onto V2. You can manually align the clips visually or audibly (looking at the waveform), or what’s even easier (and which I discovered after making the video), is just select both clips, right-click, and choose “Auto Align Clips > Based on Waveform”. Resolve will analyze the audio waveform of each clip, and move the new clip on V2 to align with the original on V1.
Note that the clip on V1 (the ATEM video clip) must not move. It will be lined up at the start of the Compound clip and needs to stay there.
4/ Repeat this for the other camera angles
Repeat this process for each additional composite that you made!
Now you’re done! You now have a full resolution version of your live show, at the highest quality that your cameras can generate.
A Note About Cameras with Varying HDMI Delay
One amazing advantage of this process is that you can now compensate for cameras with varying HDMI delays. If you’re using all the same cameras, then this doesn’t matter. But if you aren’t, then this might. All HDMI cameras have a slight delay between realtime and what comes out the HDMI port. Some cameras have very little (as little as a single frame), most have between three and seven frames delay, and some like GoPro cameras may have well over ten frames delay. Wireless cameras could easily have half a second delay, depending on the wireless HDMI technology you’re using. For a live production, there’s nothing you can do about it. But now, in the re-edit, you can compensate for that delay. If you have something visual to align to at the beginning of the show (such as a timecode display), then you can offset the most-delayed cameras to bring them in sync with the least-delayed cameras. By slipping the camera-original in the compound clip, you can move it so it’s in sync with the other cameras instead of with the ATEM recording, making everything line up perfectly. That’s pretty amazing.
Conclusion
This workflow offers unparalleled flexibility, allowing you to match camera original files from any camera to your ATEM-generated Resolve project file. Whether you're using Blackmagic cameras or not, this opens up new possibilities for your production workflow. Make sure to watch Alex's video for a deeper understanding of the first part of this process, and check out my ATEM playlist for more tips on getting the most from your ATEM hardware. Thanks for reading, and see you in the next post!
The music is from MusicBed! Get your first month free when you purchase an annual subscription by using my coupon code PHOTOJOSEPH at checkout! https://geni.us/MusicBed
Reply from @photojoseph on Tuesday, February 20, 2024 - 8:17pm
I just realized you can auto-align clips in the Compound Clip so you don't have to manually align them!! Once you add the camera original video on top of the 1080p clip, select both, right-click and choose "Auto Align Clips > Based on Waveform" . Sheesh.
Reply from @WeCreateMusicTV on Wednesday, February 21, 2024 - 3:56pm
@@photojoseph But most importantly, thank you for your genius! While it is easy for us to point out what you could have done, we sometimes forget to give thanks for the time, effort, and genius it takes in putting these videos together and sharing with us to help us put out the best products.
Reply from @photojoseph on Thursday, March 27, 2025 - 4:48pm
The non-ISO models don't generate an XML file. That's their primary additional feature — the ISO video files and the XML file. The timecode in the Program recording (all that the non-ISO versions record) will be time of day timecode, and if you're using BMPCC cameras then they may be getting timecode from the ATEM, however you'd have to test that. I don't actually recall if the non-ISO models have the record start/stop function for the cameras in them, but probably not. With or without timecode though, you're in the same boat -- you will have to line up the recordings from the cameras on a timeline and cut them all from scratch.
Reply from @streameiros on Thursday, March 27, 2025 - 3:41pm
thanks for reply, so that’s no way to generate the xml from atem mini pro, and then get the raw files from the bmpcc and replace or something like that. Maybe the timecode can set some metadata to show the edit software the cut times ?
Reply from @photojoseph on Thursday, March 27, 2025 - 3:26pm
well, without the XML file or the ISO files, then there's nothing to match back to. You can always record in each camera then re-cut it from scratch, but without that record of the live show, then I'm afraid not.
Reply from @FAMEAcademyNY on Tuesday, March 18, 2025 - 4:34am
Awesome!!! I have 3 Blackmagic Cameras and 3 Canon Cameras. Im selling 2 Canons to get another BMD but will keep one Canon so this process will help when applicable. THANKS.
Reply from @EmperadorFilms on Friday, February 28, 2025 - 10:01pm
Hello, thank you very much for this very valuable video, I am a newbie in Davinci Resolve, perhaps my question is silly, my problem is the following: I have followed the instructions in this video step by step, when replacing the clips with 4k videos it starts before the original, so I cut the initial part, then when I go to multicam that initial part still appears and everything is out of sync, I hope you understand and thank you for your answers
Reply from @photojoseph on Saturday, March 8, 2025 - 7:12pm
Interesting; I know in the video I don’t make a distinction there, but perhaps it was already set by default on mine one way and on yours another? I really don’t know, sorry.
Reply from @photojoseph on Sunday, March 2, 2025 - 7:26pm
What happens if you don’t cut the initial part? There’s no need to do that. Other than that I can tell you why it’s out of sync other than to say some step must be being missed. Sorry, can’t troubleshoot without more information.
Reply from @EmilyAcerra on Tuesday, February 25, 2025 - 9:12pm
How did you record in 4k on the cameras in the first place, if ATEM ISO only allows 1080 input? Do you not get a black screen on your cameras and monitor from signal incompatibility?
Reply from @photojoseph on Tuesday, February 25, 2025 - 9:44pm
@EmilyAcerra I’m not familiar with those cameras but they’re pretty high end, aren’t they? Maybe there’s a setting to output HD? On LUMIX cameras you can set output to 4K, HD or auto.
Reply from @EmilyAcerra on Tuesday, February 25, 2025 - 9:39pm
@@photojoseph Thank you so much for the reply! I am using 3 Sony a7iii cameras. They can record in 4k, but when I connect them to the switcher via HDMI, everything goes black. Any solution for this? I am thinking of ordering a decimator (but will need one for each camera) to convert the signal to 1080 for the switcher while still recording in 4k to the cards in each camera.
Reply from @photojoseph on Tuesday, February 25, 2025 - 9:27pm
Ah, that depends on the cameras. Some cheaper cameras don’t output over HDMI while recording. This workflow assumes your cameras can handle recording 4K while outputting 1080p.
Reply from @photojoseph on Saturday, February 15, 2025 - 2:54pm
Right, that’s logical. There’s no connection between the camera’s timecode and the ATEM files’ timecode. That’s why you have to match by audio waveform, not timecode.
Reply from @photojoseph on Tuesday, February 11, 2025 - 6:29am
How will PluralEyes keep the original edit file intact, and know which camera angle to swap with which? How will it build a multi cam clip from the originals and replace the original clips with a multicam comp? I don’t believe this is an easy task with PluralEyes, but I’m happy to be proven wrong.
Reply from @ssmaurice on Saturday, February 8, 2025 - 9:35pm
Is anyone getting this error? Unable to Reconform Timeline The source media clips in the selected bins are not able to conform the timeline. Tried it so many times now and get this every time....
Reply from @photojoseph on Thursday, January 9, 2025 - 5:14pm
Glad you enjoyed! As for supersource, the layouts are not maintained in the XML file. Graphics are there if you load MP1 or MP2, however the SuperSource just as black (it literally says "Black" on the timeline). So you would have to rebuild the SuperSource. You can see your SuperSource in the Program view, so if you drop the recorded Program on top of your timeline you would see what the SuperSource looked like so you could use that as a guide to rebuild it, but the actual layout is gone.
Reply from @bearprod on Tuesday, November 19, 2024 - 3:07pm
Can you possibly show me how (on the ATEM Extreme) have both a Chroma background with subject in front and then put that into a PIP while I show Powerpoint slides?
Reply from @AinoaMartin-c5f on Friday, November 15, 2024 - 3:43pm
This is great, thanks a lot! But I've got a question. I'm using three A7iii cameras which has a 30 min recording limit. If my video is longer than that, would I still be able to record 4K locally in the cameras for longer than 30 min if they are connected to the ATEM?
Reply from @photojoseph on Friday, November 15, 2024 - 4:14pm
No. You’re still recording internally. The ATEM will record indefinitely (only limited by the size of the connected drive), but the 4K recording is still internal to your camera. The only way around that limitation is to add 4K, recorders, externally, in between each camera and the ATEM.
Reply from @anishaandsunjay on Tuesday, October 15, 2024 - 11:28pm
this is so amazing and has literally saved me weeks of my life! Thanks to you and Alex for figuring this out. Question: do you need to delete the iso file from the compound clip you created for each of the MC angles?
Reply from @MiaogisTeas on Monday, October 14, 2024 - 11:28pm
A forewarning: I tested this on a video project duplicating the timeline first so as not to mess things up. I selected the dupe, did the final edit on it, and now upon trying to perform this swap, I've run into no end of errors. The wrong camera angles in the mulicam, clips changing color after swapping the first camera successfully, crashing, and other bizarre errors like there suddenly being two camera 3s while camera one is now camera two, etc.
This isn't failsafe. I hope I haven't destroyed this edit.
Reply from @liamfoneill on Friday, October 11, 2024 - 2:43pm
Hey @photojoseph, love all your content and you are the reason I picked up an Atem Mini Pro. I have this longstanding issue I was wondering have you came across before? I use mine exclusively for live switching in Zoom/Teams calls with Sony Camera and while it works fine, it has always bugged me that the camera flip screen displays a totally different image than I see when I check the video preview in MacOs (inside photo booth or Zoom). The image that comes into MacOS is darker and has slightly more muted colors. I set the color profile from the default BMD HDMI to the one you recommend but I know that’s not it as that’s more for pumping desktop video into the ATEM. I’m assuming I need to configure some settings on my camera itself so it outputs something more compatible with the Atem but no idea where to start. I use both a Sony A7SIII and a Sony ZV-E10
Reply from @photojoseph on Saturday, November 2, 2024 - 9:01am
Definitely sounds like a Sony video output issue. I've not seen color shifts caused by the ATEM. Not being a Sony user I don't know where to point you, but I'm sure the camera has different profiles and control over the HDMI output. I'd start there.
Reply from @photojoseph on Wednesday, October 9, 2024 - 5:11pm
I don’t think they will. It’s not in their interest because they want to sell blackmagic cameras. However, resolved does have quite a lot of scripting in it. I’m sure there’s somebody out there that could manage this. Not me though!
Hi, this is an amazing video, and I've been using and learning from it since you posted it.. However. Ive hit an obstacle with this process. Everything seems to be ok, but when I render, Cam 1 seems soft. Its the front main cam. When I go into the compound clip of Cam 1, and delete the 1080p footage, and only leave the 4k imported footage (that I've correctly synced), the cam 1 on the main timeline goes black! So it seems its still using the 1080P. Id be incredibly grateful if you could give me a tip on what might be missing in my execution of the process.. i just cant figure it out.
Reply from @photojoseph on Thursday, October 10, 2024 - 7:16am
Sounds like you’re doing it right. I assume you already did the process of conforming to the original media or you wouldn’t have a true multi cam.
Maybe it’s a cache issue, although that doesn’t really explain the black clip. Make some change to one of the multicam clips on cam 1 — add a filter, for example — to force it to redraw. If that fixed it, clear the entire cache using the cache manger. If that doesn’t help, I’d really need to see it. http://www.photojoseph.com/1to1 if it’s worth it for you.
@@photojoseph checked both transparency and that the video track is enabled. When i play it in the Compound timeline, its definitely playing the 4k version. when i check the primary timeline, with the newly created multicam, the multicam reference for the Cam 1 is still referring to the original cam mp4, and not to the compound clip that was created. i think thats whats wrong.
To summarise where I think I am. The multicam is created first, and its references are to the clips themselves. then i create a compound of cam 1, and add the 4k video to the compound. All good so far. but the primary timeline, with the now multicam all along the timeline, are still referencing the original multicam cam clips, and not the new compund ones.. I think i'm missing a step?
Reply from @photojoseph on Wednesday, October 9, 2024 - 1:05pm
You’ve made a compound clip, and you’re opening that comp to remove the HD clip? The fact that once it’s removed, the render is black tells me that it’s not seeing the 4K video file for some reason. Is it possible that the transparency is set to zero or that video track is disabled?
Reply from @photojoseph on Sunday, September 29, 2024 - 8:55am
Not an all-in-one. They have the Television Studio 4K which is $5,000 but does not include recording. You can add 4K recorders; either one for the Program or as many as you want for each input to record and pass-through. Of course the intention is that you’ll record 4K or 6K in-camera, but if you needed to do it externally, you could. You would however NOT be getting an XML file.
Amazing video! I wish the ATEM ISO already generated a true multicam sequence for you so you didn't have to go through all these steps, but glad there is a way to do it. Yaay! :)
Reply from @MiaogisTeas on Wednesday, September 25, 2024 - 4:08pm
NOTE: if you came here looking for a solution to the ATEM iso and raw clips having slightly different timecode starts and therefore not matching automatically, YES this is the solution – once you place the clips in the compound clip, align by timecode. HOWEVER! You must edit your project before changing it to a multicam project or you can't use your sync bin.
Basically, this is the final step in your edit process instead of the first.
If you follow until 5:21 you can speed up the process by following these steps. To start I have mapped "move clips up" to my page up key and "move clips down" to my page down key. I've followed everything @AlexPettitt / @photojoseph lay out for coloring the clips and setting up the multicam. Then I layerd the ATEM sequence on V4 and under it 3 copies of the multicam clip. V3 multicam (right click and switch to angle 3). V2 multicam (right click and switch to angle 2). V1 multicam (right click and switch to angle 1). Now select Timeline / Select Clips With Color / Select color for cam angle 1. With Cam angle 1 selected move clips down to cut through V3 and v2, and finally delete these angle 1 clips from the timeline. Next, Select Clips With Color / Select color for cam angle 2. Move cam angle 2 down, then delete these angle 2 clips from the timeline. Then you can remove the remaining clips on v4 (these are the remaining atem non multicam clips). Select all clips on Track three and move clips down. Then select everything on track 2 and move it down. https://youtu.be/53t4GJuXwUI
Reply from @samgillespie on Friday, August 2, 2024 - 4:08pm
All I can say is THANK YOU! I was literally looking to invest in some BMPCC 4k/6k as a way of getting 4k+ recordings through my ISO Extreme ISO, but this workaround means I can use my current kit. Of course a few more clicks of the mouse, but well worth the saving!
Reply from @e.leewhite7907 on Friday, July 26, 2024 - 5:44pm
First I want to thank you for all this valuable information you give away!! I’ve had a ATEM pro ISO almost since came out years ago. My problem I couldn’t started from lack of supportive clients. I purchase this ATEM case mainly due to it having the stream deck inside the case. The main misgivings is the developer. Send the case out any instructions video links or instructions at all .with no supportive instructions on using the case. https://youtu.be/dXqml2I59UI?si=iuqjGQ_NYmy8aq8t any help from you would be great
Reply from @photojoseph on Monday, July 29, 2024 - 8:42am
I haven't talked to the developer since I made the original video on the product. He isn't responding to emails or on his facebook page? All I can say is to keep trying, and threaten to return it if you don't get some support!!
Reply from @photojoseph on Thursday, July 11, 2024 - 6:01am
Not easier, because there’s still no way to get timecode to the video assists from the ATEM. So it’s the same procedure but you can use the ProRes or RAW files from the VA!
Reply from @robsmith1239 on Sunday, June 16, 2024 - 12:59am
Joseph, can you help. We just upgraded from atem mini pro iso to the extreme, right in the middle of our first recording I see the recording indicator flashing, and now we have to keep stopping. We have one of the recommended drives, it's set up correctly, can you tell us why this is happening?
Reply from @robsmith1239 on Monday, June 17, 2024 - 1:28pm
@@photojoseph Thanks Joseph, We were using the cable that came with the drive. I ordered a new SSD drive so we will see. Thanks for your help. Love the work/content you do on here, you have saved us so much time and trouble with your videos, they have helped us in creating a great workflow that woulld've taken us forever to put together! Very much appreciated.
Reply from @photojoseph on Monday, June 17, 2024 - 9:37am
I have not tried that drive. All I can really recommend is trying another drive, or at minimum a different cable, although that's not likely the issue, assuming you're using the cable that came with the drive. Actually if the drive didn't come with a cable, and you're using whatever you had laying around, that's likely the issue. Not all USB-C cables are the same; make sure it's a high speed data cable. Let me know what you learn!
This is absolutely awesome! Thanks for your help! Now the only thing missing for me is removing the multi-view labels box from atem mini iso, so I can use a clean feed in VMIX :D
Nice. I’ve been doing something similar in Premiere for the last couple years since I got the Atem Mini Extreme ISO. Davinci frustrates me because I can’t zoom in and out on the timeline with the track pad. 😂
Reply from @gutandrew on Sunday, May 12, 2024 - 10:22pm
one more question - if I have 2 files for camera 1 and 2 files for camera 2. For example if show has a break and I turned off the cameras. Reconform option is not working in this way. Only 1st camera is able to reconform. I tried to add different colors for 2nd camera but it doesn't work
Reply from @magastha8147 on Sunday, May 5, 2024 - 10:50pm
Thank you Thank you Thank you Thank you Thank you Thank you Thank you Thank you Thank you Thank you Thank you Thank you Thank you Thank you Thank you Thank you Thank you Thank you Thank you Thank you Thank you Thank you Thank you Thank you Thank you Thank you Thank you Thank you Thank you Thank you Thank you Thank you Thank you Thank you Thank you Thank you Thank you Thank you Thank you Thank you Thank you Thank you Thank you Thank you Thank you Thank you Thank you Thank you Thank you Thank you Thank you Thank you Thank you Thank you Thank you Thank you Thank you Thank you Thank you Thank you Thank you Thank you Thank you Thank you Thank you Thank you Thank you Thank you Thank you Thank you Thank you Thank you Thank you Thank you Thank you Thank you Thank you Thank you Thank you Thank you Thank you Thank you Thank you Thank you Thank you Thank you Thank you Thank you Thank you Thank you Thank you Thank you Thank you Thank you Thank you Thank you Thank you Thank you Thank you Thank you Thank you Thank you Thank you Thank you Thank you Thank you Thank you Thank you Thank you Thank you Thank you Thank you Thank you Thank you Thank you Thank you Thank you Thank you Thank you Thank you Thank you Thank you Thank you Thank you Thank you Thank you Thank you Thank you Thank you Thank you Thank you Thank you Thank you Thank you Thank you Thank you Thank you Thank you Thank you Thank you Thank you Thank you Thank you Thank you Thank you Thank you Thank you Thank you Thank you Thank you Thank you Thank you Thank you Thank you Thank you Thank you Thank you Thank you Thank you Thank you Thank you Thank you Thank you Thank you Thank you Thank you Thank you Thank you Thank you Thank you Thank you Thank you Thank you Thank you Thank you Thank you Thank you Thank you Thank you Thank you Thank you Thank you Thank you Thank you Thank you Thank you Thank you Thank you Thank you Thank you Thank you Thank you Thank you Thank you Thank you Thank you Thank you Thank you Thank you Thank you Thank you Thank you Thank you Thank you Thank you Thank you Thank you Thank you Thank you Thank you Thank you Thank you Thank you Thank you Thank you Thank you Thank you Thank you Thank you Thank you Thank you Thank you Thank you Thank you Thank you Thank you Thank you Thank you Thank you Thank you Thank you Thank you Thank you Thank you Thank you Thank you Thank you Thank you Thank you Thank you Thank you Thank you Thank you Thank you Thank you Thank you Thank you Thank you Thank you Thank you Thank you Thank you Thank you Thank you Thank you Thank you Thank you Thank you Thank you Thank you Thank you Thank you Thank you Thank you Thank you Thank you Thank you Thank you Thank you Thank you Thank you Thank you Thank you Thank you Thank you Thank you Thank you Thank you Thank you Thank you Thank you Thank you Thank you Thank you Thank you Thank you Thank you Thank you Thank you Thank you Thank you Thank you Thank you Thank you Thank you Thank you Thank you Thank you Thank you Thank you Thank you Thank you Thank you Thank you Thank you Thank you Thank you Thank you Thank you Thank you Thank you Thank you Thank you Thank you Thank you Thank you Thank you Thank you Thank you Thank you Thank you Thank you Thank you Thank you
Reply from @photojoseph on Monday, April 29, 2024 - 8:14am
You can open the XML in FCP but I don’t know how well this true multicam timeline will carry over. I haven’t tried. If you’re going to try it, follow the steps in this video first, then export to FCP XML and see what happens. Here’s a video that shows that, around 12:40https://youtu.be/vwPH4l5R-dw?si=7ymGu3mJulx29d_m
Reply from @PetrKrenzelok on Sunday, April 28, 2024 - 9:49am
@@photojoseph Well, they don't make it easy even with their own products, so 🙂 Worked with ATEM a few bits in terms of our corporate studio (really an amateur here). We could not get split HDMI multicam view for e.g. with any adapter. Just google related complaints. And now compare with something like all-in-one Yolobox (ok, not having a tacticle feedback is Yolo's disadvatage) - ATEM has no battery operation, no wireless (not to mention bonding), you need notebook, you need monitor, streaming to just one platform at a time. Even Osee StreamDeck looks more useful here .... well, except if you want an ISO, then you are back to the ATEM again. And BM knows that 🙂


Comments from YouTube