Teeth Whitening in Aperture 3

Be sure to check out the video version of this tip at the end!
Reader Dane [@danebert on twitter, manfesto on flickr] suggested writing a tip on teeth whitening in Aperture. I asked what technique he used, and he replied “I actually use a saturation brush - cover the teeth and drag saturation down”. I tried it, but found it to be a bit heavy-handed, so started experimenting with using Curves, which is what’s described below. In the meantime, he went back and tried it with the Color adjustment, and reported that this worked even better: “I’m testing the color brick and eye dropper, looks more natural since only yellows get desat’ed and I can brighten too!”. This is one of the great things about Aperture, isn’t it… there are so many ways to achieve a similar goal, and by knowing as many tricks as you can, when one doesn’t work as expected, you can try something else (or even a combo of the two).
Below I’ll outline a few simple steps to doing this using Curves, but try it yourself as Dane described, using the Color adjustment. Maybe that’ll work better for you!
Using Curves to remove color tint on teeth
I’m cropping this photo slightly tighter than you might normally, out of respect for the subject :-) You can clearly see that the subject’s teeth could use a little whitening. It didn’t help that this guy is normally pale as a sheet, but came to the shoot sunburned. By the time I “fixed” that, the teeth were even worse.
 The starting point… notice that the teeth need a little help
The tool I want to use is Curves. Again this is just one way, but it worked out quite well.
Set the white point on the teeth
Step one is to use the white-point eye-dropper and to click on the teeth. This will tell Curves that this is supposed to be white and everything else will fall into place from there.
 Before clicking, notice the current RGB readings
In the screenshot above, you can see that the eyedropper (which does’t show up in the screenshot itself) is pointing at the teeth, and in the loupe, you can see the RGB readings. If this was pure white, or even any neutral grey, then the R, G and B readings would be the same. You can see here that they are not, and you can see how far apart they are in this close-up of the histogram. If this were already white, those lines would be on top of each-other.
 The R, G and B lines are nowhere near aligned
When you click on the picture, Curves will adjust the red, green and blue channels so they all line up, making that part of the image white. This works really well if you’re clicking on a white backdrop that’s got a color tint to it due to improper color or white balance, but when you click on something that isn’t actually white to begin with, and tell Aperture to make it white, when everything else falls into place, it ain’t pretty.
 Look at them pearly white! Shame about the rest of the image…
The teeth are white, that’s for sure! But the rest of the image isn’t pretty. You probably already guessed the next step… brush the mask!
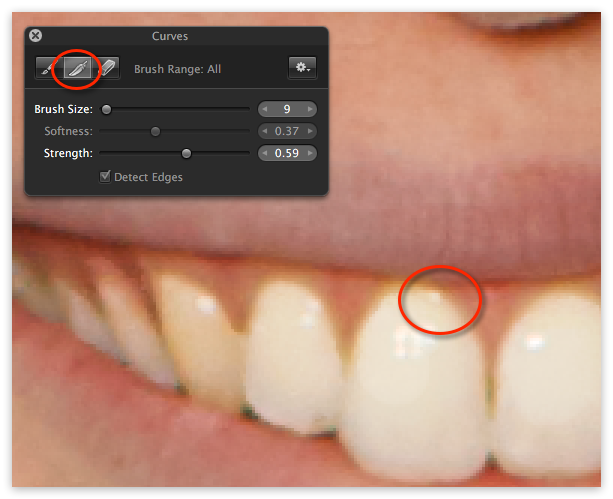
Brush the Curves in
Start by selecting “Brush Curves in” from the gear menu, and don’t get too heavy handed right away. Check out the video at the end to see more of the technique, but in brief, you’ll want to go slowly, building the mask up and erasing it away bit by bit.
 Start by brushing the Curves in, and go slow
As soon as you select “Brush Curves in”, the effect will disappear from the entire image, and you’ll be able to start brushing it in. I would suggest not starting with a full-strength brush, but going maybe half-strength or so, and building up from there. The original setting of pure-white is going to be too strong, so having a mask that shows a little of the original, blended with your white version, should give a pleasing and realistic result.
 Don’t use full strength, and you may want to try Detect Edges
Zoom in, and if you see rough edges, use the feather tool to soften them up a bit.
 Use the feather tool to smooth out rough edges
Also don’t forget to enable the Brush Strokes view under Overlay so you can easily spot harsh transitions. You’ll see more of these if you use Detect Edges when brushing. That’s one of those features that can save a lot of time, or you may find that you waste just as much time cleaning it up as you would have spent brushing it accurately to begin with.
 Don’t forget to enable Brush Strokes Overlay to check your edges
Adjust overall effect strength
Finally, if the effect is too strong (or not strong enough), you can adjust the Luminance curve to darken/brighten the teeth overall. Here I’ve dropped it down a little; the teeth were a bit too bright. Remember, no one’s teeth are perfectly white. Don’t make your subject look like a teeth whitening comercial! Unless that’s what you’re shooting… in which case… go for it ;-)
 You may want to adjust the luminance a little to darken or brighten the overall effect
Result!
With a little practice, you’ll be creating lovely white teeth in no time at all.
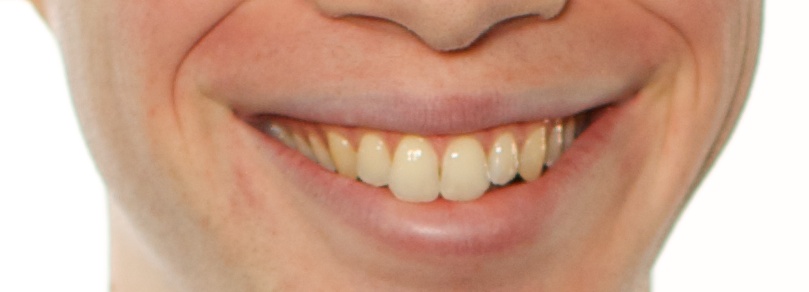 before…
 …and after!
What technique do you have for whitening teeth in Aperture?
Video version of this tip
Comments
on July 4, 2013 - 11:34am
Truly amazing
on July 4, 2013 - 1:31pm
I think I’ve watched everyone of your Aperture training videos and you still can come up with something new I didn’t know. (I’m talking about the mask eraser strength mentioned in the video)
Thomas
on July 6, 2013 - 5:13pm
When in doubt … or after all other avenues are exhausted … Curves can usually be applied in a manner to get you where you want to go and still maintain image quality. Though it may be intimidating for users who are not familiar with the complexities of curves … the more you work with it, the more confidence you will have.
Nice tip Joeseph.
on July 10, 2013 - 7:27am
I’ve been trying to get my head around Curves for ages. This specific technique is a huge help in that regard (and gives me another way to avoid switching to Photoshop.) Thanks!