Cropping & Exporting Multiple Versions Workflow Tip
So, no new version of Aperture to jump into today. Guess we’re back to Aperture 2 tips for now!
I’m working on a project for a client now that requires something very specific, but probably not terribly unique. I came up with a workflow to make this move really quickly, and thought I’d share it here.
I shot 128 photos of 128 products for an online catalog, and the client needs each photo delivered in three versions; a tightly-cropped square thumbnail at 220 pixels, a more loosely-cropped square image at 300 pixels, and then a cropped-to-product (showing the entire product at its best) at 800 pixels. Three versions of 128 files each, and a lot of repetition in doing it. So how best to approach?
Here’s what I came up with.
Editing
First off, I’m using a Wacom tablet for this; one of the reasons is that the buttons on the tablet are programmable, so I can put common keyboard shortcuts right under my fingers. The two shortcuts I’m using over and over are Option-V, for New Version, and Command-Right Arrow, for Next photo. Other than that I’ll occasionally have to hit the C key for the Crop tool, but as you’re about to see there’s really no reason to ever close the crop tool. Step-by-step, here’s what I’m doing (I’m taking a break from this photo edit to write this now, so forgive the bizarre past- and present-tense switches. My mind is still on this project).
- Every file has been named (in the Version Name) descriptive of the product. They’ve been named as “product type color”, like “bracelet beaded red” so that they sort alphabetically in a way that makes sense. All bracelets are together; all beaded bracelets are together, etc.
- I created a base-level adjustment for all the photos (a slight exposure , black level and enhancement adjustment), then lifted and stamped that across all 128 pictures. I can still make minor tweaks to each image as-needed, but that made a good starting point.
- I set Aperture to Browser & Viewer view, to better keep track of where I am. Leaving the Browser in Filmstrip mode works great. I also hid the dock and even hid the toolbar (Shift-T) to maximize the size of the Viewer. Yes I could probably switch to full-screen and get even more pixels, but since I’m obsessively switching out of Aperture to check mail and do other things, I find it easier to just work in the main Aperture window.
- With the first image in the viewer, I turned on “Highlight Hot and Cold Areas”, and have left it on for the duration of this workflow. I need to keep an eye on blown out highlights (some of these products have hundreds of shiny beads on them, so keeping those highlights intact is important), and also I want to make my shadows dark but without blacking them into oblivion. Again the Highlight Hot & Cold feature keeps me in check.
- Watching the histogram and the Highlight warnings, I’ll adjust the black point if needed to get the blacks black, and adjust the exposure to ensure I have full range in the histo. These are shot against a white background and consistent lighting so that’s pretty easy, but sometimes some items just look better a bit darker or lighter. Once those adjustments are done on an image, I have a correct exposure for that item that will carry through to all subsequent versions.
- If that photo needs cropping to get rid of an excessive white background, I’d do that now. Most products I moved in on to fill the frame in-camera, but some were quite small and so still need a bit of cropping. I don’t need to crop to the original aspect ratio of the shot; that’s irrelevant for these needs. What matters is filling the frame with the product and getting rid of any excess background. NOW I have a correctly exposed and cropped main file. This version will be exported as the largest version at 800 pixels.
- Next, I hit option-v. Notice that I haven’t closed the crop tool. You can actually do other work, like adjust exposure, while the crop tool is up. Also when creating a new version, Aperture automatically adds the text “ - Version 2” (with ascending numbers) to the Version name. This will come in VERY handy later on.
- I change the crop constraint to “Square”, and cropped in really tight. This will be the 200 pixel thumbnail, which is meant to be tight to show off details (like beadwork) on the product.
- With the crop tool still open, I hit Option-V again (actually I’m hitting the button on my Wacom), creating a product named “ - Version 3”. This will be my middle-sized crop that will get exported at 300 (there’s no reason I couldn’t do the middle sized image second, then the small thumb last; I just chose to crop tight then expand instead of cropping wide and contracting. I simply adjust the crop larger, ensuring to include the area that was in the original tight crop). And that’s it; all three versions are complete.
- Next I just hit Command-Right Arrow (or my Wacom button) to go the the next image, and repeat steps 5—9.
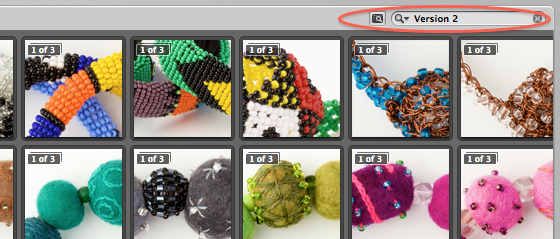
Eventually that will result in 128 x 3 = 384 files. Each collection is in it’s own stack, which makes keeping track of them easy, but I still need to separate them for the final export. That’s really simple too. Here’s a sample of what this looks like so far.

Exporting
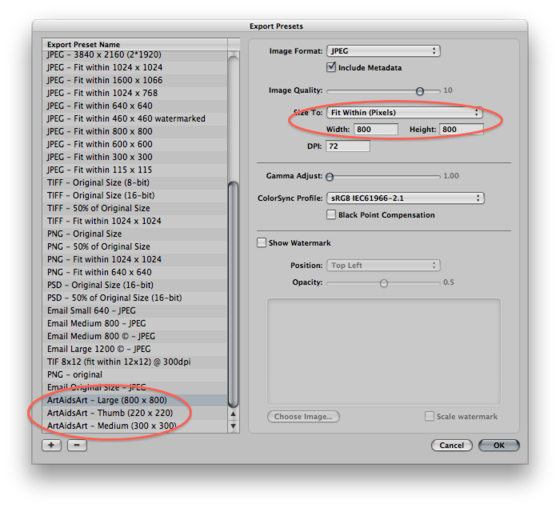
I created export presets for the size and also for the name. Partially because I’m particular like that, and really like making presets and keeping things exact… and partially because it makes it easy to send samples to the client and ensure that the exact same size and naming scheme is used every time. So my export and naming presets look like this:
 Export Presets—click for larger view
For the export, I made three presets, named Large, Thumb and Medium so it’d be quick to see which was which. Each one is sized to “fit within” the required size of 220 or 300 or 800. By the way, if you set your export size to 800 x 800, that means that no matter the ratio of the original image, the longest side will be only 800 pixels.
 Naming Presets—click for larger view
Same idea in the naming. Make it obvious by naming the presets Large, Thumb and Medium. And then the name itself is set to “Version Name” (which is the “bracelet beaded red” name), followed by “-Large_800” or an appropriate name.
Those paying close attention will realize that I’ll also have an “ - Version 2” and “ - Version 3” in my export names, which I really don’t want in the final delivery. That’s OK, those are really easy to remove in the Finder.
OK so now I have all three versions of each file ready to go, the export presets are built and the naming presets are built. Time to export! But what’s the easiest way to select just the 128 files of the now 384 for each batch? This is why those names are handy. I’ll start with the Thumb and Medium.
- Search in the project for “Version 2”. This will immediately show all and only the version 2 files, which of course are the small thumbnails.

- Select all of those, and export using the export preset named Thumb, and the naming preset named Thumb. Voilà!
- Repeat the search for “Version 3” and exporting with the appropriate presets.
- For the large, which has no “Version xx” in the name, there are two ways. You could just close all the stacks, and since the large image was the first image, that will be on top of the stack. Select all and export, and it will be exporting only the top image in the stack. OR, you could do a search for version names that do NOT include the word “Version”, but that takes more time to set up. If you wanted to create a smart album however to show you just those images, that’d be a great way to do it!
Clean-up
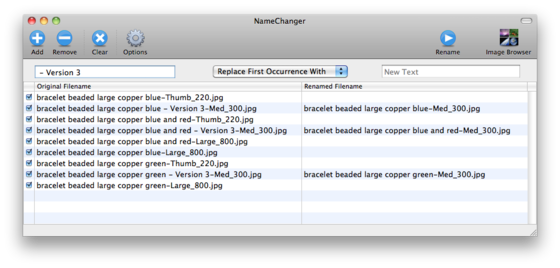
Finally I need to get rid of the “ - Version 2” and “ - Version 3” in the filenames. I use a fantastic utility called NameChanger from MRR Software. This utility allows you to almost instantly replace, add or delete text strings in file names. I swear by it. In this screenshot you can see that I’ve already removed the “ - Version 2” and am about to remove “ - Version 3”.
 NameChanger in action—click for larger view
Now, I gotta back to this project. I’ll post a bunch of photos and talk about the shoot itself on my photography blog, ConfessionsOfATravelJunkie.com later on (tomorrow at the soonest).

Comments
on January 30, 2010 - 9:46pm
I just discovered this website. I am new to Aperture and am very anxious to learn more.
I have a Panasonic G1, but Aperture does not recognize the raw files from this camera.
There are others with the same concern, but Aperture ignores out inquiries.
Any ideas?
on January 31, 2010 - 4:19am
Jerry, welcome to the site. Aperture regularly updates RAW support, but I know it’s not fast enough for everyone’s liking. Hopefully the next version will support the cameras you need! In the meantime I hope you can learn a thing or two from this site.
cheers!
-Joseph
@PhotoJoseph
— Have you signed up for the mailing list?
on October 11, 2010 - 9:41am
Changing my old 4:3 pix to 16:9 in Aperture 3.0 How to do it please.Have hundreds to change.Can’t find an example so far and did not want to have to go back to P/shop to do it, if I don’t have to.
Saving the world one photograph at a time
on October 12, 2010 - 7:39pm
Brian,
You can crop using the Crop tool in Aperture, set the crop ratio to 16:9 in the Crop tool, and then lift and stamp the crop to all your other photos. Adjust as needed.
If you would like a more detailed response, please post an original question in the forum and I’ll respond there.
@PhotoJoseph
— Have you signed up for the mailing list?