You are here

Tips

Predicting Aperture 4.0/X

PhotoJoseph's picture
February 2, 2012 - 4:30am

[UPDATED on Feb 5, thanks to Whitney Dunn in the comments below! I had calculated based on the Aperture 3.2 release being the present, which threw everything off by several months. Oops!]

Share

Using 3rd Party Apps with Aperture

PhotoJoseph's picture
January 26, 2012 - 8:53am

The App Store is filling up fast with awesome little applications that, like iApps, do just one or two things — but do them really well. The app Snapseed from Nik Software that I mentioned a few days ago is one of those.

The problem with many of these apps for Aperture users however is that they don’t simply “save”, but only “save as…”. The ability to simply “save” means from Aperture you can Open in Editor, (for example Photoshop), do your work then simply save and close the image, and it’s automatically updated in Aperture. It’s one of those fantastically simple features in Aperture that opens it up to just about any app you like.

But as soon as you can’t simply “save” — as you can’t in Snapseed — that process breaks. You now have to “save as…” to some other location, import that into Aperture manually, merge it back to your project, etc. etc. and the process, while not particularly hard, is just annoying.

Automator to the rescue

Reader Jon Parsons of Jon Parsons Photography sent over his workflow which makes this process a lot easier. I’ve modified his steps a little as he had an extra step in there, plus I’ve modified for Referenced master users, and added a tip on how to easily switch between External Editors, but other than that he gets credit for this technique.

By the way, this has the potential to get even easier through AppleScript. If it can, I’ll certainly let you know here.

What it’ll do

In brief, you’ll create a dedicated folder for all those “Save as” images, and attach a script to it that will automatically import photos added to that folder into Aperture. Unfortunately it has to add them to a dedicated project, so you’ll need to manually move them to your current project (assuming you want to keep versions together), but otherwise this is quite clean.

Setting up Aperture

First let’s make it easy to switch External editors. I gave this tip once before, but it’s worth repeating. You probably know that to switch editors, you just go to the menu Aperture > Preferences… > Export > External Photo Editor: and choose the one you want. But digging through your entire Application folder can get tedious, so I’ve set up a folder of aliases to the apps I’m using from Aperture. I also keep that folder in the sidebar, making it quick to get to at any time.
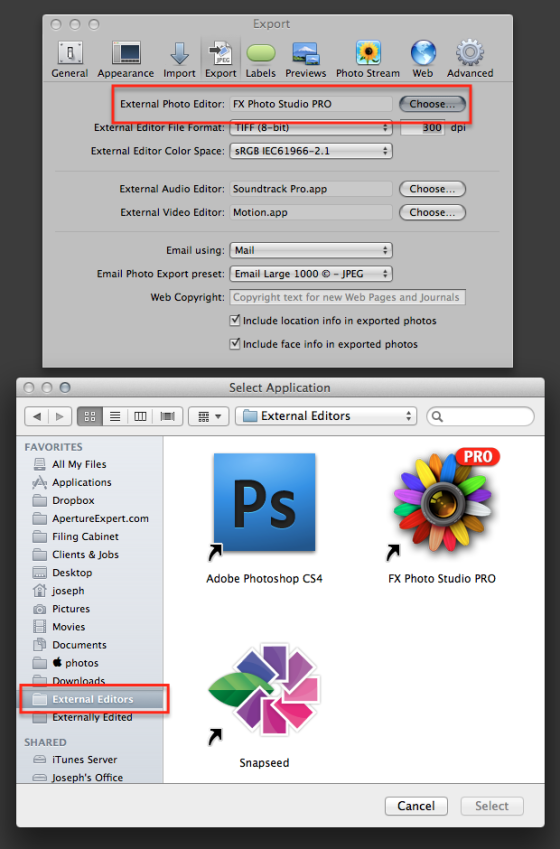
As you can see above, just click on the Choose button next to External Photo Editor: and then using the handy-dandy External Editors folder set up in the sidebar, quickly navigate to the app you want to use, and click Select.

Unless you’re sending to Photoshop, you may as well set the filetype to TIFF (8-bit). Many apps won’t read PSD files, so you could just get an error, and you’re not saving back to this format anyway when working with alternative apps, so just keep it simple.

Next up, you’ll need a Project in Aperture that’s dedicated to importing these externally edited photos. I called mine simply Externally Edited (clever, no?) and that sits at the top of my Library list.

Share

Nik Software’s snapseed—Now for the Mac

PhotoJoseph's picture
January 21, 2012 - 11:00pm

I’ll do a proper look at this later, and be sure to talk about how to best integrate it into an Aperture workflow, but just in case you haven’t seen it yet… Nik Software (the maker of my favorite plug-ins for Aperture, and no, I’m not paid to say that!) also makes one of my favorite iApps, called snapseed, available for both iPhone and iPad.

Share

Should You Scan Negatives to JPG or TIF for Aperture?

PhotoJoseph's picture
January 20, 2012 - 3:32am

This question came up in the forum this morning, and I wanted to address it here. What you’re reading below is my response to the question; “is it worth scanning my negatives to TIF for manipulating in Aperture, or should I just scan to JPG”? JPEG files are of course a lot smaller then TIF, so for anyone scanning a large library of negatives, this is a pretty important question.

Here is my response. As you’ll see, there are gaps in my knowledge when it comes to scanners, and if you, dear reader, have any additional information, feedback or corrections, please join the conversation in the forum. I’ve closed comments here; I’d like any discussion to happen on the original forum post. Thanks.

TIF vs JPG for scanned negatives

The essential advantage of TIF is twofold; one, it’s uncompressed, and two, it can be higher bit-depth than a JPG. JPEGs can only be 8-bit, whereas a TIF can be saved up to 16-bit (the spec actually allows for 24-bit RGB or 32-bit CMYK).

Share

iMedia Browser for Multiple Aperture (and iPhoto) Libraries

PhotoJoseph's picture
January 19, 2012 - 5:28am

If your workflow includes multiple Libraries, you know how tedious it can be to switch Libraries just to access an image or two—especially if you’re not sure where they are!

I wrote about this app once years ago on my photo blog, before I even launched this site, but a user question just made me think of it again and I realized a lot of you may not be aware of it.

Share

New Flickr Gallery for ApertureExpert Photos

PhotoJoseph's picture
January 17, 2012 - 8:02am

Hello everyone,

Here’s something new… I’ve just created a gallery on flickr to display photos created using ApertureExpert presets or techniques learned here. I realize that’s a bit loose, but hey, let’s see what happens!

There’s a new link in the toolbar called “Gallery” so you can access it at any time.

Share

Highlight Hot & Cold Areas… Command-drag or Toggle?

PhotoJoseph's picture
January 4, 2012 - 11:07am

A reader in the forum asked a great question today, and I thought I’d post it here as a tip.

Dan asked:

On the training videos you use the hot/cold feature to show blown highlights and blocked shadows. To set the white point and black point in my photos, I press the command key when adjusting Exposure, Recovery and Black Point sliders. Is there a difference between the two methods or are they just different ways to reach the same goal?

Share

Pages

You may login with either your assigned username or your e-mail address.
Passwords are case-sensitive - Forgot your password?
randomness