Traveling with Aperture 3: Managing Your Library

For those with multiple Macs, i.e. a desktop and a laptop, it's quite likely that your primary library is on the desktop, and the laptop is used while on the road and for smaller, more temporary libraries. Personally I have an iMac in the studio which is my main system, and while I do have a MacBook Air, it's getting on in years (it was never meant to be a big Aperture machine) and I've largely stopped traveling with it. Plus the iPad mini retina has become my laptop replacement for a lot of my mobile work, photo editing included. Needless to say though there are times where you need bigger hardware, and this trip was one of those. I was fortunate enough to be able to borrow a MacBook Pro Retina 15ʺ for this journey, so I enjoyed the full power of desktop processing from my Airbnb apartment in Hong Kong. Pretty sweet, I must say.
 My workspace in my Airbnb Hong Kong apartment
Managed vs Referenced
Of course you have two choices when working with Aperture on where your Originals (the files that come off the camera) will be stored; Managed (inside the Aperture library) or Referenced (outside of the library, usually on an external hard drive). In the studio I run referenced (with over 4TB of Originals on an external RAID), but when traveling I find it easier to run Managed. Unless I'm planning to shoot beyond the capacity of my internal drive, I'd rather stay Managed and keep it simple. If I'm going to employ an external drive in this workflow, I'd rather use it as a backup destination, so I don't have to have it connected to do any work. Plus, keeping managed makes it easier to migrate to my iMac later on.
 Storing managed makes it easier on a mobile library
Back up to external drive on import
When importing in Aperture, one of the features you have is a backup option. You can choose to have your Originals copied from the memory card to a second destination, and you can even choose to have them organized in whatever folder structure you like, just like when importing referenced. When I use this system, I typically have them sorted into subfolders based on the Project name. That way if the worst were to happen and I lost my Aperture library, at least when I went to reimport the backed up Originals, they would already be organized into projects. For the record, I've never once needed to do this though, knock wood!
 It can’t hurt to backup to an external drive when traveling
Leave the images on your memory card
I also prefer to leave my images on the memory cards while traveling, and only delete if I absolutely need to free up space. Frankly I'd rather buy more cards if it came to that. To see how I know where I left off, see the previous tip, “Traveling with Aperture 3: Importing New Images Only”.
Create a Vault in a DropBox folder
Here's a great way to have a dedicated backup for your Aperture library. You may already be using Backblaze or another online backup making this is unnecessary, but I do like having Vaults for these little projects. Easy to recover if necessary. Also in my case, I was using a loaner MacBook Pro, so it wasn't on my Backblaze backup anyway.
So, I created a Vault which I updated after every import (since it's a managed library, the Vault contains all the Originals), and let that just sync over Dropbox in it's own sweet time. My connection wasn't great unfortunately, but I still was able to have my Vault synced to my Dropbox every night.
Make a new Metadata preset with location and job info
Why not duplicate your primary Metadata preset (that's the one with your copyright info in it), and add in the client, location, job #, whatever you need. That way you know every shot imported on this job will have all the relevant info!
Step by step import
OK here's a step-by-step of the import process.
- You fired black frames after your last import, so now it's easy to identify where you left off.
- Click on the first new image, then shift-click on the last new image, selecting all new photos.
- Reverse the selection by tapping Command-R, now selecting all OLD images (yes you could just select the first photo on the card, and then shift-click on the last black image, but I find my way quicker). Click on the checkbox on one of the images you don't want to import, deselecting all of them.
- Ensure your Metadata preset is set to your custom one for the trip. (This will be sticky and remain selected between imports).
- (out of view) Select your backup destination, if you're doing that. (Also sticky)
- Create an album that matches the import you're doing. As you can see below, I created an album for all of a day, then broke that into details as necessary.
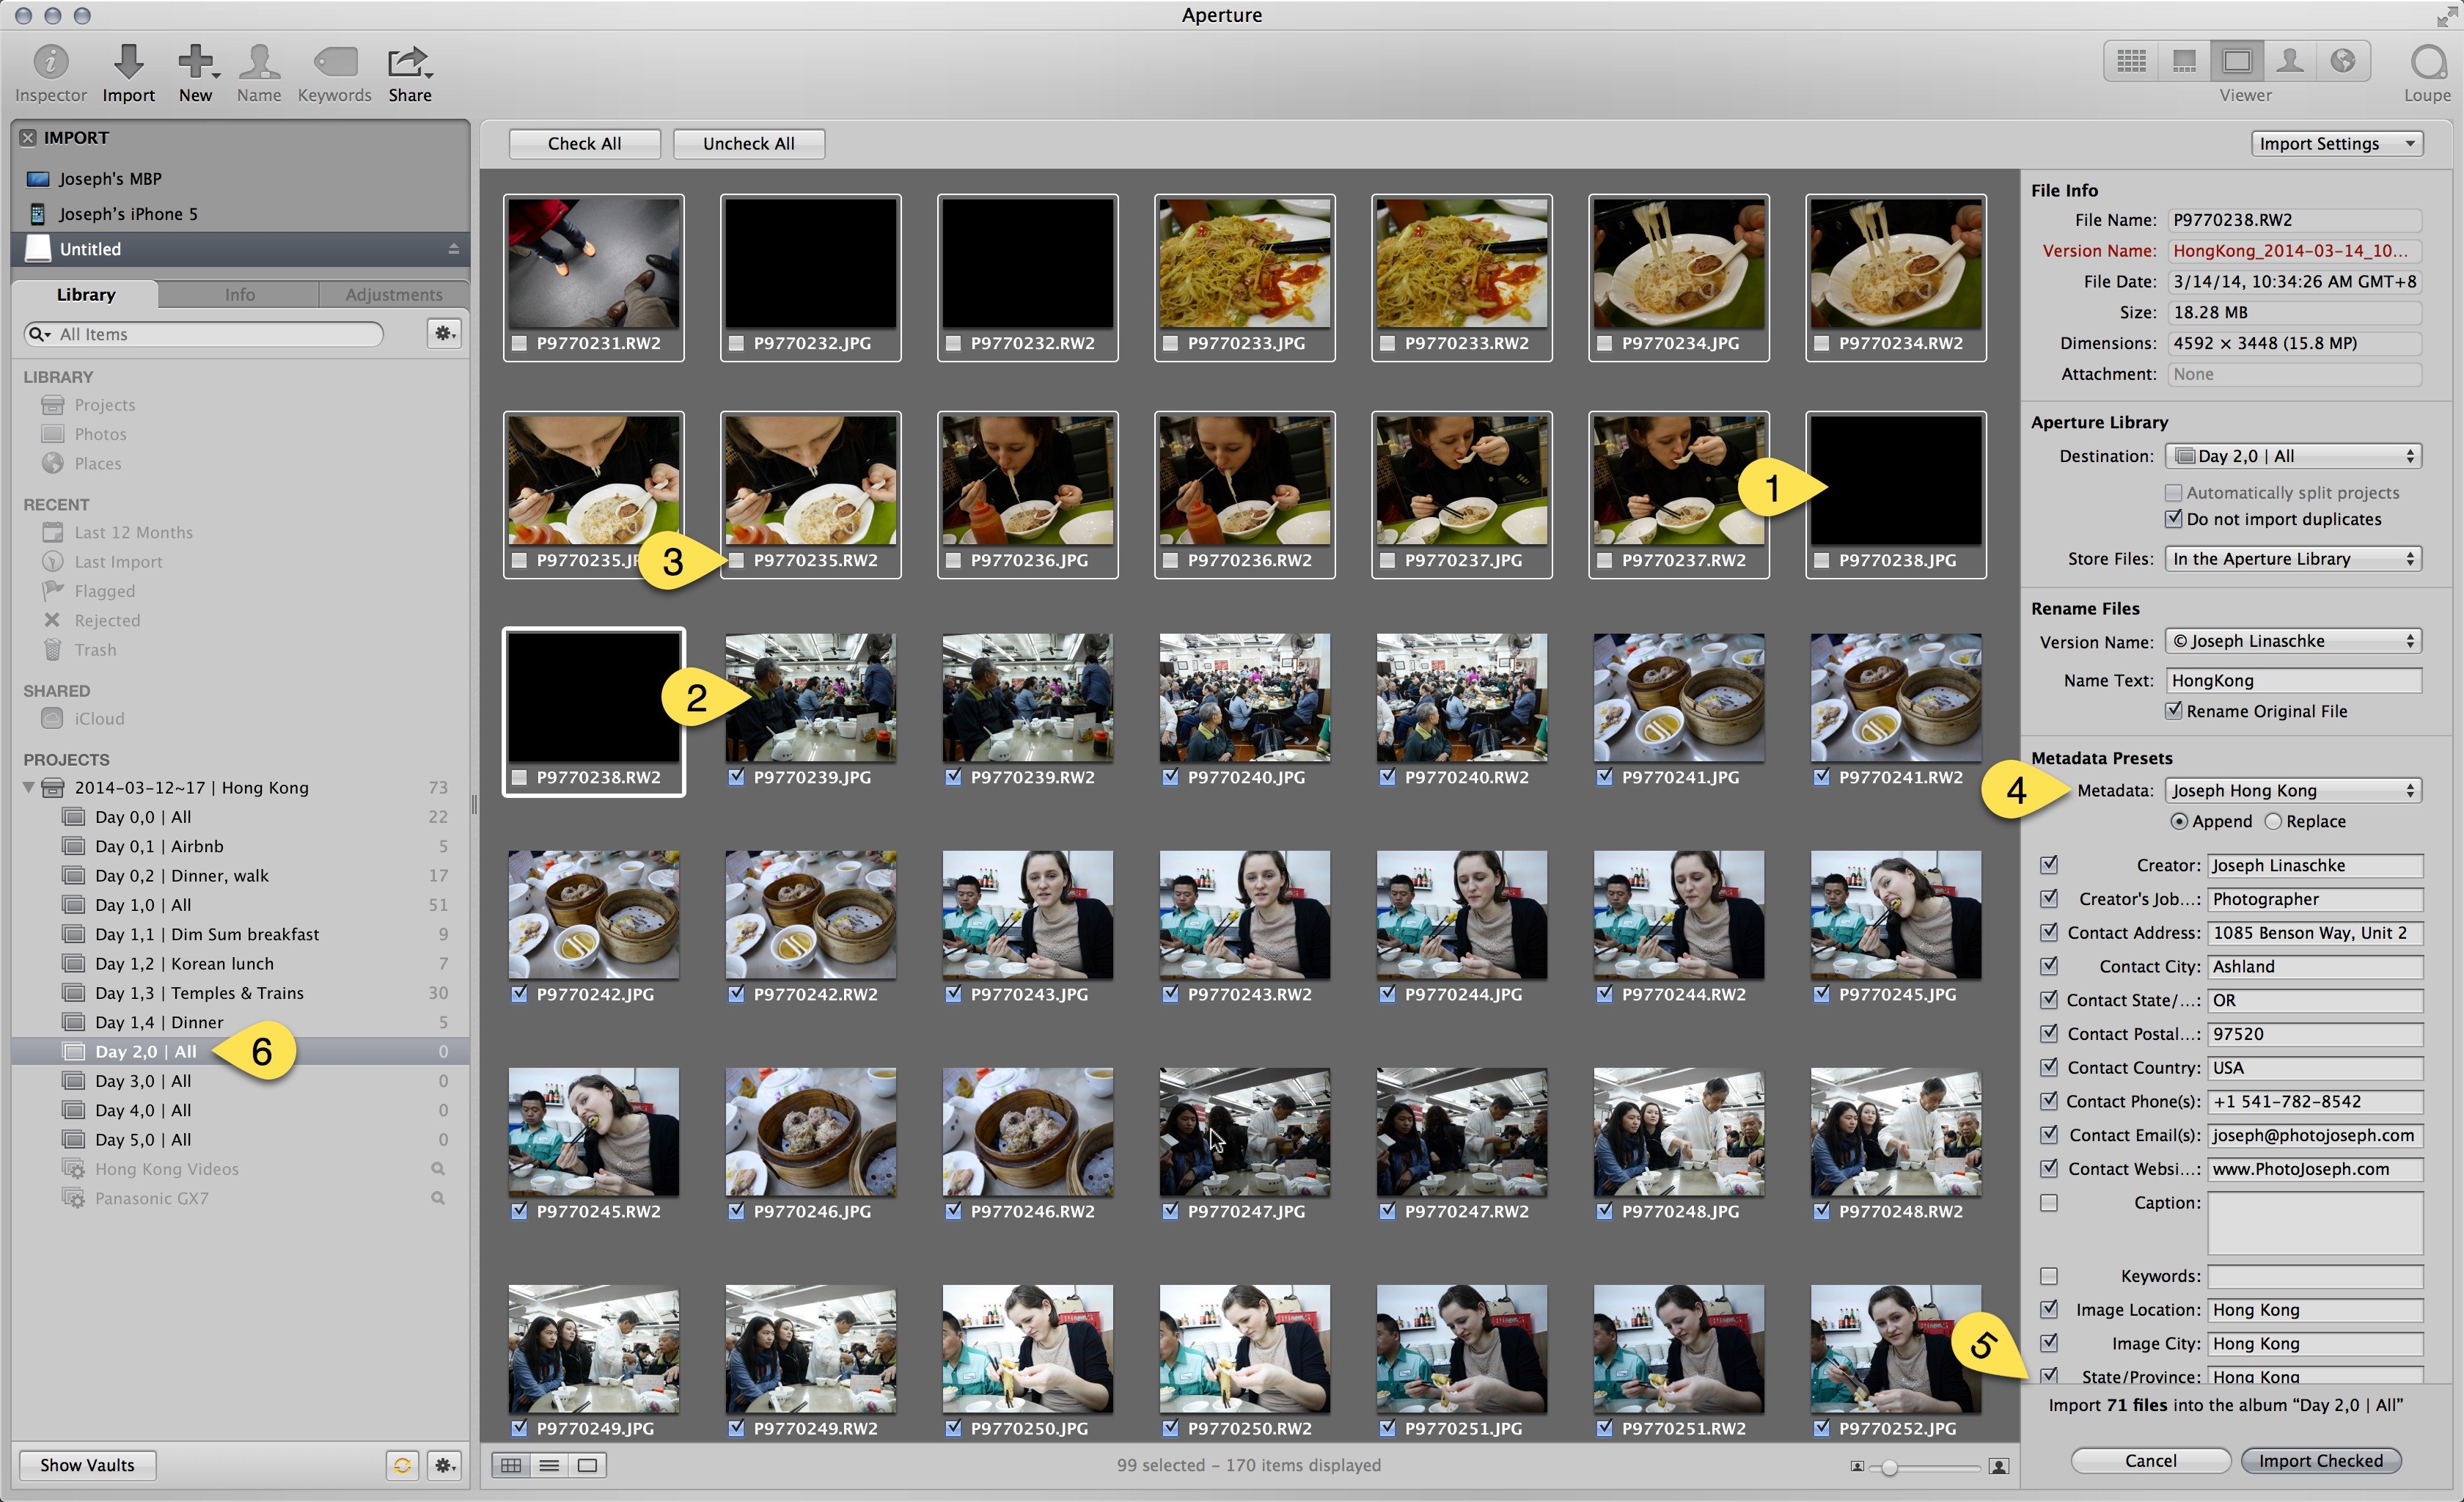
Once you get this set up, the actual import kick-off takes mere seconds.
Merging the travel Library with the main Library
Finally, once home, you need to merge this travel library with your main one. Here's the steps I go through to do this as quickly as possible.
- Copy the library from the MacBook Pro to the iMac over the network. You could copy it to an external hard drive, then plug that drive into the desktop as well if that's more convenient or faster.
- Relocate Originals on the temporary drive into my RAID. I do this before the import because it has to happen eventually, and if I do it after, then I'll be copying the files more times than necessary, wasting time.
- Open the main Library, and go File > Import > Library… and select my mobile library. For me this can take a very long time (too long, frankly… it's because my main library is so big, and I'm hoping this gets sped up in a future release), so I'll do it before leaving for the night.
- If necessary, move the traveling Project(s) into their correct folder in my main Aperture library.
What's your routine?
That's how I work… how about you? Do you have any other steps, or shortcuts, for your mobile-to-desktop Aperture workflow?
Comments
on March 19, 2014 - 2:26pm
Joseph, Thanks for the review of your importing process when traveling. Two questions: First, I’m confused by the command-R process on old photos. If you have already imported them on a previous occasion, why go through this step? Secondly, I didn’t realize you could import directly into an album. I was under the impression that it had to be to a project. I break down my project into albums similar to your set up but using the 00, 01 etc naming for the albums as describe in a previousTip given here.
Florian
Florian Cortese
www.fotosbyflorian.com
on March 19, 2014 - 5:21pm
Hi Florian. The Command-R is to reverse the selection, to make it easy to uncheck the already-imported images. When you insert the card, all photos are checked. So you select the new photos, then Command-R to reverse the selection, now selecting the old (already imported) photos. It might be easier to select the first (already imported) image, then scroll down and shift-click on the last already-imported image (or the last black frame), but for whatever reason I've found it easier to select the new images, then reverse the selection to select the old. Whichever way you go, the point is to select all the old photos, and uncheck them.
Importing to an album is a huge time saver for me. They obviously go into the host project, and also are already added to the album. Yay!
@PhotoJoseph
— Have you signed up for the mailing list?
on March 19, 2014 - 8:49pm
Thanks Joseph. Ok, that now makes sense and importing directly to the album is a GREAT TIP! It will save me a ton of time and work! Great stuff as always.
:)
Florian Cortese
www.fotosbyflorian.com
on March 26, 2014 - 11:27pm
Is it possible to download from the memory cards to the computer and external HD at the same time?
spike
on March 26, 2014 - 11:41pm
@PhotoJoseph
— Have you signed up for the mailing list?
on March 27, 2014 - 12:31am
I’m sorry but must have missed something …….I’ve gone to the import page and see at the top right “Import Settings” which had a subsetting, “Backup Location”, where I was able to enter the name of the Ext HD that I had plugged in to experiment. And, lo and behold, the download was split! As an test I deleted the files from my computer and they were still on the Ext HD. The down side is that they were not filed in a Project, as I had set up in Aperture but as individual files that I could view in preview. How can the Folder structure be transferred to the Ext HD? Thanks……I’ve been using Aperture for several years and am, overall, very happy with it’s organization and editing capabilities. I’m happy to have found you to move further.
spike
on March 27, 2014 - 2:28am
You can't “transfer” a folder structure (and I assume you mean Album structure). You can choose a structure for the backup on import from the “subfolder” menu, but once it's copied this has no connection to Aperture itself. It's just a backup of the original files.
@PhotoJoseph
— Have you signed up for the mailing list?
on March 29, 2014 - 7:04pm
Hi Joseph,
Thanks for the tips on merging travel libraries with home based ones, very helpful.
The method I use to select “new” images from a previously used memory card is as follows as I found the CMD-R method confusing.
When the import window has finished populating click the <deselect all> button at the top of the window, then locate your first new photo, click to highlight it, then shift-click the last photo in the window, to highlight all in between then just click the check box in one of the highlighted photos, all will be checked and then click the import selected button at the bottom right.
Just another way of accomplishing the same thing for someone line me we can’t remember keyboard shortcuts. :-)
Cheers
Dave
on March 30, 2014 - 1:30am
Great tips as always Joseph, I do a lot of these things when I travel and download my shots, I do like the idea of firing black shots to separate days etc. I always start the day with a frame of the name of the city/town I am about to shoot in which then gives me a title shot to place on top of the ‘Stack’, but I’m also going to add the ‘black frame’
Lance
Lance
on March 30, 2014 - 7:28pm
Could you explain what you mean by;
Relocate Originals on the temporary drive into my RAID?
Thanks
on March 30, 2014 - 8:42pm
Mitch,
I mean simply to copy the originals their current location, which in this case is temporary (it could be an external USB drive, or the internal HD on the portable computer), onto my RAID, which is my very fast drive system that I use in the studio. Does that help?
@PhotoJoseph
— Have you signed up for the mailing list?
on March 31, 2014 - 1:30am
I was attempting to set up a RAID system 2 years ago and was told by Apple that Aperture did not recognize a RAID configuration. I’ve been backing up photos and Libraries, 8 different Libraries, on a 2TB G-drive but would like to connect that with another 2TB G-drive in a RAID configuration to have the extra backup. I was also told by one of the Apple trainers that in any given Library the maximum # of photos in RAW should be about 20,000. I had many photos corrupted(noted with yellow and red badges) when I exceeded that number within one Library.
spike
on April 14, 2014 - 12:56am
Spike - I am now using a raid for my referenced files, and I haven’t heard anything negative with this type of storage as long as it’s formatted as HSF+. Anyone else heard of issues with raids?
Joseph - Thanks for the great workflow tips. I never knew about the Cmd + R trick. Here are some of my thoughts on the above:
* Managed Library + Originals backed up to an external is a good option in your situation because you had internet access. However if you were offline then maybe running a Time Machine backup or a clone drive on the external would be better. That way if the main library disappeared you wouldn’t loose your metadata and edits.
* When backing up originals on import I like to organise them in folders by date. My preset is Image Year / Image Month / Project Name. The project name is always YYYY-MM-DD | Custom Name (a tip I found from you here!). This might sound like overkill, but it does make it easier to cull old data when clearing out my portable drives. This is also the same structure I use for my referenced library imports on my desktop.
* Renaming originals - I now name all my originals as YYYY-MM-DD_HH-MM-SS_Custom-Name. Again maybe this is overkill… thoughts on this?
* Merging libraries - For transferring extra large libraries try using target mode on the laptop. That avoids having to copy to an external drive first.
* I have a slightly different method for getting my originals onto the raid - First 1) I merge the new image library into my main library, then 2) I relocate the originals onto the raid using Image Year / Image Date / Project Name as a folder structure, then 3) I run a clone on the raid to assure the originals are backed up.
NOTE: to save even more time here you could relocate the originals to the raid directly from your laptop. Then you would only be merging metadata and previews into the main library. This may reduce your issues with lengthy merges??
Personally I wouldn’t copy the originals from the portable backup drive to the raid as I may have deleted some images from the travel library, which wouldn’t remove the original from that backup location, resulting in orphaned RAWs. However if you are the type of person who keeps everything then this shouldn’t be an issue.
As it goes, I actually use this workflow for on-location libraries where I’m running tethered, so there is no import step, although the tether options are exactly the same.
-CB
www.pixbeatphoto.com
on April 14, 2014 - 11:49pm
Nice stuff Chris. Your naming scheme sounds good to me — both the folder and file name system you may have gotten from here ;-)
Does target disk mode still work? I haven't tried that in ages. I used to use it all the time, but now networks are so fast I must have not missed it for a while. Probably also because my only laptop is a MacBook Air with USB 2, no firewire or thunderbolt — so that'd be one slow-a** target disk transfer!
My ridiculously long merges have nothing to do with how much content there is. I can merge a library with a single image in it, and it'll take ages. If I say “hours” that's overkill, but I know for certain that I can't do it and expect to get right back to work.
@PhotoJoseph
— Have you signed up for the mailing list?
on April 15, 2014 - 1:48am
Yes, I still use target once in a blue moon. Mostly because my old MBP is so damn slow to boot to the desktop!
www.pixbeatphoto.com