Understanding Image Export Presets in Aperture 3, Part I
Your camera shoots digital photos at much higher resolution than you need for most purposes. If you're posting to a website, you may only want images that are 800 or 1,000 pixels wide, for example. Or if you're ordering business cards, the recommended size might be 1,100 pixels in the longest direction. A print service may request a photo that's 4ʺ × 6ʺ @ 233ppi and not give you a pixel count. Or of course any other variety of sizes might be required.
The Photoshop way (aka what you might be used to)
In an image editing app like Photoshop, if you ever needed a version of your photo at a different size than it currently exists, you would either go to the Image Size menu and punch in the appropriate numbers, then save it or save-as, then undo or otherwise revert the image back to the original size. Or, you may have used the “Save for web” feature, and scaled and saved at the same time. But neither of these features exist in Aperture, so if you're new to the app, you might be wondering how this works.
The idea behind presets
Remember that in Aperture, your original image is never touched. Even the cropped, enhanced, filtered images you're seeing on screen are just a render of the original photo plus any adjustments you've assigned (not including changes made by plugins, which do generate a new file, and is a totally separate topic). So that means there's no way to scale an image within Aperture, because you'd be making a permanent change to the original, which we don't want.
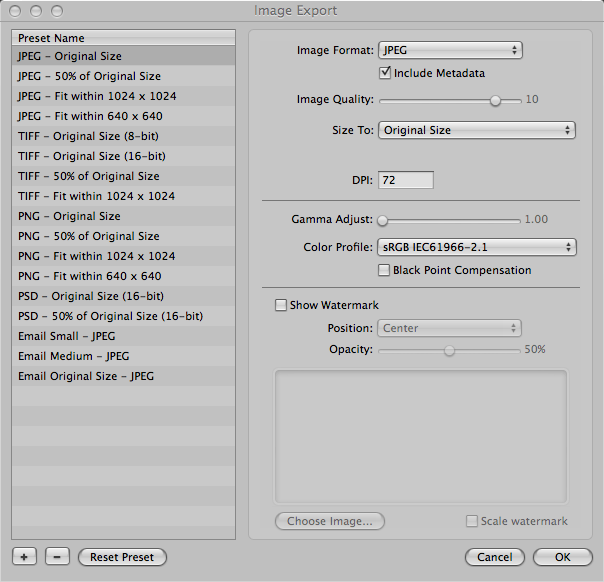
The Aperture way is to scale your images when you export versions. Remember you always have to export a version to get anything out of Aperture. There's no “save” command, because it's not needed (changes are infinitely undoable and turn-off-able so the concept of save doesn't exist), so exporting a version is the closest thing to it. Your photos as you've modified them exist solely in Aperture, and you need to export versions of them to use the images elsewhere. And it's at the time of export where you choose a preset that could scale your images. The default “Image Export” preset list looks like this:
As you can see, there are a list of presets in different formats and sizes. The first one, JPEG – Original Size is going to create a full-size JPEG of your image. By looking at the settings on the right, you can see how this is put together. The Image Format is set to JPEG, the option to include Metadata is enabled (that's your copyright info, and more), the Image Quality is set to 10, and the Size is at Original Size.
If you select the next one down, you'll see it's set to 50% of the original size. That's pretty obvious what it'll do, but then let's go to the next one, which is “Fit within 1024 × 1024”.
What does “fit within” mean?
The idea behind the “fit within” setting is that you don't have to worry if the image is vertical or landscape. No matter what aspect ratio or orientation it is, by setting to “fit within” and setting both the Width and the Height the same, the image will be exported at that size on it's longest side.
Making your own presets
These presets are just the default, but of course you can make your own to customize your experience. If you have a client that wants images at a specific size, create a preset at that size, and name it for the client. That way when you go to export the monthly postcard print job for the local auto shop you're shooting for, which requires images at a specific size for their print run, you don't have to think about it every time. Just choose your export preset “Bob's Auto Shop” and away you go.
What about odd aspect ratios?
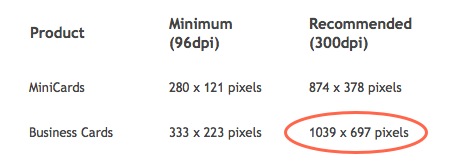
I just ordered some new business cards from Moo.com (love those guys!), and they have both minimum and recommended pixel size for the photos you can put on the back of each card. As you can see from this screenshot of their site below, the recommended size is 1039 × 697 pixels.
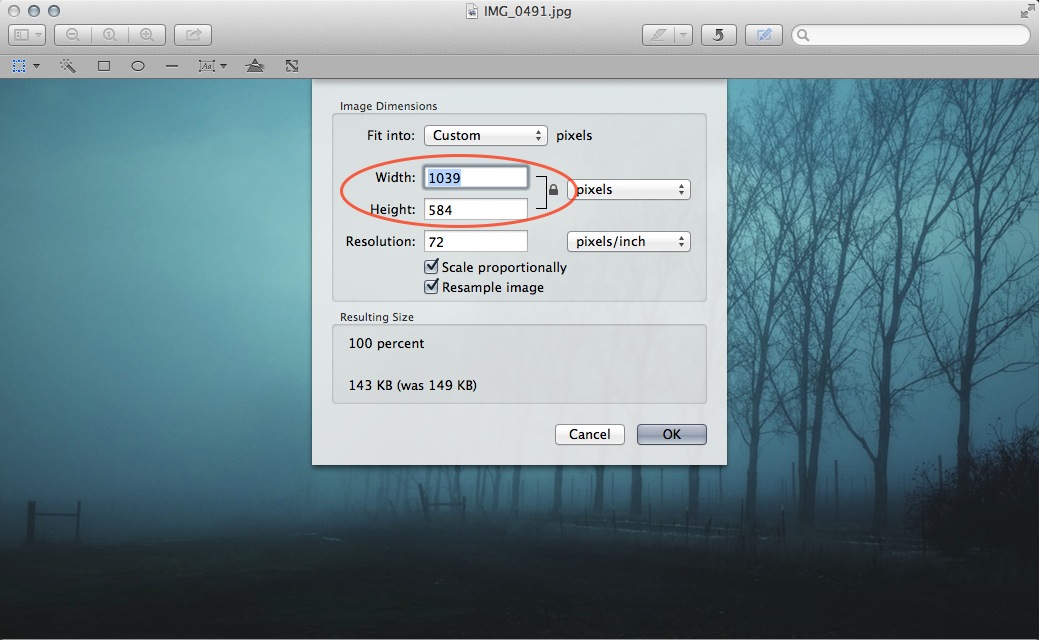
In most cases, there's no need to export a larger image than 1039 pixels in the longest direction, so making a preset of “fit within 1039 × 1039” would theoretically work great for my Moo cards. However, I've found that many of my photos are cropped a little wider than the aspect ratio of a business card, so I end up having to zoom in on them a bit to fill the card, which means the pixel count would be less than the 1039 or 697 recommended pixels. Here's what I mean… in the screenshot below, you can see a wide-cropped photo (it's a 16:9 ratio), exported at 1039 pixels wide. The height is only 584.
 Because this image was cropped to a wider aspect ratio than a business card, the height is under the recommended pixel count for printing
That 584 is still well above the minimum, but not quite the recommended. By the time I filled the card template with this photo, it'd be getting 584 pixels on the height, and something less than 1039 on the width. I want my photos to look the best they possibly can, so I'd rather export a little bigger and ensure that I'll get full resolution, or more.
What I do for my Moo cards is export to fit within 1250 × 1250, which in the case of this image, would result in a photo 1250 × 703. I don't need to get it exactly at 697; as long as I'm over, I'm happy.
So why not just upload full size or half size images, which would obviously be way, way bigger than needed? Because it's inefficient throughout the entire workflow. It'd take longer to export, longer to upload, and take up more space on my hard drive if I kept the exported collection around.
But what if you want to be precise?
What if you want to be exact, however? In the next post, we'll take a look at some options for controlling your output in a variety of exacting ways.


Comments
on February 4, 2014 - 6:26am
This would be a good article series to explain the DPI setting and how it works. For example, why it doesn’t change the size/quality of the image when you use size to: fit within. I see lots of confusion over this and it’s difficult to explain.
Thomas
on February 4, 2014 - 3:18pm
@PhotoJoseph
— Have you signed up for the mailing list?
on February 5, 2014 - 1:31am
Hi Joseph
I was going to try Moo Cards but was put off when they requested CMYK photos. Can you create that in the Aperture exports?
dagge
on February 9, 2014 - 4:47pm
Hi Joseph, Do you know if there is a way to set the share size/resolution when you share to Facebook, iCloud etc? Up until now I’ve been exporting smaller versions to desktop, then importing and then sharing, I’m sure there must be a simpler way to do it but can’t find it! Also have you heard any recent news on Aperture 4/X yet? Thanks!
on February 21, 2014 - 12:24pm
Awesome Stuff…!!!
Getting detail information regarding image designing and image editing for business cards…
you also get detail information from Spot UV Business Cards