Auto Mask: My Favorite Feature Since Moving to Lightroom
At the beginning of January I decided to make the switch from Aperture to Lightroom. It has been a series of highs and lows as I struggles to modify my streamlined workflow to the new platform. My initial impression, like many others, is that the user interface is a bit clunky and Digital Asset Management tools are lacking. I find myself saying quite the opposite when it comes to editing my images in the Develop Module. I can see why Lightroom users have thought they had it good… in terms of image editing tools, they certainly do!
One example of a more powerful implementation is the brush tool in Lightroom. In Lightroom the brush tool allows you to apply more then one adjustment at a time. You can apply adjustments like exposure, clarity and hue all in one go. To do this in Aperture you would have to use multiple brushes to achieve a similar effect. In Lightroom you can also use the brush multiple times, each time with a different set of adjustments. This lets you apply effects as pseudo layers on top of your photos. For this reason the brush tool is extremely powerful and much more versatile than the brushes implementation in Aperture. I've spoken to a few different Aperture users and one area of confusion with this tool is that the brushes are in their own seperate panel and not tied to the basic adjustments like we we are used to in Aperture. I agree at first this was very confusing to me, but once I saw the power of being able to separate brushes from a single adjustment and instead apply multiple effects in a single pass it made a lot more sense.
Using Auto Mask in brushes
 Use the Auto Mask for fine tuned, edge-detected adjustments
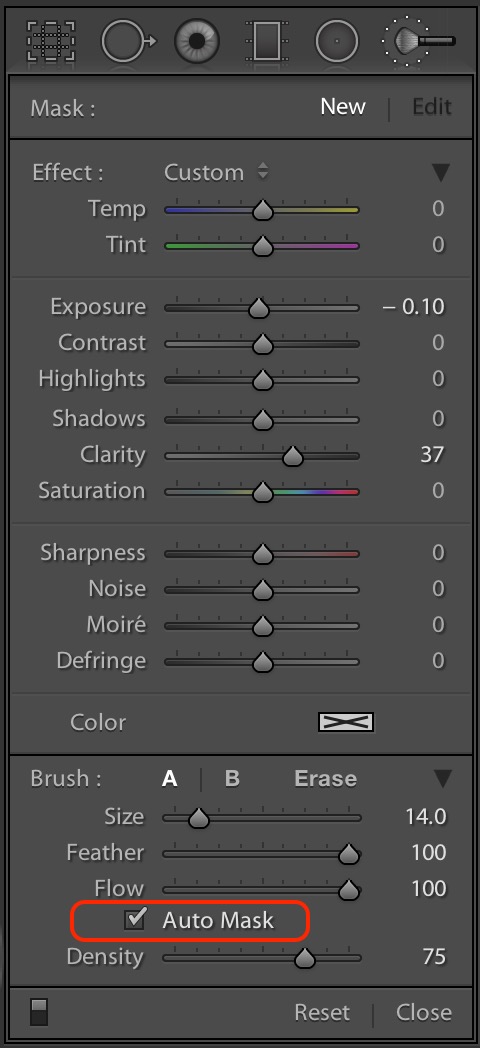
If you want to take brushes even further, there is a check box at the bottom of the brush panel labeled Auto Mask. By turning this feature on it enhances your brush by using color and contrast to detect the edges within your image. As you paint, it searches for similar tones to what the center of your cursor is on, and only applies adjustments to areas that are similar. You can quickly turn this feature on and off using the keyboard shortcut “A” while using the Adjustment Brushes.
When the Auto Mask brush misses spots
Sometime when using the Adjustment Brush with Auto Mask turned on, I have found adjustments aren't always applied completely to an area of the photo. Lightroom misses little spots because it determines the tones don't go together and it believes these areas are supposed to be edges. To correct this I always check my mask using the “Show Selected Mask Overlay”. With the overlay turned on you can see the little spots in your adjustment mask. To fix this simply turn off the Auto Mask feature and paint using a small brush over the missed areas. This will paint over everything and smooth out those little spots, applying the adjustment completely.
Examples of how I've used this tool
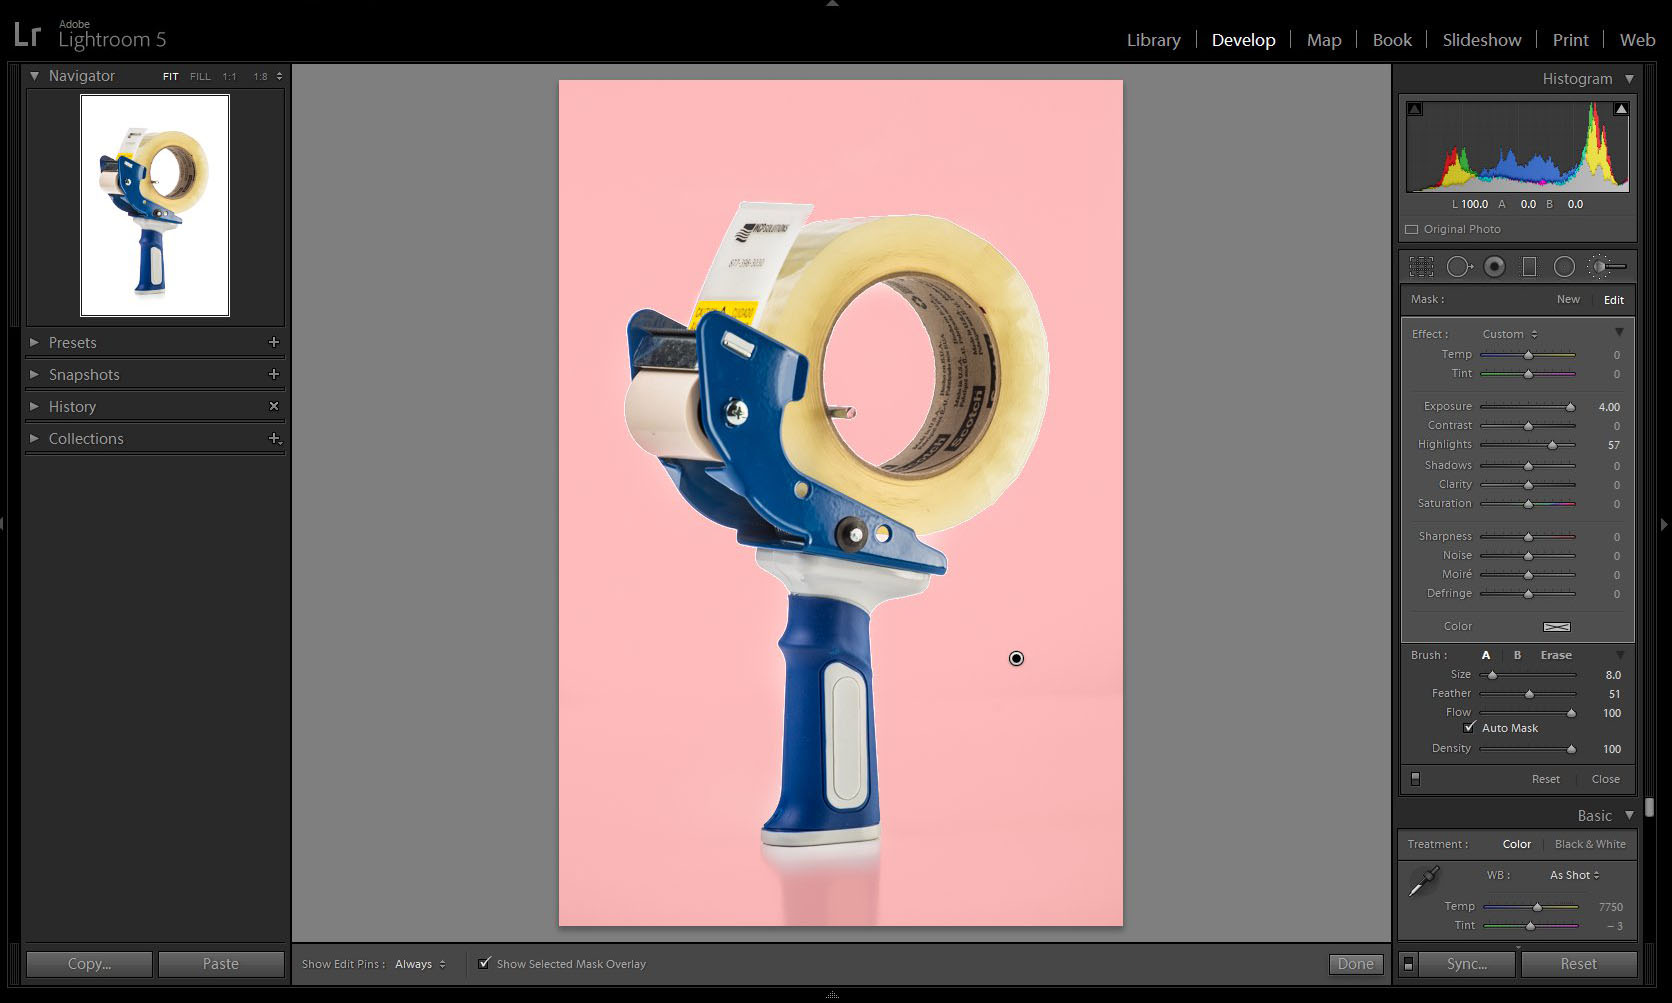
I've found Auto Mask to be useful in a wide range of photographic subjects. I shoot a lot of products and I use the Auto Mask tool often to select areas around my products and apply finishing touches for delivery. In the example below I used the mask to select the area that is supposed to be pure white. I have the Show Selected Mask turned on so the area in pink is the area of the photo where the adjustment effects will be applied. Using the adjustment brush panel I was able to push the exposure to the right making sure the background was pure white.
 I used auto mask to apply effects only to the background, to make it pure white
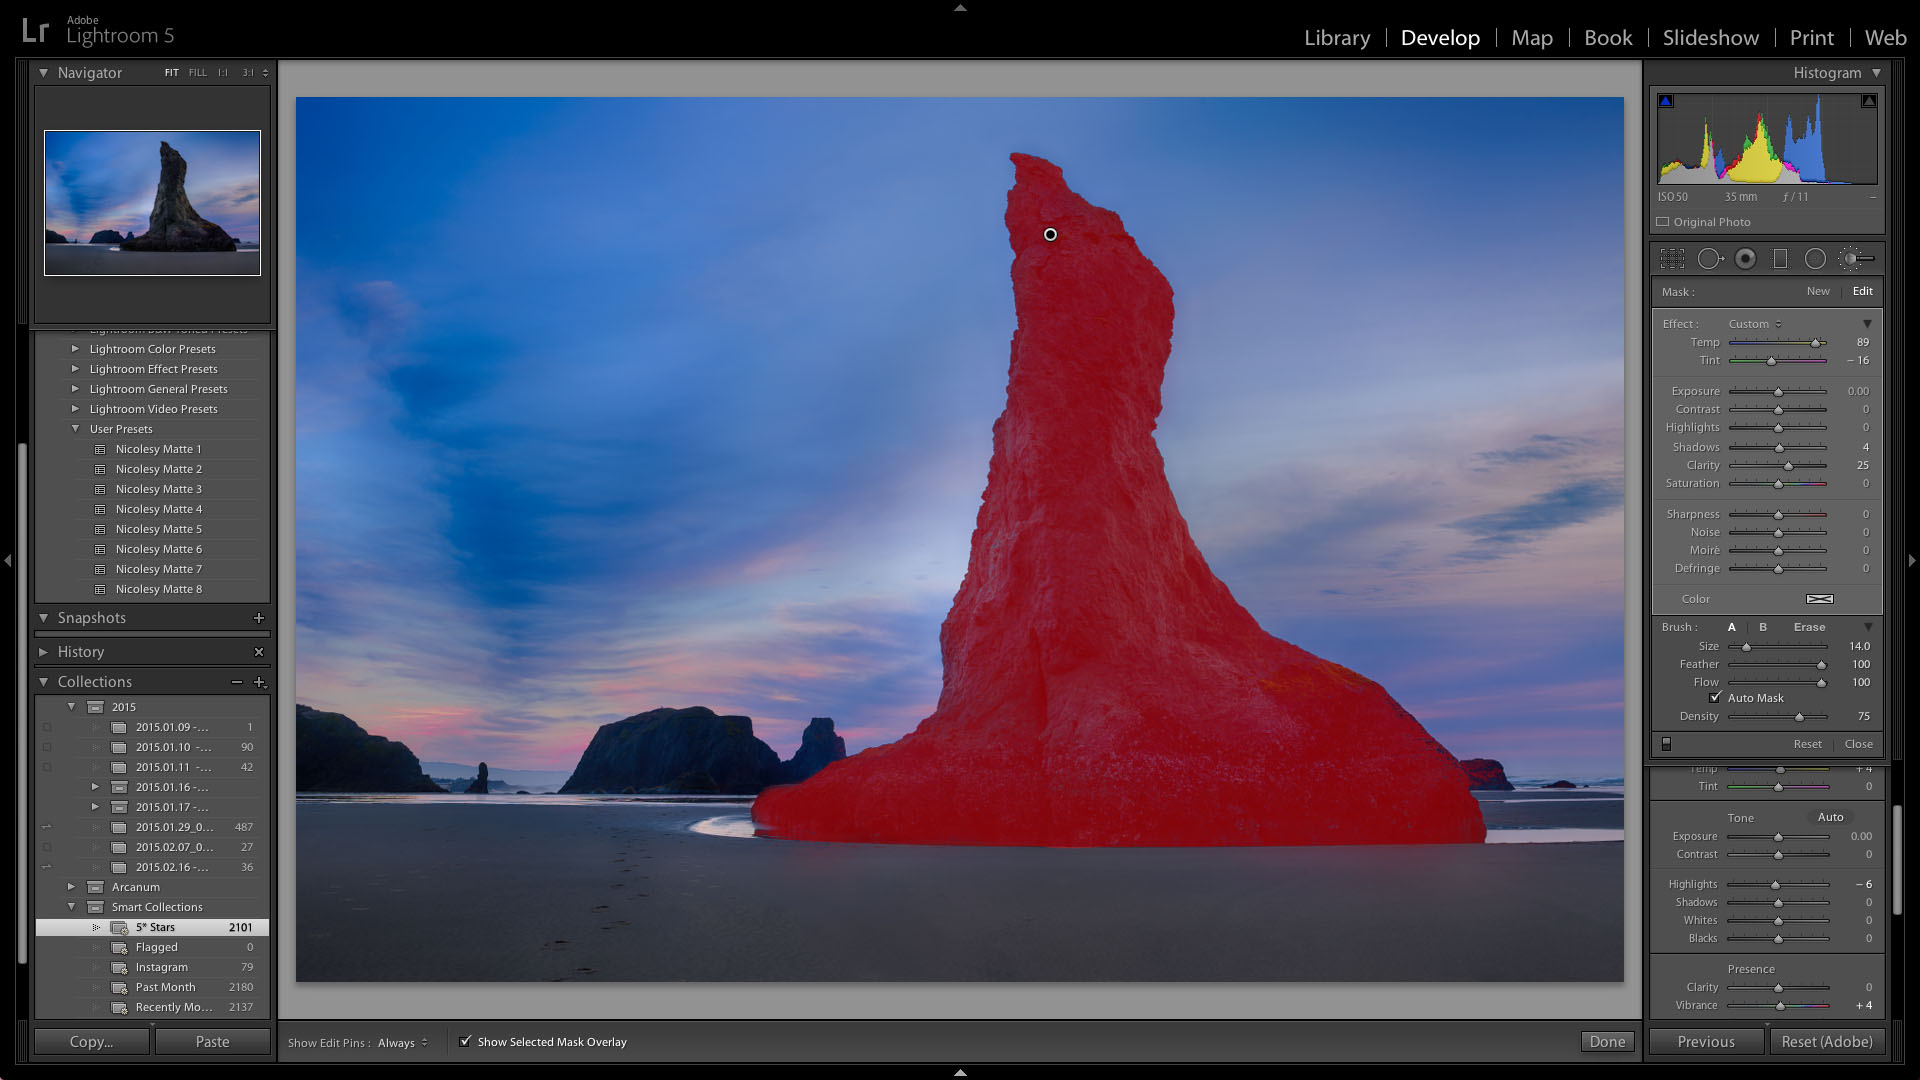
Another example of an area that I've used this tool for is in my landscape work. I recently was working on an image of a sea stack formation on the Oregon coast. As I was working on the the image I wanted to apply clarity and white balance adjustments to the subject without it bleeding into the sky. By using Auto Mask I was easily able to apply those adjustments to only the areas I wanted to effect.
 I used auto mask to selectively apply edits only to the seastack
These are just two situations of many that I have used the Auto Mask in Lightroom to finely tune how I apply adjustments and effects to my images. If you haven't given this feature a try I highly recommend it, and find it to be a very powerful and versatile tool.
More like this
- Tip
- Tip
- Tip
- Store
- Tip

Comments
on April 4, 2015 - 4:17pm
Thanks, Nick, for this review. I, too, made the jump to Lr in January and indeed find the adjustment brush tool very handy and love the fact that you can use multiple adjustments at one time and even change those after you’ve added them by adjusting the sliders once again if the effect is not quite what you envisioned initially. I’ve adjusted my approach to the difference in the DAM handling in Lr v Aperture. I still use Joseph’s model with y-m-d format and a substituted album-subalbums structure to replace project-subalbums for my import. From there I do all my culling, getting rid of rejects and moving what’s left into Collections. I quickly set up a simplified Collection Set structure to house my selected photos in sub collections by category depending on the shoot. Working in Collections makes it much easier moving through the Develop module. There are two deficiencies in Lr, however. Smart Collections are separate so you can’t tie them to a Collection Set, like you could have a smart album in a project in Aperture. And you can’t set up a template of a collection set format like you could in Aperture, duplicate it and drag it to where you want. Maybe something like this will be available in Lr 6 when it surfaces. I think any of the other programs, be it Lr, C1, etc will involve some degree of a learning curve and each of us will need to decide based upon our individual needs and likes which one will suit us the best. I don’t think there is a really wrong way to go whether to stay with Photos or move on. I comes down to what each of us feels works best. And this is a great CENTRAL site to share the various experiences.
Florian Cortese
www.fotosbyflorian.com
on April 4, 2015 - 6:21pm
Thanks for sharing your experience Florian… I agree being able to apply so many effects and adjustments after we've painted using the brush or other local adjustment tools is really wonderful.
I've been using a collection based approach for my organization as well. I'm waiting to see if Lightroom 6 makes any changes to collections, collection sets and smart collections before I lock down a workflow. One of the main issues I've had working with collections is when I roundtrip to apps like NIK. It appears sometimes that the final image doesn't make it into the collection I'm working in but ends up in the folder where the real file is stored… I have a feeling it has to do with me accessing photos in the collection set and not the collection itself… but I haven't had very much time to research it. Keep on sharing your experiences!
www.nicknieto.com / Portland, Oregon
on April 4, 2015 - 6:33pm
Hi Nick, nice review of the merits of Lr's local adjustments over what Aperture users used to know. I like the ability to brush multiple adjustments at the same time too - Capture One does it in the same way. What I miss from Lr is using an inverted mask (“Brush out” in Aperture, or the invert mask command in Capture One. Another nice thing in Capture One is “Fill Mask” which allows you to fill a closed area you first draw with the brush. Last not least - it is possible to copy masks from one layer (similar to Lr's “pins”) to another.
It's a pity that Lr doesn't allow to brush its HSL adjustments or White Balance. And Apertures “Curves” of course.
ciao,
Jochen
http://neonsqua.re
on April 4, 2015 - 6:37pm
Jochen - that fill mask sounds like a great feature in Capture One… I'll have to check that out. I too wish you could apply HSL and Curves via the brush… fingers crossed for LR6?…
www.nicknieto.com / Portland, Oregon
on August 8, 2015 - 10:49am
Thanks for posting. I’m constantly frustrated with the lack of good context-sensitive help, so I’m always using Google “Lightroom featurename” to figure out what something does at all (as in this case) or find tips on using it.
One proofreading issue: “only the areas I wanted to effect.” you mean “to affect”.
I found your writeup not only good in explaining what this checkmark was for in the first place, but the usage tips was exactly what I found: use the “O” to see what you’re doing, and go back and fix the missing specks with “auto” turned off.