Correcting for Mismatched Timestamps in Aperture 3—After Import

Last week I talked about correcting time zones on import in Aperture 3, in the article “Original Photo Capture Timestamp Hidden in the Import Window”. If you were importing from multiple cameras, and some were correct but some weren’t, it’s not hard to deduce how to correct for that—import the right ones normally, then the rest using the tips in that article.
But what if you’ve already imported your photos, and suddenly find yourself with out-of-order photos in the browser, as I did yesterday after a shoot for my new book?

I was shooting with multiple cameras, and while I’m normally very good at setting the time on all cameras before a shoot, in this case I forgot one. I was shooting with five different bodies, including one from borrowlenses.com (love those guys… give ‘em some love!). I was importing in the field into the MacBook Air 11” (which performed very well for my needs in the field… I’ll write more on that another time though), and realized later that these were time stamped incorrectly.
There’s two ways to fix this… the easy way, and the hard way. How you handle this depends entirely on your file naming workflow.
The Easy Way
Aperture 3 has a built-in tool for batch adjusting the timestamp on a photo, and it even allows you to alter the metadata on the Master file (the original RAW file) if you want to. Simply select the collection of photos you need to change, choose one file as your “primary selection” (that’s the last image you clicked, and will have a heavier white outline around it)…

…then from the Metadata menu, choose Adjust Date and Time…

This opens the date and time adjustment tool. As you can see, you have the Original time, followed by a changeable Adjusted time. Additionally, you can opt to Also change master files at this time.
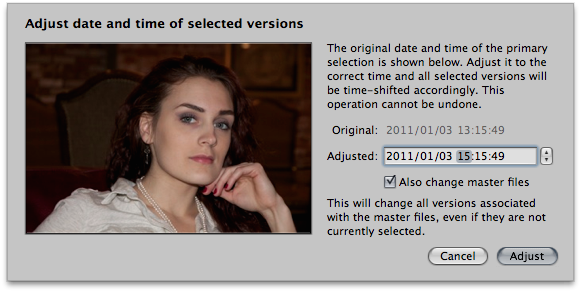
And that’s all there is to it! The times will shift, and as you can see, you can shift by anything from a single second, to, well, any amount of years, months, days, hours, minutes or seconds.
Bonus Tip: Take a Photo of a Clock
This is another reason to take a photo (with each camera) of a known-accurate time source, such as your iPhone (with seconds displayed, please). I use a simple free app called Clock!, as below. This is a great way to synchronize every shot from every camera, perfectly!
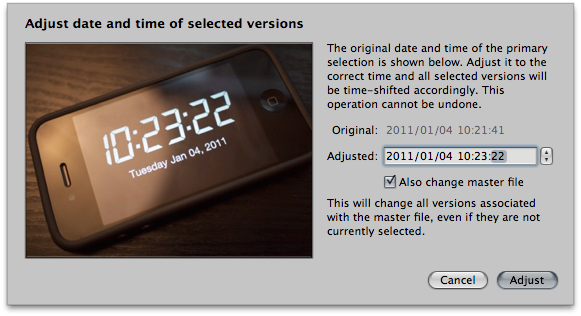
As you can see, this camera was off by a couple of minutes and seconds. By simply entering in the time as displayed on the iPhone clock into the Adjusted field, the photos from that camera will be synced to one-second accuracy. Nice!
The Hard Way
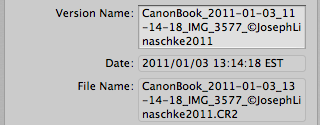
The above method, as simple as it is, is only the first step for me—and for anyone else who embeds the date and time into the filename, as I outline in Tip #4 – Making Your Own “Rename On Import” Custom Preset in my “ApertureExpert’s 15 Tips on File Management in Aperture 3” eBook. My filenames include the date and the time of capture, so by using this “fix” above, suddenly I’ll have mismatched times, like this:
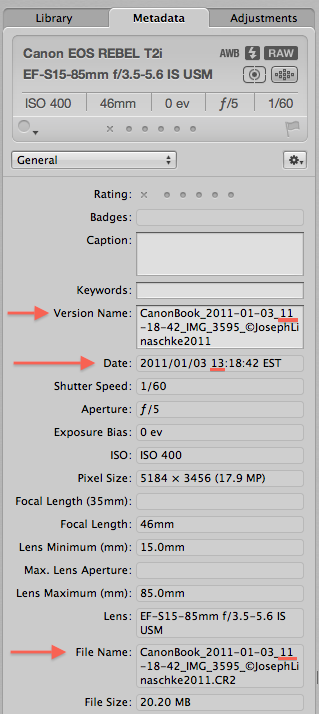
See how the Version Name and File Name no longer match the Date; I shifted these by two hours, so that’s not good.
If you still have the images on the card, you could just reimport the photos from the card at this point, and shift the time zone on import. That won’t fix any time that’s off by minutes or seconds, but at least you can easily shift hours this way. However this following process, while seemingly arcane, is probably faster and has the added advantage of not wiping out any Adjustments or Metadata work you’ve already done! And of course if you’ve already wiped the cards, then this may be your only option.
Here’s an overview of what’s about to happen: the master files will be renamed to their original off-the-camera names, then you’ll rename the Version and Master file name simultaneously (just as you would on import), but there’s a trick you have to employ here or some of the files won’t rename properly.
If the files are currently Managed, you’ll need to expose them in the Finder so you can make the following changes. Select all the images, and choose File > Relocate Masters… and put them in a temp folder somewhere.
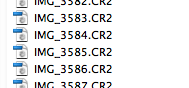
Select one of the photos in Aperture and choose File > Show in Finder. Your file collection will look something like this (assuming you’re following my naming scheme, or one similar to it):

NOTE: Leave Aperture 3 running at this point! If it’s running while you change names, Aperture will keep track of them throughout this whole process. Neat!
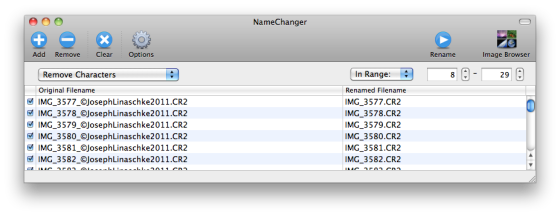
If you don’t have a file renaming app, check out NameChanger. I swear by this utility, have talked about it here a few times before, and it’s even free—but be kind and donate to their PayPal fund.
 NameChanger.app
Launch NameChanger, and drag all these files into it. To change the name back to their original format, you’ll need to hit them with NameChanger twice; once to remove the first extra characters, and again to remove the last extra characters. Here’s what mine looked like:

and then…
Now all the files are named as such (be sure to leave the .CR2, or whatever file extension your files have, when renaming the files).
At this point, go back to Aperture and make sure that the files are still linked. Just look at the Metadata, or select a photo and Show in Finder again to see if it jumps back to it.
Now for the tricky bit. Your initial thought may be that you could just rename the Versions, and rename the Masters at the same time, just as you do on import. That’s basically what you’ll do, but if you simply choose the Batch Change command and try it from there, in my experience about half the finder files will fail to rename. So how do you do it?
The Super Secret Tip
What you have to do is actually move the files while renaming. If the Finder is moving the files at the same time, then it doesn’t fail on renaming.
Select all the photos you’re working with in Aperture, and select File > Relocate Masters. Choose a new location, and your preferred subfolder organization, and choose your Name Format preset.
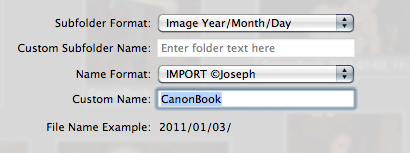
Presumably that naming format includes a date and time stamp in it, or you wouldn’t be going through this mess in the first place! Unfortunately the File Name Example (file name preview) you get in this view is useless, and doesn’t actually show you the full name if you’re using a scheme like this (just a long-standing bug in Aperture).
Once that’s done, compare the Date and File Name in Aperture… they should match, but we still have to fix the Version name—that isn’t changed when you relocate the files.
Select all the photos in Aperture, and choose Batch Change (Command-Option-B), and set the new Version Name to Master Name. This will pull the Master name from the file in the Finder (that you just renamed when you did the relocate in the previous step), and put it in the Version name.

Check the results, and here’s what you should see!
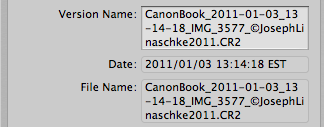
As you can see, the Version Name, Date and File Name now all match. The only difference between this and the naming if you had it all right in the beginning is that there’s a .CR2 (or whatever your file extension is) now included in the Version name. I haven’t found a way to do this where this doesn’t show up—hiding the extension in the Finder doesn’t do it, and while you probably could remove the .CR2 using NameChanger before doing the name update, then add it back again, frankly that’s not worth it to me to get that .CR2 off of there—plus I have a sneaky feeling that it could mess other things up. Maybe not, but again, it’s makes this too many steps and feels unnecessary. You can of course change them by hand in Aperture if you really want to, as well.
So that’s it! And best part… you didn’t have to reimport, so any adjustments or metadata you added while in the field are intact. Seems like it’d take a lot of time, doesn’t it? Actually, it’s not…
A Recap, Quickly
That seemed like a lot of work, but only because I took the time to explain in detail what was actually happening. Here’s the short version of the “hard way” to fix your mismatched timestamps after import, and you can probably do this in a matter of a minute or two.
- In Aperture: Locate the incorrect files, and using the Adjust Date and Time command, shift their time. Be sure to change the Master file too!
- In the Finder: Locate these master files, and rename them back to their original status (probably something like IMG_1234.CR2) using a utility like NameChanger (leave Aperture running while doing this so it keeps track of the files).
- In Aperture: Relocate the master files using the Relocate Masters command, and rename them using your standard import naming script.
- In Aperture: Batch rename the photo Version name, updating from the Master name.
That’s it! It really is super easy.
Summary
If you rely on accurate date and time stamps, as many of us do, finding out after import that you have mismatched stamps can be an absolute nightmare. But following these very easy steps, you can correct for this in a matter of minutes!
More like this
- Tip
- Tip
- Forum
- Forum
- Tip
Comments
on January 5, 2011 - 5:04am
Joseph
Those are fantastic techniques to fix your master file names! Thanks for sharing!
I did a similar thing like you described in ‘The Hard Way’. But instead of renaming the master files on disk first, I renamed all the version names back to the original IMG_1234 etc. in Aperture. After that was done, I could do a ‘Relocate Masters’ and apply my naming scheme with the correct date and time to the version name and also to the name of the master file by checking “Apply to Master Files”, like you did. The nice thing is that this doesn’t add the .CR2 extension to the version name.
As far as renaming all the version names in Aperture is concerned, I didn’t do that manually. I found an Apple script that allows you to rename version names in Aperture using “Search and Replace”. I modified the script a bit so it worked with the wildcard character “*”. That way I could strip out everything from the version name that is not “IMG_*”. I have to admit that it is not the cleanest script due to my limited knowledge of Apple Script and ‘sed’ (a linux command). If Apple would introduce a rename function in Aperture that supports Search and Replace using wildcards it would make life a lot easier.
Your described method is way more solid than my hack, but I thought I’d mention it, as somebody might be keen to develop a proper rename Apple Script for Aperture.
Thanks
Tom
on January 5, 2011 - 5:31am
Tom,
That’s very cool, thanks for sharing. I didn’t realize (or didn’t consider) that you could rename using AppleScript. I’ll have my scripting guy see if he can come up with a clean and foolproof way to do it. Thanks!
-Joseph @ApertureExpert
@PhotoJoseph
— Have you signed up for the mailing list?
on January 5, 2011 - 6:44am
Nice one, Joseph.
I’d be more than happy to send you the script as a starting point. Please let me know. As I already mentioned, it is a modified version of “Find-Replace in name” written by Brett Gross, which is freely available. I just added the wildcard functionality to it using ‘sed’.
Thanks
Tom
on January 5, 2011 - 9:44pm
Tom,
Sure, thanks. Joseph@apertureexpert.com!
@PhotoJoseph
— Have you signed up for the mailing list?