How to Edit Unsupported RAW Files in Mylio

I almost hate to do my first mylio post on a workaround, but the fact is that I'm playing with mylio as an alternative to Photos, really liking what I'm seeing so far, but am shooting with a LUMIX G7, which doesn't yet have RAW support in mylio.
Mylio has its own RAW decoder. For better or for worse, it does. As I understand it, they don't use the OS X RAW decode because of their cross-platform nature. The app is available on Windows and Mac, iOS and Android, and by making their own RAW decode, it can be used on all platforms. Personally I'd love to see an option built-in to use either their RAW decode or OS X's RAW decode, which would negate this issue entirely. These days, Apple is adding RAW support very quickly for new cameras to OS X.
The first piece of good news is that mylio handles RAW+JPEG pairs largely like Aperture did, and certainly with more grace than Lightroom does. It's not perfect, but it works. And the big bonus is that if you are shooting with an unsupported camera as I am, even though you'll see a warning on import that there were nn unsupported files, those files are still imported, and since mylio is always watching its Finder folders for changes, as soon as RAW support is available, those images will just start to work. Today you don't see an “unsupported image” icon, which is a feature I've asked for, but if a RAW+JPEG pair you'll just see the JPEG and have no access to the RAW. If you only shot RAW then you'll see nothing until support comes. But the files will be imported and managed by mylio.
The short story
In brief, here's what you'll do. Rate, color label, flag, whatever you like to select your favorite photos. (Sure you can do the following steps with all of your pictures, but you may as well just do it with only your selects. If you want to do it to all of them, then just skip the sorting steps.) Move those selects to a new folder in Mylio (which also moves them in the Finder), which will move both the JPEG and the unsupported RAW file. Using Automator or Adobe Bridge, convert all the unsupported RAW files to TIFF files, which mylio will immediately recognize. You can then move the photos back into the original folder, or just leave them in your selects folder, or move back the RAW+JPEG pairs and leave the TIFFs behind… it's really up to you. Either way, now you have TIFF files that you can work with — either in mylio, or using other third party apps.
The detailed version
Let's get into the nitty gritty…
Sorting your favorites
I prefer to use a star rating system for most of my sorting, using three stars as a starting point for any photos I like well enough to consider, then raising them up or down on subsequent passes. (I've gone through my strategy at length a few times, most recently in the Live Training 105 video. While that video is based on Aperture, the system is sound regardless what app you're using… oh, except Photos, which has no star ratings… *sigh*). But whatever favoriting system you use, just do that. As long as you can filter by your favorites at the end, that's all that matters.
 through your folder, and be sure to select ALL of 3, 4 and 5 star buttons") Filter (don’t search) through your folder, and be sure to select ALL of 3, 4 and 5 star buttons
Filter (don’t search) through your folder, and be sure to select ALL of 3, 4 and 5 star buttons
In the screenshot above, notice that I've chosen to Filter instead of search. In mylio, searching will search your entire library, while filter will only look at the current view. Also under Ratings, I've selected ALL of the 3★, 4★ and 5★ buttons. Clicking on just one does NOT search, for example, for all three-star and above. You have to explicitly click on each one. This has caught me out before, so watch for that. There is no “three star or better” search/filter option.
By the way, don't bother doing any edits to these photos yet. If you were working with supported RAW files, just like in Aperture any change you made to one would be reflected in the other when you “flipped” from using RAW or JPEG. However in this situation, since we are going to be converting RAW files in the Finder, there will be no application of edits made to the RAW+JPEG pair. If you need to edit them, do that later.
Move your favorites
Now that you've isolated the shots you want to work with, select all of them, right click and choose New folder with Selected Items.
 Right click and choose “New Folder with Selected Items” to move the photos both in mylio and in the Finder
Name it something useful like “Convert to TIF” so you know what it's for. Mylio will move the photos in the app and in the Finder. Once that's done, right-click on the new folder and choose Show in Finder.
Getting ready to convert to TIFF using Automator
This step can be done a variety of ways, and may depend on where you find support for that RAW format. If the RAW file opens in Preview, then OS X is supporting it and you can convert using a simple Automator script. If Adobe supports it, you could batch convert using Bridge. I'm sure there are other ways too, but for this case I'll focus on Automator. If you have the choice between the Apple and Adobe solution, you may want to compare them to see what look you like better. Adobe may apply different lens correction, color balance or any number of things. With my LUMIX G7 files, I found the Apple conversion to be more colorful and vibrant than the Adobe one, but otherwise virtually identical. The Apple one looked good to me, so that's what I went with.
SIDEBAR: You may be thinking, “just use Adobe's free DNG Converter!”. And that was my original intention. But it turns out that mylio won't read those, either. I don't know if it doesn't read any DNG files, or if it just didn't like these, but that didn't work. Bummer.
To create your own Automator script, launch Automator and select File > New, then select Service. This creates a script that will run by right-clicking an item or items in the Finder, and choosing your script from the Services menu.
 You want to make a Service so it shows up in the Finder’s contextual menu
Then build the script. You can search to find each command, and drag them into place. The explanations of each step are listed below the screenshot.
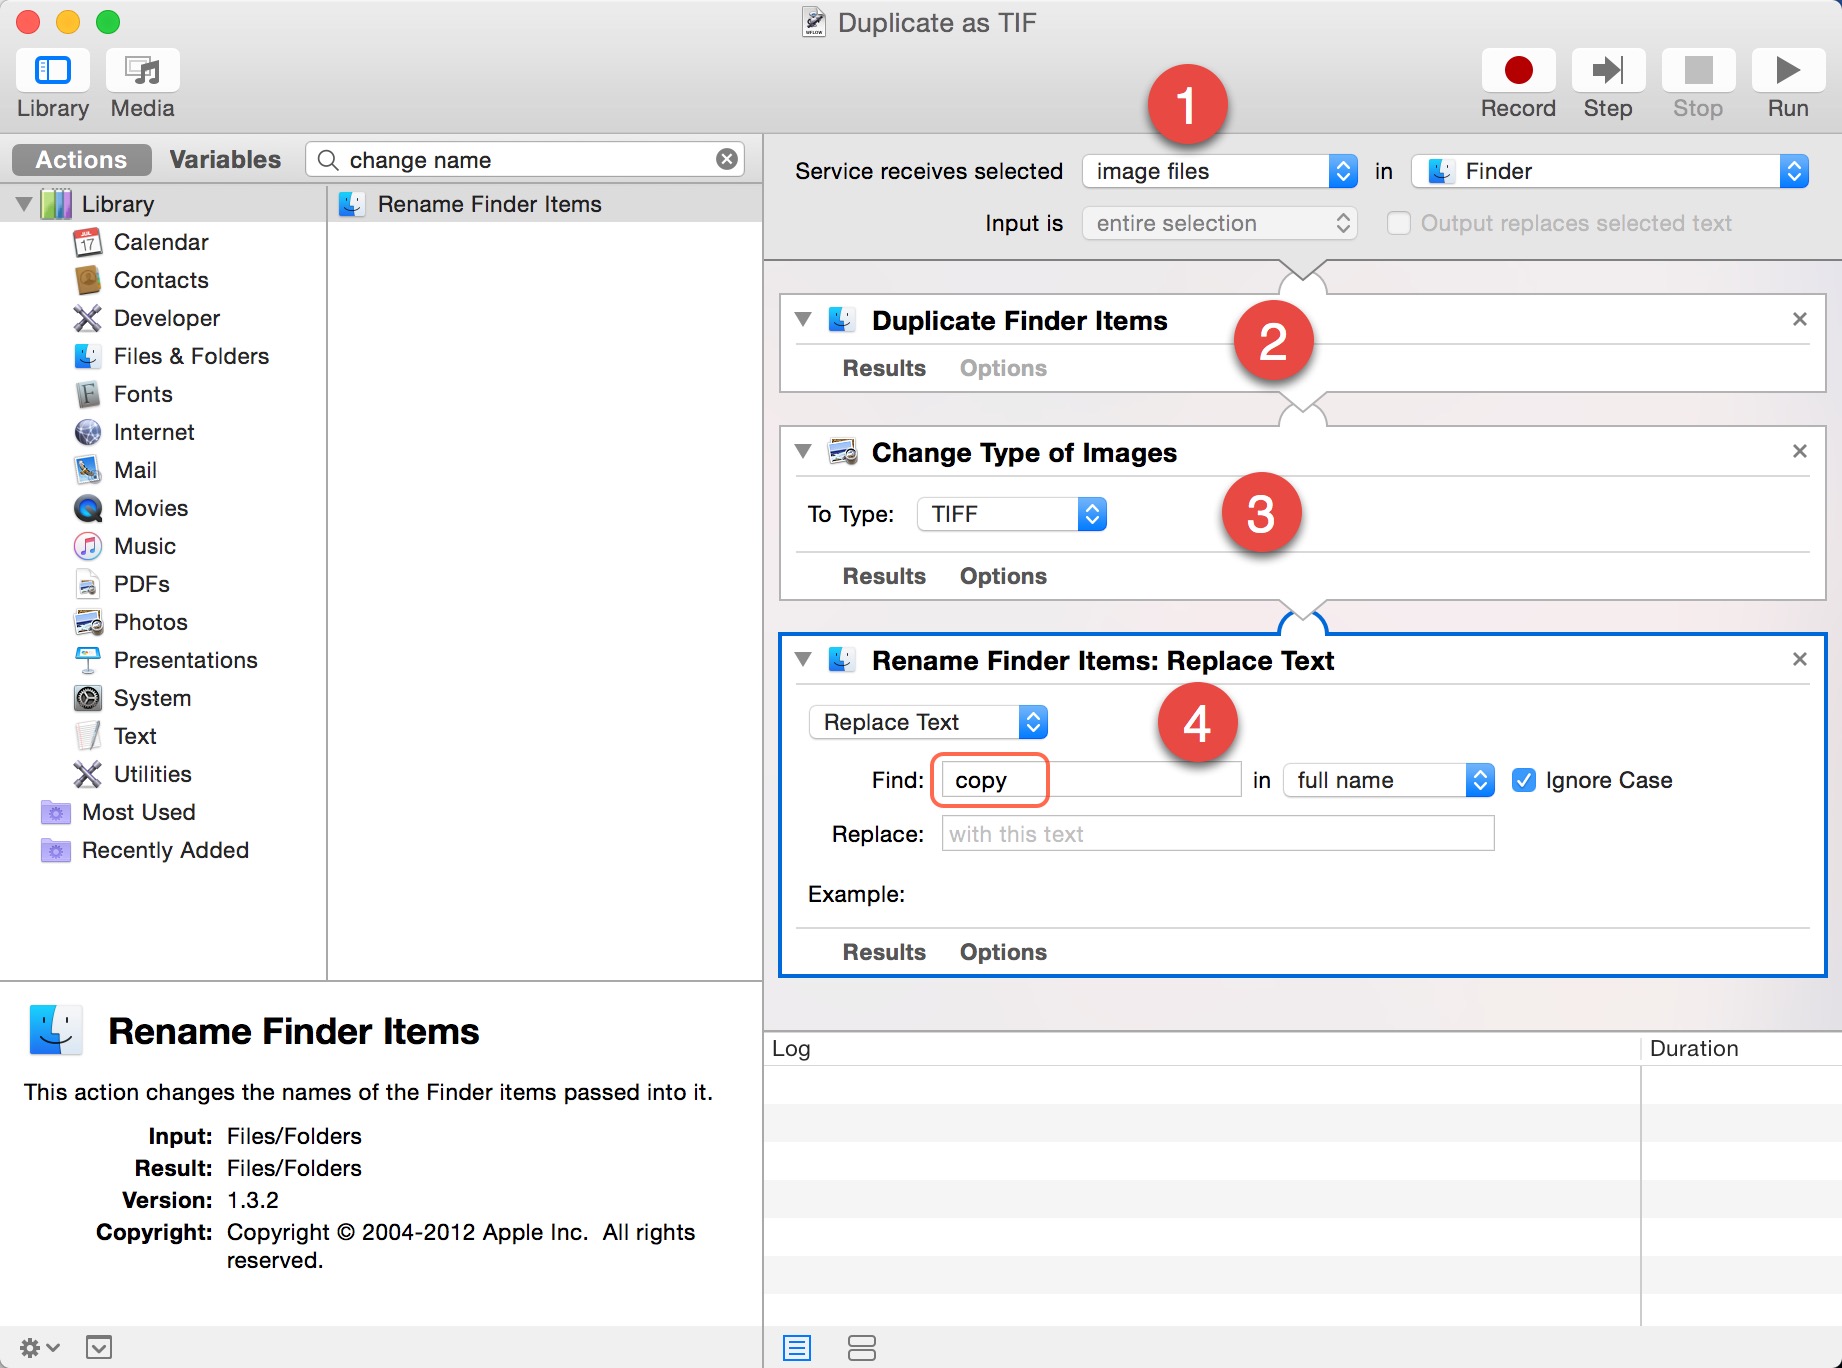
- You'll want to set the Service receives selected to image files, so that this option only shows up when clicking on an image file. I also set it to in Finder, because, Finder.
- Duplicate Finder Items is a very important first action to add. You don't want the script overwriting your original RAW files, which is exactly what the next action will do if you don't duplicate the photos first.
- Change Type of Images is how you convert to TIFF (you'll want to set it to TIFF, of course). There are no configuration options here, but surprisingly, this action makes a 16-bit TIFF file. Nice!
- Finally, Rename Finder Items is the last step. When the Duplicate action runs, it adds a “copy” to the end of the file name, and a space before that. So “IMG1234.RW2” becomes “IMG1234 copy.RW2”. Icky. So use the action Rename Finder Items, set it to Replace Text, and in the Find field, enter ” copy” (don't forget the leading space).
Then save the action, and call it something clever like “Duplicate as TIF”, and since it's already set to be a Service, Automator will automatically prompt you to save it in the Services folder. But if for some reason it doesn't, this file belongs at ~/Library/Services.
Or, skip all that and just download mine, and add it to ~/Library/Services.
Getting ready to convert to TIFF using Adobe Bridge
I'm no Adobe Bridge user. In fact, the first time I ever installed it was when looking for the most efficient way to do this workflow, and figured that might work out well. Since what I know about Bridge wouldn't fill a tweet, all I can tell you is what I found on google. Apparently you can convert a selection of files by choosing Tools > Photoshop > Image Processor… which seems to create an 8-bit TIFF, or by choosing Tools > Photoshop > Lens Correction… which gives you all the lens correction options, and also saves an 8-bit TIFF. In my case, all three test images (two via Bridge, one via Automator) were pixel-for-pixel identical other than the color shift (i.e. no lens correction applied by either source). Your experience may of course differ depending on the camera you're using. I did find it interesting that Automator is the only one making a 16-bit file though!
Converting your photos
If you're using Bridge… well, you're on your own :-) No not really, just follow the steps above and save them back to the same folder. Or a new sub-folder — results will be the same.
If you're using the Automator script, you need to select all the RAW files in that Finder folder you revealed earlier. This folder however will have JPG files as well, and possibly XMP files too. To make it easier to select just the RAW files, do a quick search for your RAW file format (mine is “rw2”) and refine it to this folder, as you see in the screenshot below.
 Searching for your RAW files will isolate them from the rest, making it easy to select just those you need to convert
Then select all the images, right click on them, and choose Services > Duplicate as TIF.
 Right click > Services > Duplicate as TIF
When the action is running, you don't get a progress bar, but you will see this little cog spinning in the menubar.

When that goes away, you know you're done. And of course because you'll now have a pile of .TIF files, too. But you won't see them if you've searched for the RAW files, so don't forget to clear the search box to see the new TIFFs!
Back to mylio
If you switch back to mylio now and open that folder, at first you won't see anything new because your filter is still set to show just the three star and above photos (or whatever you used to filter your selection). To clear that you just click the (×) in the search window, however…
 Clear your search filter in mylio to see the new TIF files
…before you do that, you may want to do some clean-up. This is totally optional, but personally I want my RAW+JPEG selects back where they started. You could also move ALL the photos back; it really depends on your workflow and your plans. Keep in mind that at this point it's easy to move photos around. For example if you want to do what I just suggested, while the rating filter is still applied (so you're not yet looking at the TIFF files), select all of these rated photos, right click and choose Move to Folder… and choose where you want them to go. Totally optional, but for my next step, separating these RAW and JPEG files from the TIFFs will come in handy.
 Moving your original selects back where they came from is an optional but convenient choice
So, now what?
Time to edit!
Now you have TIF files in mylio where you used to have unsupported RAWs. Yay! You can edit away, knowing that you're as close to a RAW file as you can be without actually having the RAW file.
Edit in mylio
Mylio has some pretty nice editing tools, and of course any changes made here will immediately propagate out to all your other devices, which is one of the things that makes mylio so cool. Like Aperture and Lightroom, adjustments are not made to the files themselves, but saved as metadata instructions that are ready and re-applied every time you load the photo.
Edit in Photoshop… or anything else
Another of mylio's big attractions is that you can edit in just about any app installed. Choosing Photo > Open With will list all the same apps that you would see if you selected Open With in the Finder.
Unfortunately though… and this is a BIG unfortunately… the edits you've made in mylio will not be transferred to another app. This command doesn't generate a new TIF or PSD file from your adjusted image; instead it opens the original file in the requested app. On one hand this could be great because it means it'd be super easy to open a RAW file in another decoder, such as DxO OpticsPro. On the other hand, if you expect to do image adjustments like exposure and crop in mylio, then send the file to another app like Color Efex Pro 4 for finishing, you'll find it doesn't work. Hopefully this is a change we'll see in a future version, because this is a Big Deal™.
Finally one other thing you can't do in mylio is send multiple files to an external editor. If you select more than one, the Open With command is greyed out. Which again is too bad as many apps do handle multiple files just fine. But that's OK, this just leads us to another tip…
Edit externally
Since mylio instantly updates with any changes made in the Finder, you can use any app you like to edit the photos from the Finder, and save over the original or even save a new version — either way, mylio will see it. This also opens up batch processing in an app that can do that.
Recently I did a post on batch processing with DxO FilmPack out of Lightroom, but DxO FilmPack has its own internal batch processing tool as well.
Batch process with DxO FilmPack
When you batch with DxO FilmPack, you choose a preset from a list, which means you need to know what preset you want before you batch. I just opened FilmPack and navigated to my “Convert to TIF” folder, and picked a shot at random to try different presets on. Once I settled on one, I opened a few more shots to preview, just to ensure the preset would be universally good. There's no need to save any of these at this point; you're just trying things on.
The preset I chose was Kodak Portra 160 NC which, according to the FilmPack info panel, was a film developed in 2002 specifically for the wedding and portrait professional. Pretty neat that I picked that one without knowing this to apply to this wedding I attended :-)
 This is the DxO FilmPack favorites view, showing the few I’d narrowed my selection down to, including my final choice, Kodak Portra 160 NC
Once you're ready to batch, from DxO FilmPack select the menu File > Batch…, add your photos, and select your preset, format and destination, and off you go. Details below the screenshot…
 The batch process window in DxO FIlmPack
- Add your photos by clicking the (+) button and navigating to your “Convert to TIF” folder. Tip: It may be under the Recents menu. Select all the files and add them to the batch.
- Choose your Preset from the list.
- Pick a Format. If you're going to be done at this point, you could probably use JPEG. I may want to continue editing these in mylio, so I'll choose TIFF, and also set it to 16-bit. Which frankly is overkill, but you know… storage is cheap.
- For the Destination, you could leave them in the same folder but for sorting ease, I created a new subfolder called “FilmPack'ed” inside the “Convert to TIF” folder.
- You don't have to add a Suffix, but again for ease of searching/filtering for the photos in mylio later, I added “_FilmPack” to mine.
It took about a minute and a half to process 72 images. Nice.
Enjoy your photos!
Back in mylio, again it should update automatically to show your new photos or folder of photos. If it doesn't, you can always force a refresh from the menu File > Advanced Commands > Scan for Changes.
You can of course continue to edit these new photos in mylio as well, and if you export from here to your final format (i.e. JPEG files for uploading to the web), the mylio adjustments will be included. Again if you know you're going to edit, you should generate at least 8-bit TIFF files, not JPEGs, out of DxO FilmPack (or whatever you might have used).
And remember…
Many of the steps outlined above are extra, and of course in extreme detail. This isn't hard at all. Just move your selects into a new folder in mylio, then run the Automator script to duplicate the RAW files as TIFFs, and jump back into mylio for editing. That's really all there is to it!
Comments
on March 30, 2016 - 8:03pm
Another great post Joseph! FYI - we have significantly expanded our RAW file support in releases v1.6 and v1.7. Here is the updated list of files supported: http://mylio.com/support/file-support/
Mylio’s Marketing Magus, developing digital communication systems designed to support a thriving Mylio user community. He is a new father, a music producer, and an avid student of the human ability to progress toward awesomeness.